
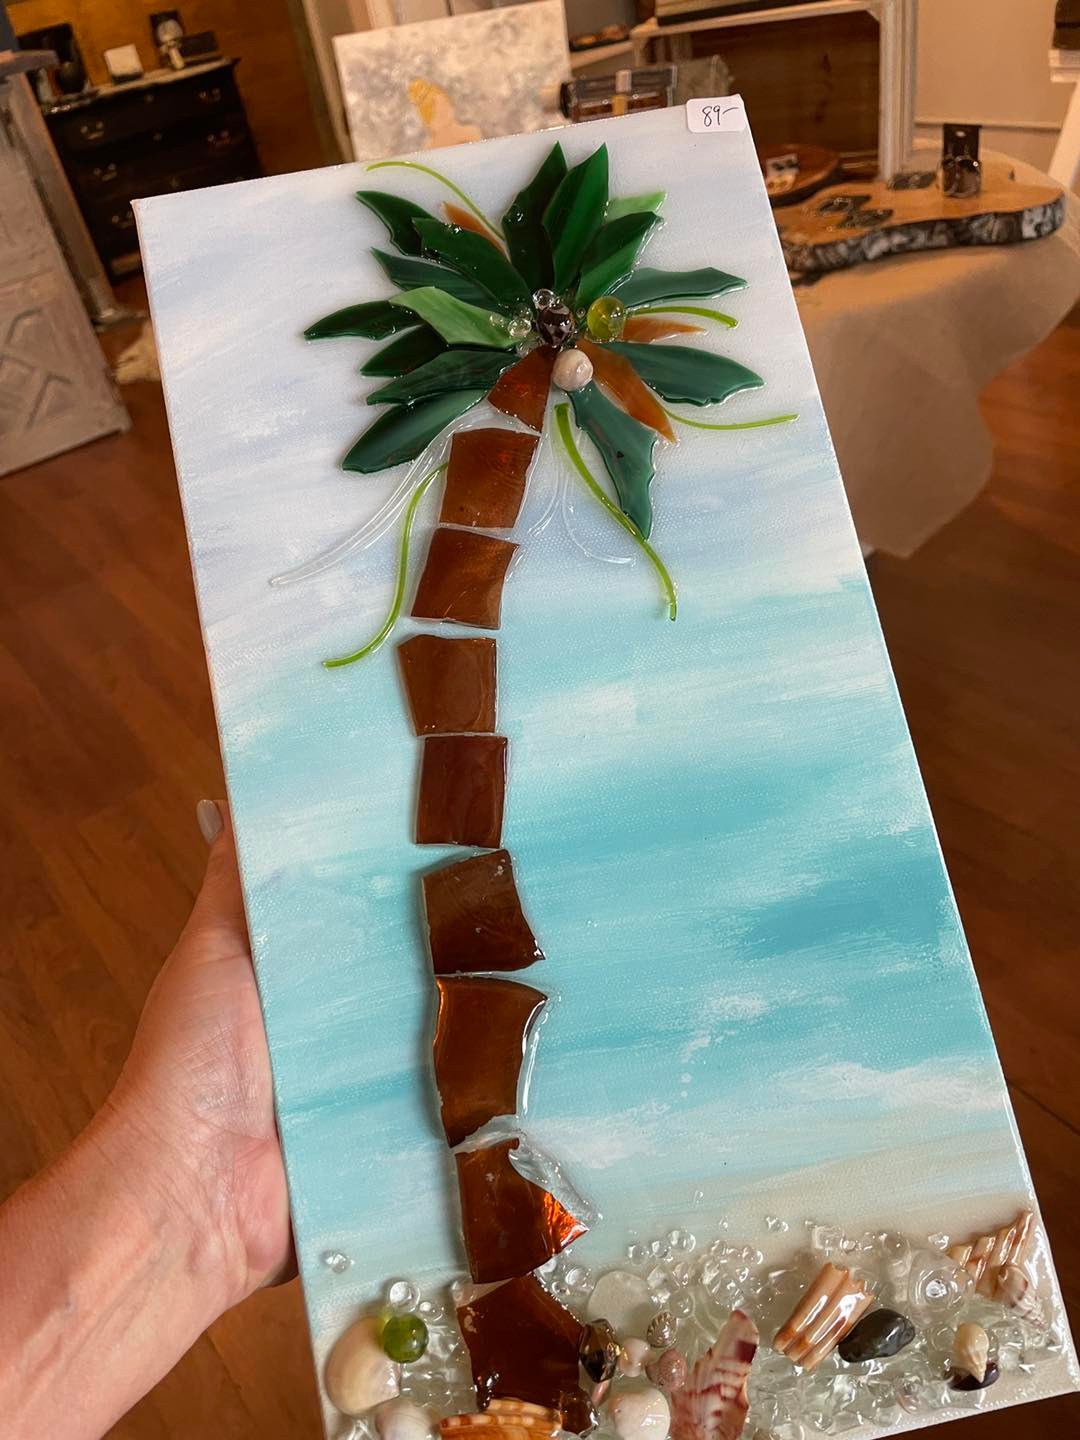
Beachy Palm 🌴
We’re making a bright, beachy palm tree on an 8x16 canvas with a quick painted background, a glass “found object” trunk, nipped sheet-glass palm fronds, a few shells and sea glass on the shoreline, and a glossy resin finish that makes everything pop. The best part? The background truly takes about five minutes, and the glass work is basically like putting together a puzzle.
Step 1: Paint the Background
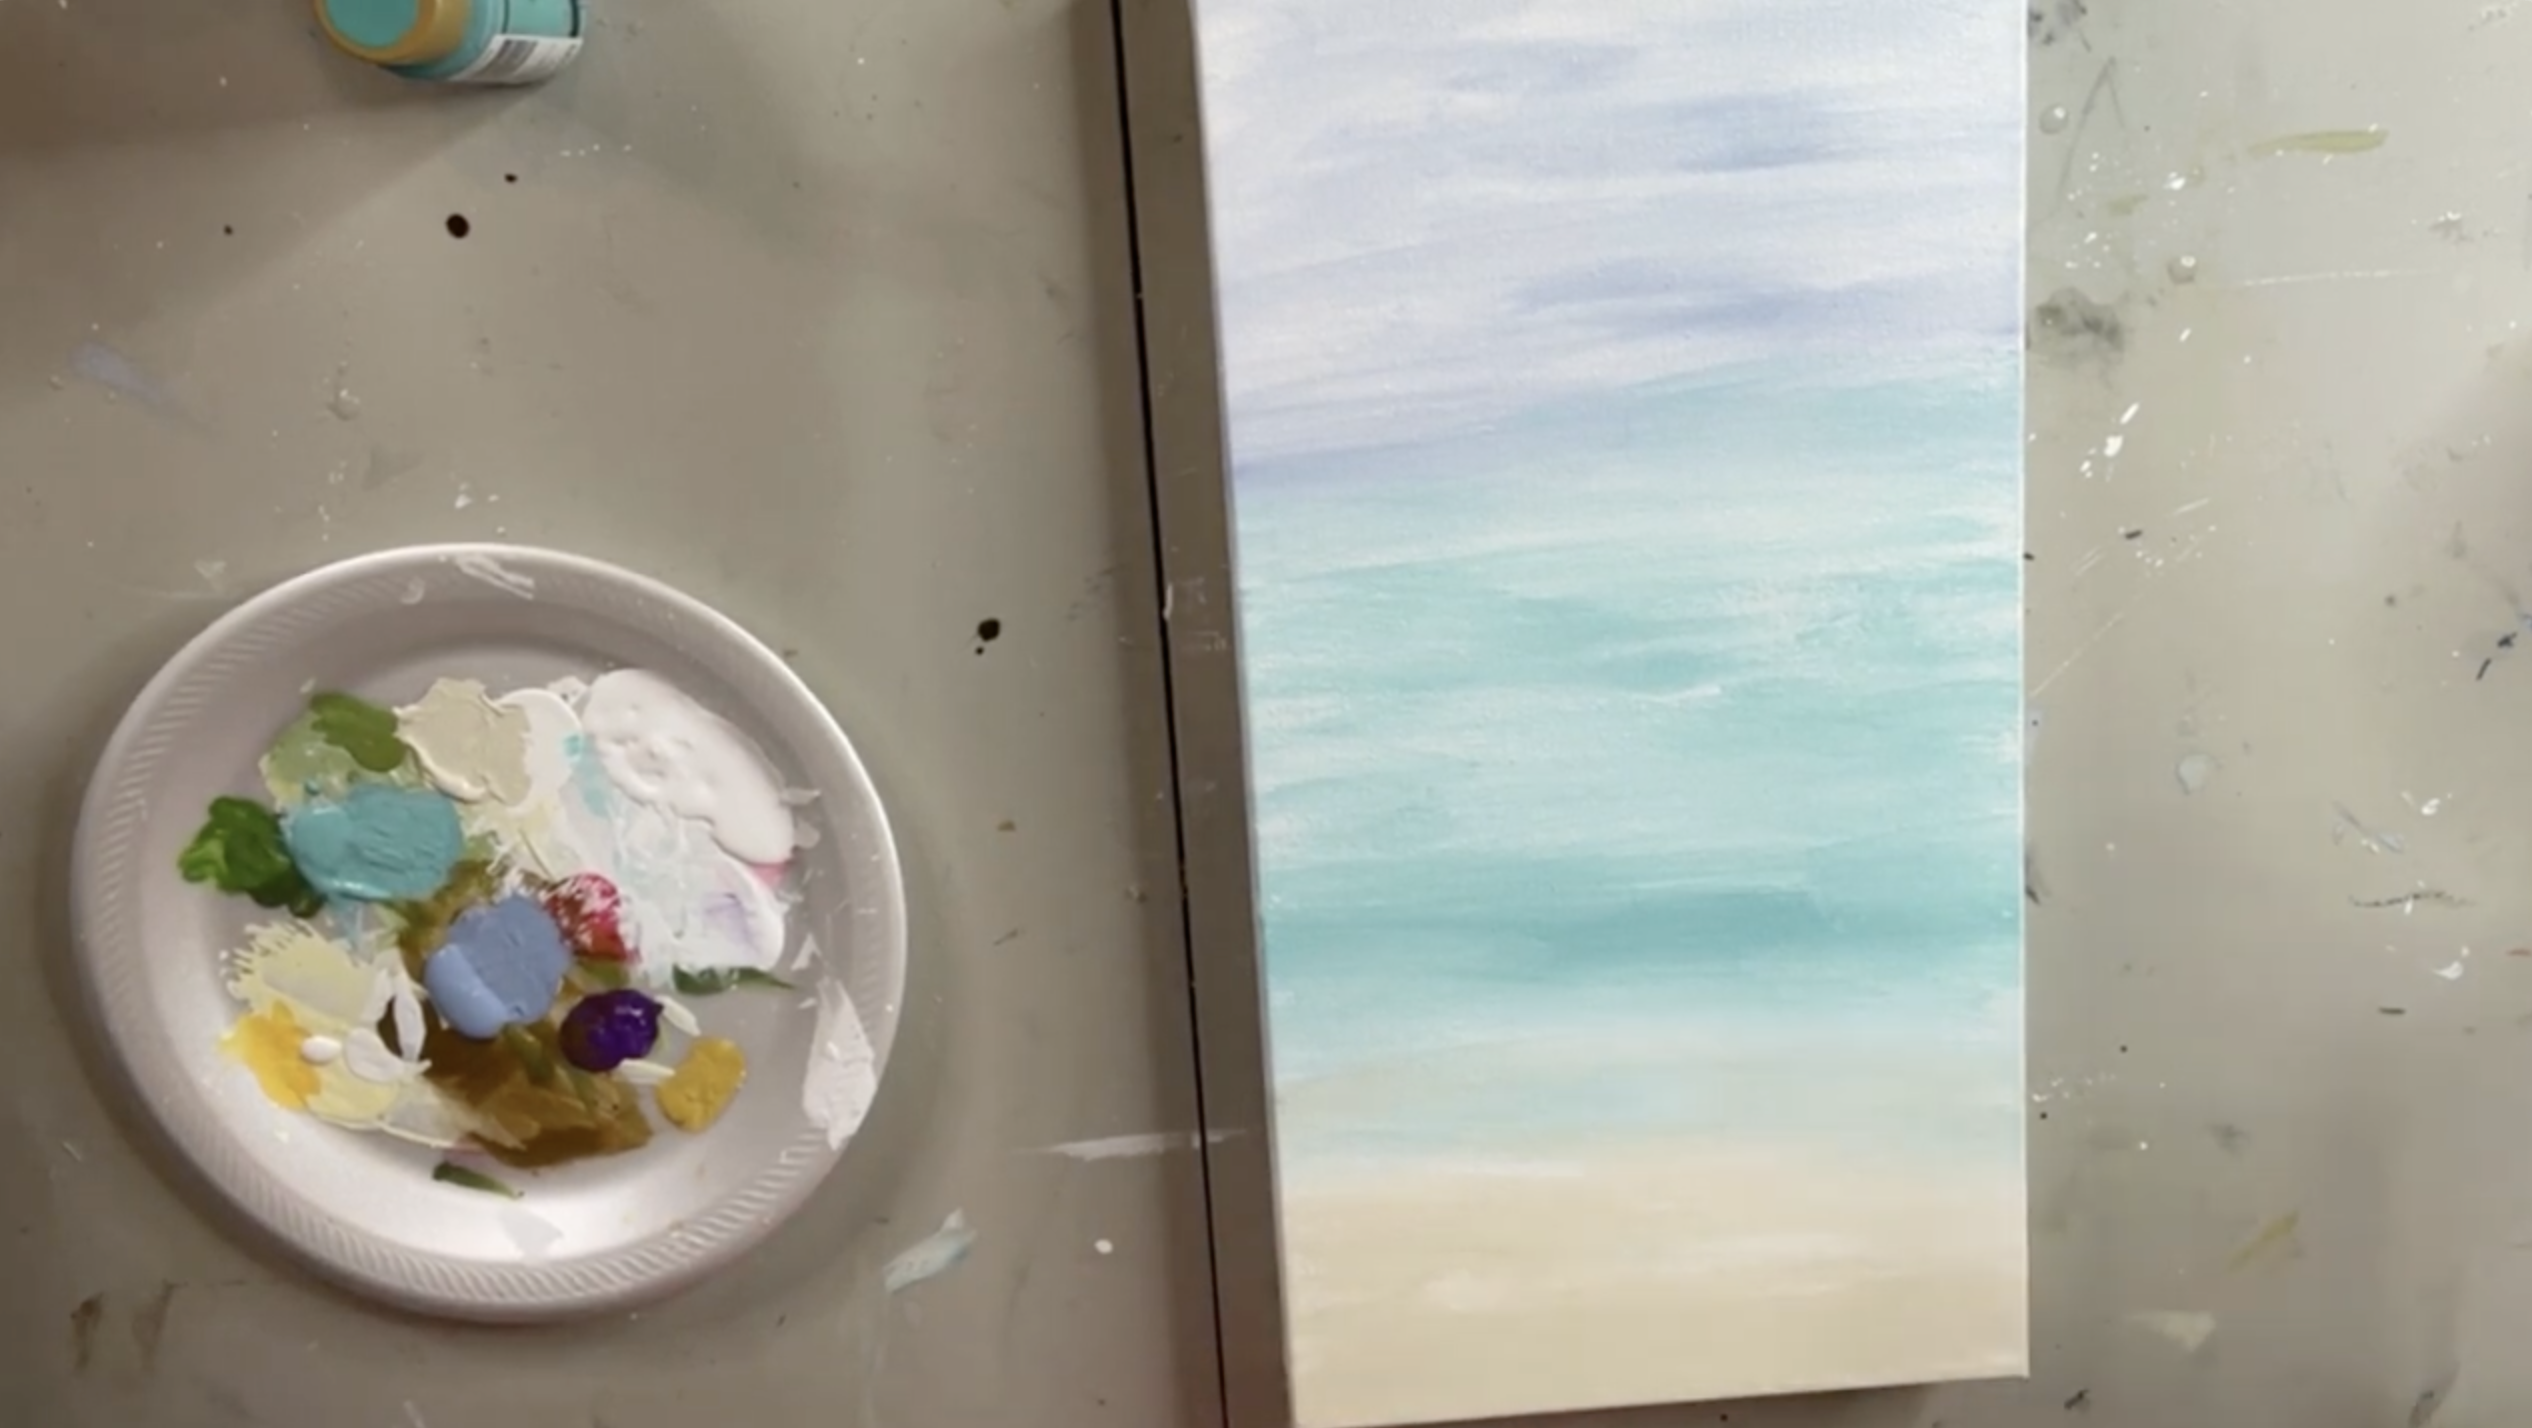
Start with a thin coat of white across almost the entire canvas. This is a simple trick that helps soften the blues so they don’t grab too hard and scream neon on the canvas.
Without rinsing your brush, dip right into your sky blue and apply it to the top third of the canvas using the flat side of the brush. Keep it abstract and imperfect - this background is meant to be soft and supportive, not competing with the palm tree. Let some of that white show through so it feels like a breezy sky instead of a solid block of color.
Using that same “dirty” brush (still with a little sky blue on it), dip into your water color (Aqua Sky) and blend it down into the middle portion of the canvas.
Switch to a clean brush so you don’t drag blue into your beach. Paint Bleached Sand along the bottom portion, then pull a tiny bit of that sand color up into the water area. That little overlap makes the shoreline feel natural and helps everything blend.
Step 2: Make Easy Clouds and Waves
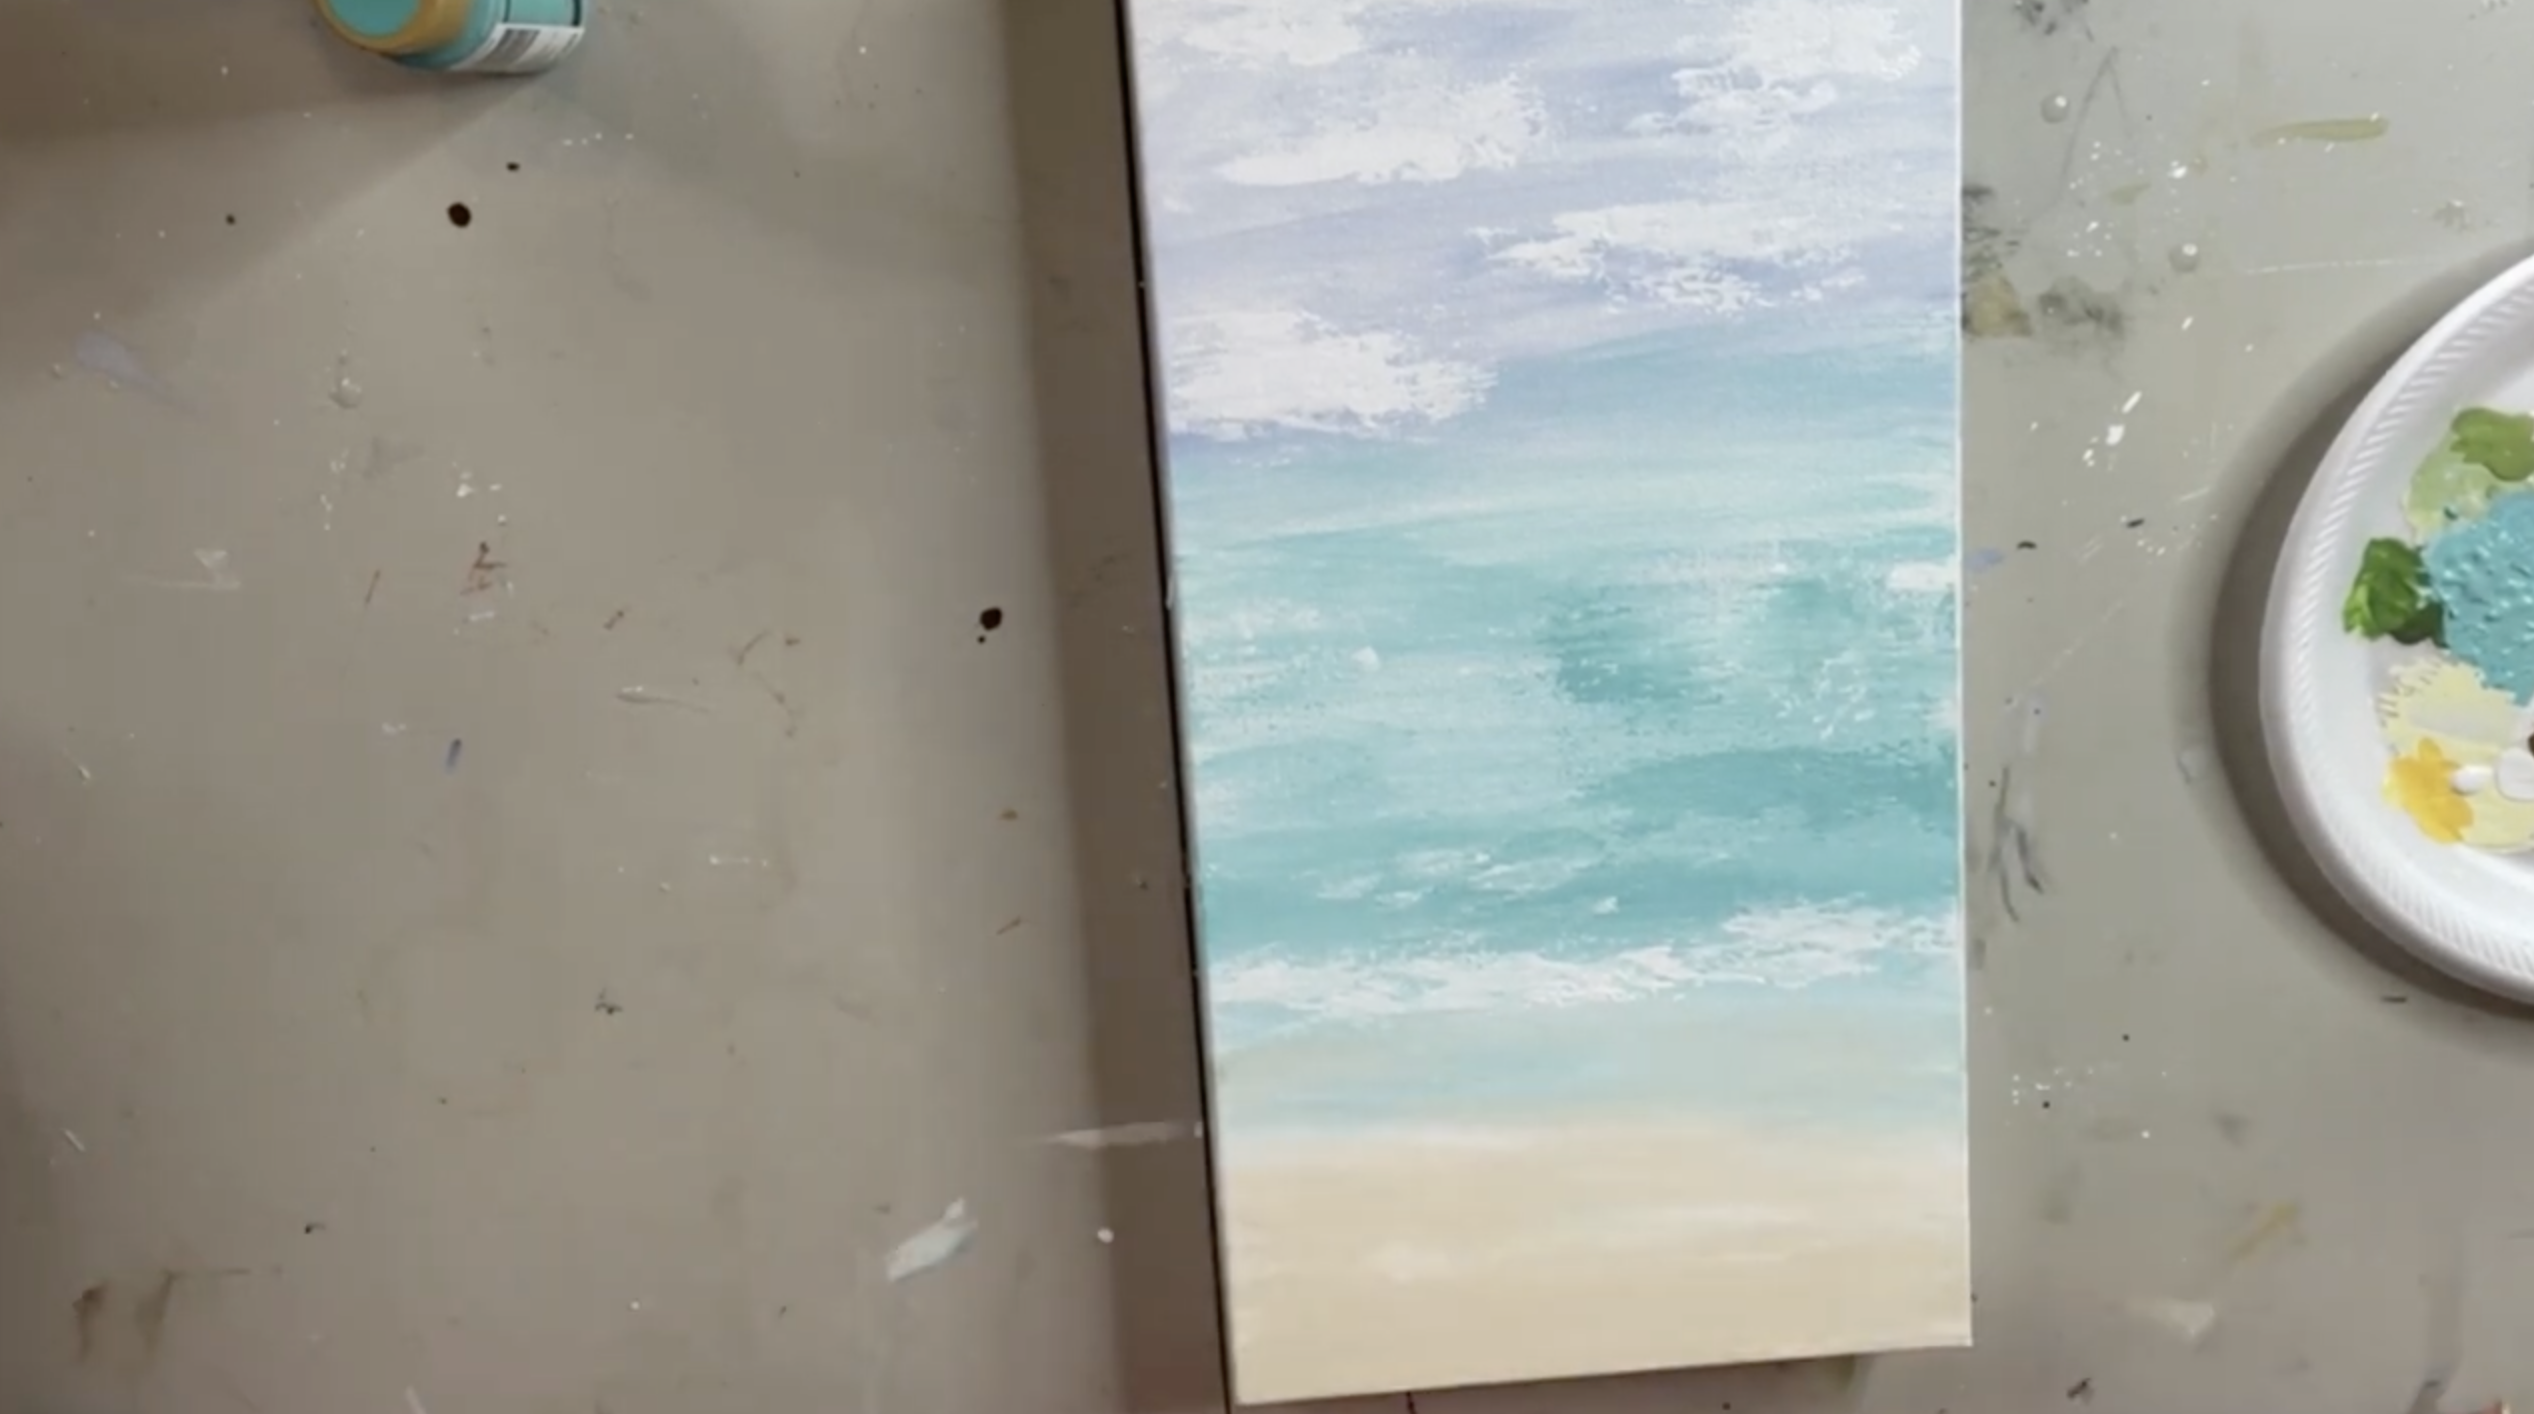
Grab your palette knife and load a little white paint onto the back side. Tap it onto the sky in a few spots where you want clouds, then once your little cloud bumps are placed, gently “tickle” them down by lightly pressing and smoothing so they flatten into soft, simple clouds. It’s fast, it’s forgiving, and it looks adorable.
Pull a little white into the water area. Then, about an inch above where the sand begins, drag a thin horizontal line of white across the canvas to suggest wave foam. If you want to soften it, add a tiny touch of water color over part of it and then dab white back on top so it isn’t one solid stripe. At this point, your background is done - let it dry completely.
Step 3: Add Glass
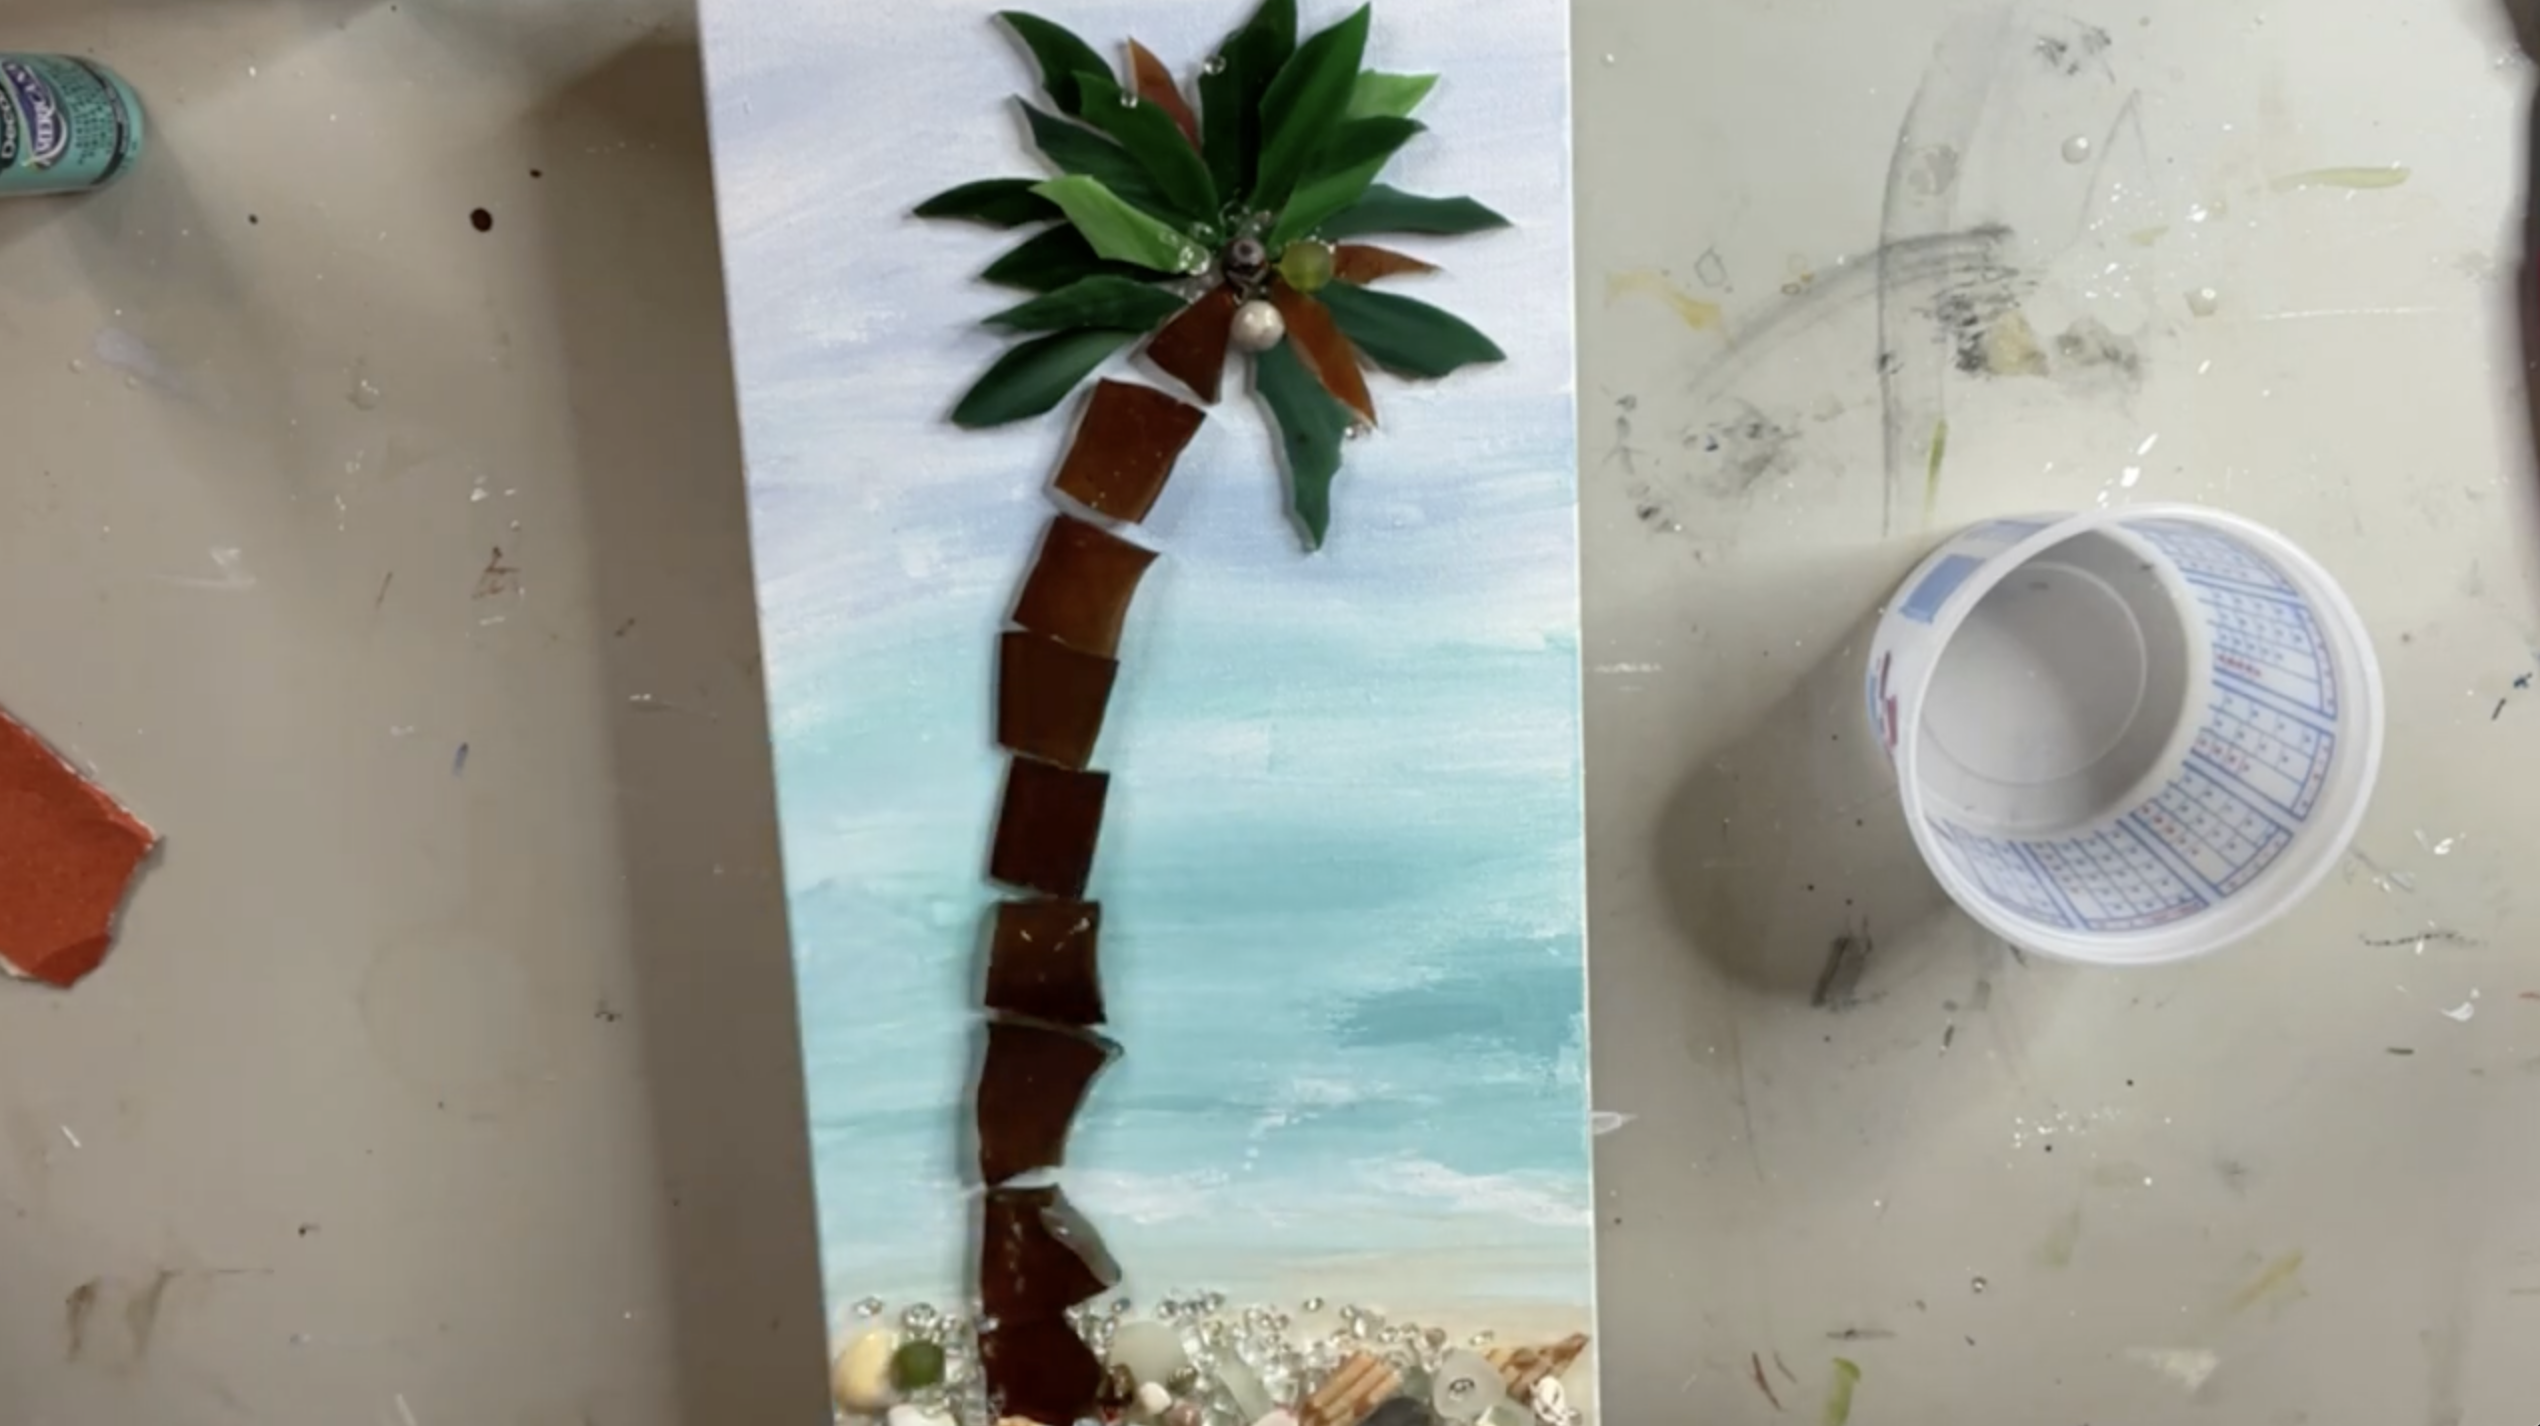
Take your broken bowl glass and arrange the trunk pieces like a puzzle, stacking them upward until you get the palm tree height you want. Slightly curve the trunk as you build so it looks organic and beachy. Don’t overthink the shapes - these were cut quickly with nippers, and the imperfect edges make it cooler.
A helpful tip here is to leave tiny gaps between trunk pieces. Those little spaces give resin a place to seep in and grab, which helps everything hold better long-term.
At the bottom, sprinkle a handful of clear glass where your “shoreline” will be. Then toss in a few pieces of sea glass (remember: sea glass turns more transparent once resin hits it, so it becomes more of a texture sparkle than that frosty look). Add a few shells or rocks.
Using sheet glass and nippers, create leaf shapes by squeezing out long petal-like pieces. If a leaf ends in a straight, harsh line, nip the end slightly so it has a more natural point. Start with your biggest leaf pieces first and layer them around the top of the trunk like a burst. Then tuck smaller pieces underneath and between to fill gaps.
Mixing a couple warmer tones (like amber/brown) into the greens makes the palm feel more dimensional, like some leaves are sun-kissed or drying. Step back and look at the overall “reach” of your palm fronds. If it feels too tight or too small, swap one piece for a longer one so the top spreads out more.
Add a small dot of glue in the center where the leaves meet and place a few beads to act as coconuts. You can mix colors (bronze, tan, green) because it reads as playful and tropical. Then sprinkle in a few bubble beads (because bubbles make everything better) and any extra acrylic stash beads along the shoreline for sparkle and texture. If you want one coconut down in the sand like it fell, glue it near the bottom for a cute story detail.
Before resining, take a clean, dry brush and lightly dust off any tiny debris or grit from the canvas so you don’t trap it forever under resin.
Step 4: Resin the Piece
Place the canvas up on blocks/risers so resin can flow without gluing your artwork to your table. For an 8x16 piece like this with glass elements, you'll need 2 ounces total.
Drizzle resin over the palm leaves first, then the trunk pieces, then the shoreline glass and shells. Make sure you coat the edges of thicker pieces and let resin sink into those little gaps between trunk segments. Work your resin gently so it covers well without flooding and dripping off the bottom edge. Feel free to add even more glass at this point, like green and clear vitrigraph.
Use a torch, heat gun, or small kitchen torch to pop bubbles. If you’re using a torch, keep your hand moving the whole time - never stop in one place, and never let flame touch the resin or the artwork.
Once bubbles are popped and everything looks evenly coated, let the piece cure flat and undisturbed.
If glass and resin feels intimidating, this is actually a great “first” piece because the background is quick, the layout is basically a puzzle, and the resin step is straightforward once your pieces are placed. Do one simple project, and you’ll be shocked at how much confidence you gain!

If you're a member of The Shattered Circle, you'll find this tutorial in your classroom under Art Shattered Weekly Facebook Lives, search for "Beachy Palm".
If you don’t want to miss my Facebook LIVE art instruction, make sure you are on my texting list. I always text 10 minutes before I’m going to go LIVE, so you won’t ever miss it. You can text “Hey Cindy” to 901-519-2923.
Want more inspiration and artwork?
- My website artshattered.com with resources, shop, and more!
- My creative membership The Shattered Circle, where you can explore the world of glass art with online workshops, a supportive community, and more!
- My mini creative membership Just A ‘Lil Bit Monthly Glass Art Club, where you’ll get a new quick and easy online tutorial for just a lil' bit of sparkle in your life!
- My Facebook page where I go LIVE every Wednesday night.
- My YouTube channel which has tons of free art lessons right at your fingertips.
