
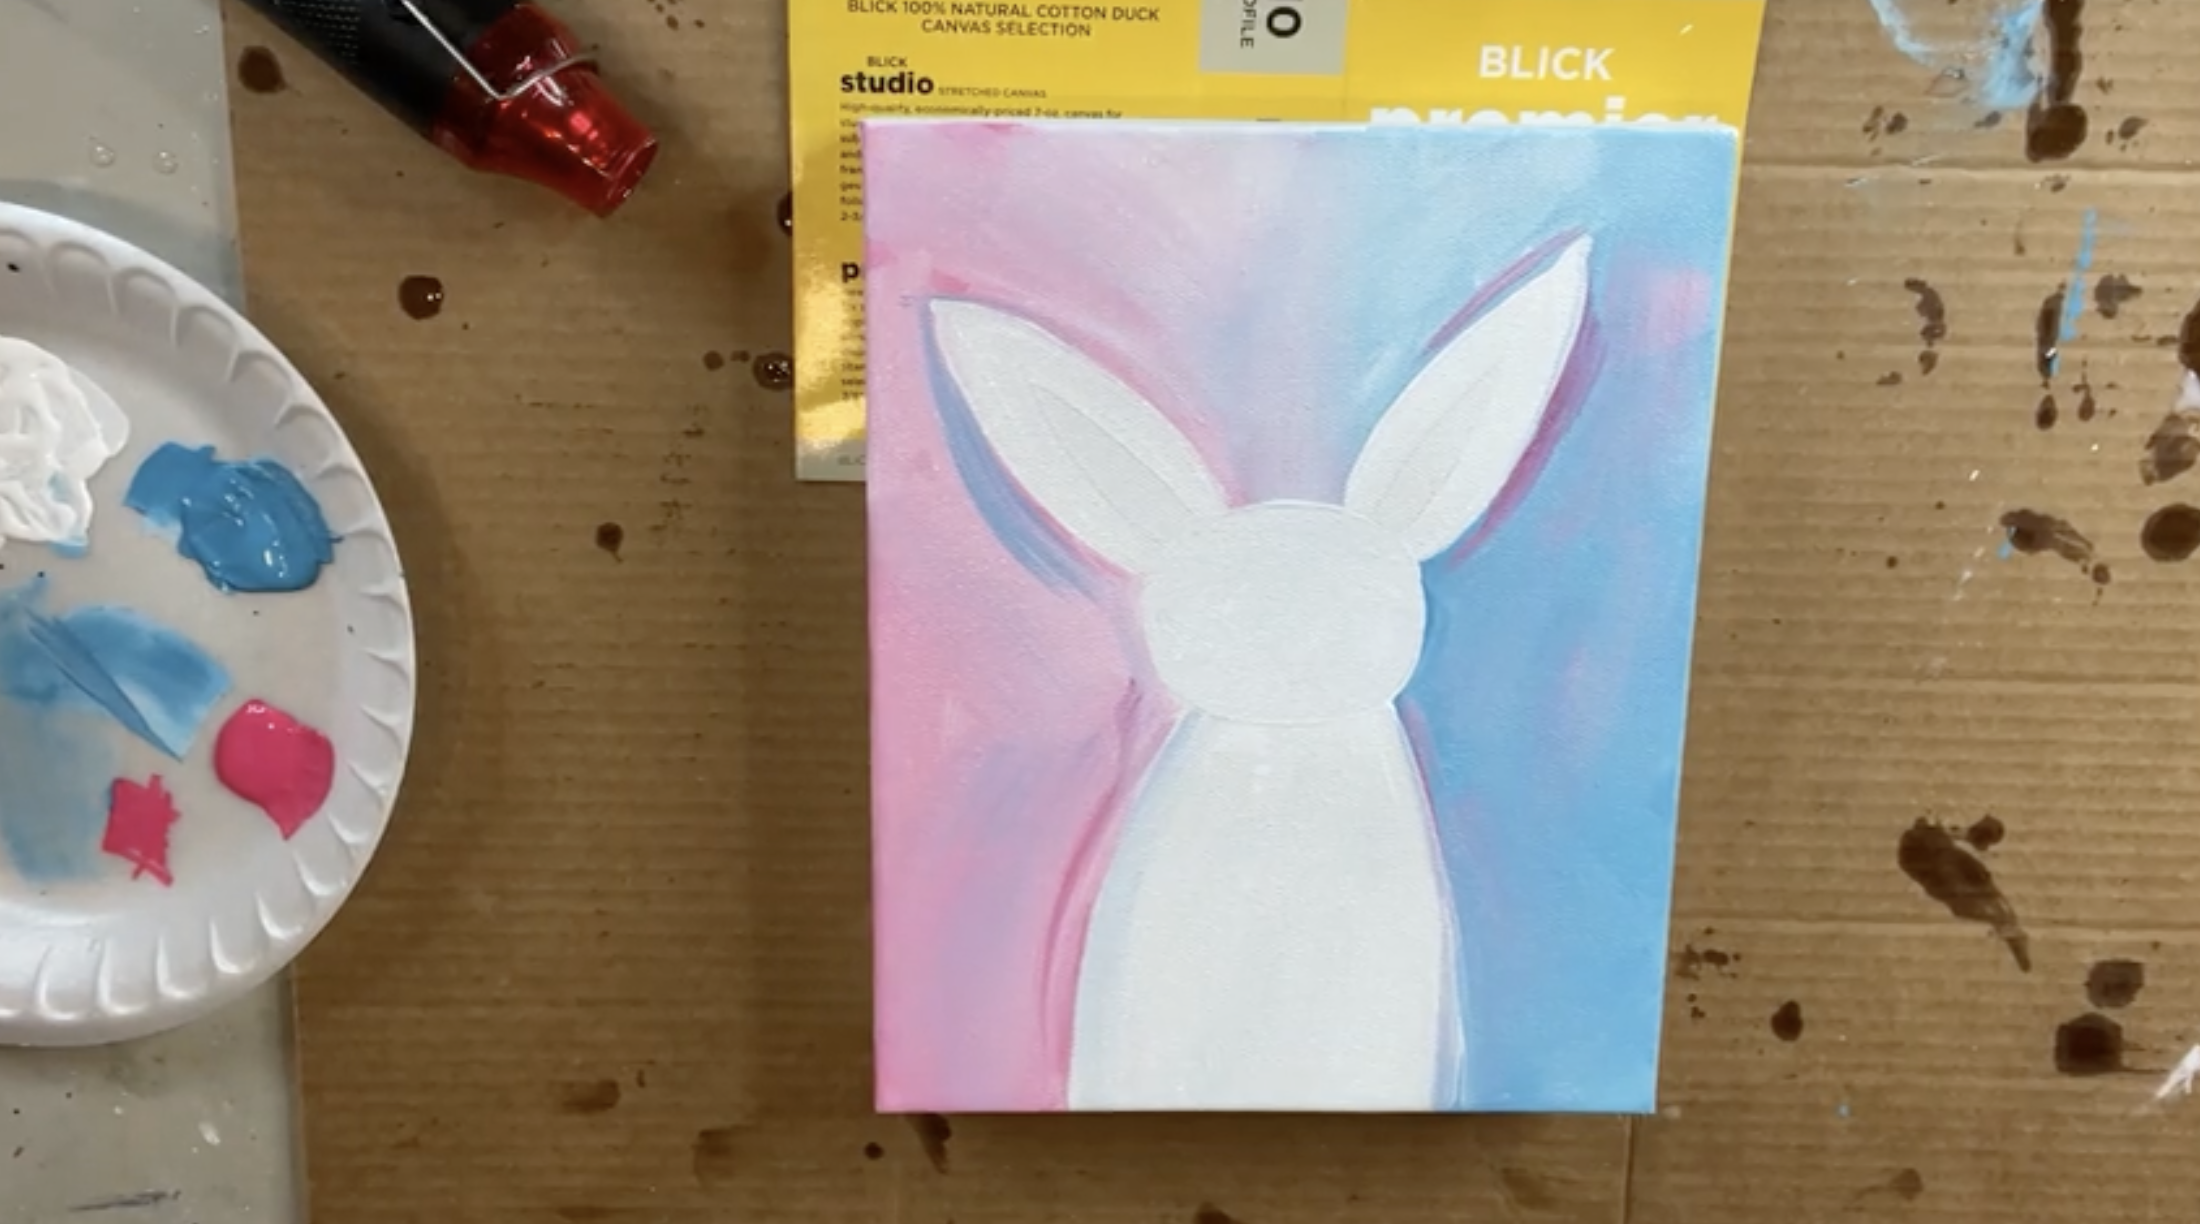
Start by placing your bunny tracer on the blank canvas and shifting it until the spacing feels balanced, leaving room for two button flowers on one side and one on the other. Tape the tracer down so it can’t wiggle while you trace. Slide your graphite paper underneath and trace the bunny’s head, body, and both ear shapes, including the inner ear sections, but skip tracing the tail because you’ll be creating that with glass later.
Step 2: Paint the Loose, Blended Background (Blue to Pink)Start by putting white down first on one side of the canvas, working loosely around the bunny outline. Blend Mermaid Blue into that white near the edge, then fade it inward by picking up more white and softening the transition toward the center. On the other side, repeat the same approach with white first, then blend in Dragon Fruit pink near the edge and fade it toward the center. To make it feel cohesive, lightly dip a touch of pink into the blue side and a touch of blue into the pink side, outlining the bunny. Let dry.
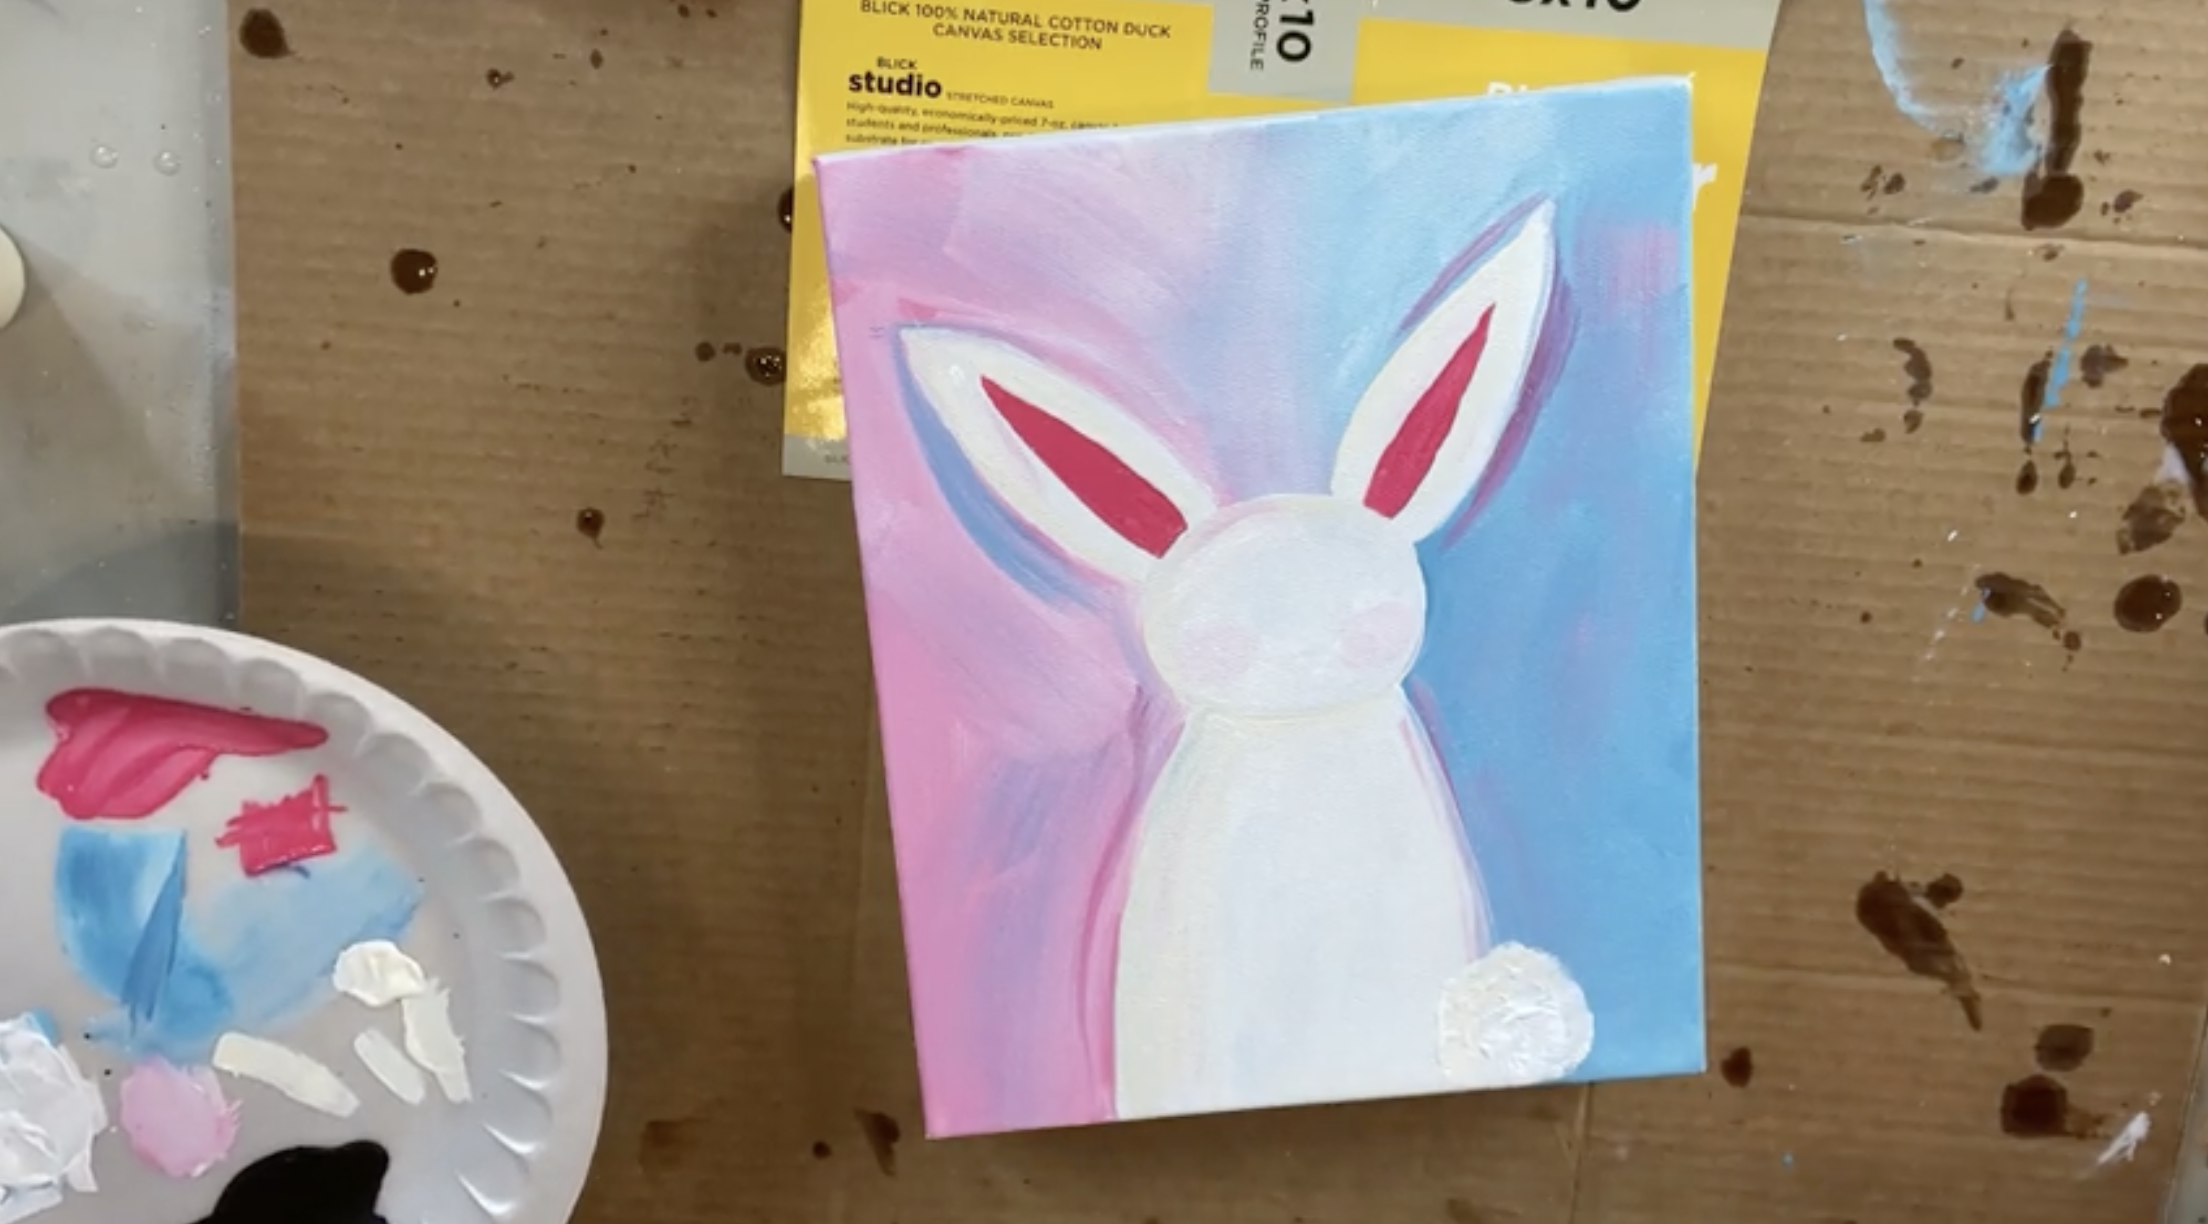
Paint the inner ear shapes with Dragon Fruit pink. Add subtle shading throughout the body using Vintage White (or an ivory/off-white). Blend a soft shadow around one side of the face and under the chin, then bring a little of that shadow down one side of the body. Add a touch along the edge of one ear for separation and depth, blending back with white so it stays gentle. For rosy cheeks, tap a little white where you want the blush, then mix the tiniest amount of Dragon Fruit into the white until it’s a pale pink and dab it onto the cheeks. If you want, you can also add a faint blush touch elsewhere for extra whimsy.
Before drying, add a bit of white where the tail will go so whatever glass you add later doesn’t reflect the blue or pink underneath. If you want the tail area to feel more defined, lightly tap a tiny bit of Vintage White on one edge of that tail area to hint at a rounded shape. Then dry the bunny thoroughly.
Use your 0.5 archival graphic marker to place simple dot eyes and a small nose/mouth shape. If you want a little extra personality, add a tiny lash, but keep it minimal. After you map it with the pen, use a size 0 liner brush and black paint to fill in the eyes and the nose/mouth so they look solid and crisp rather than textured.
This is the step that makes the whole bunny feel finished. With your graphic marker, loosely outline the bunny’s head, body, ears, and the tail shape, letting the line be imperfect and slightly sketchy. Add a few dots on the cheeks and sprinkle in a couple tiny hash marks around the ears or body like “stitched” details.
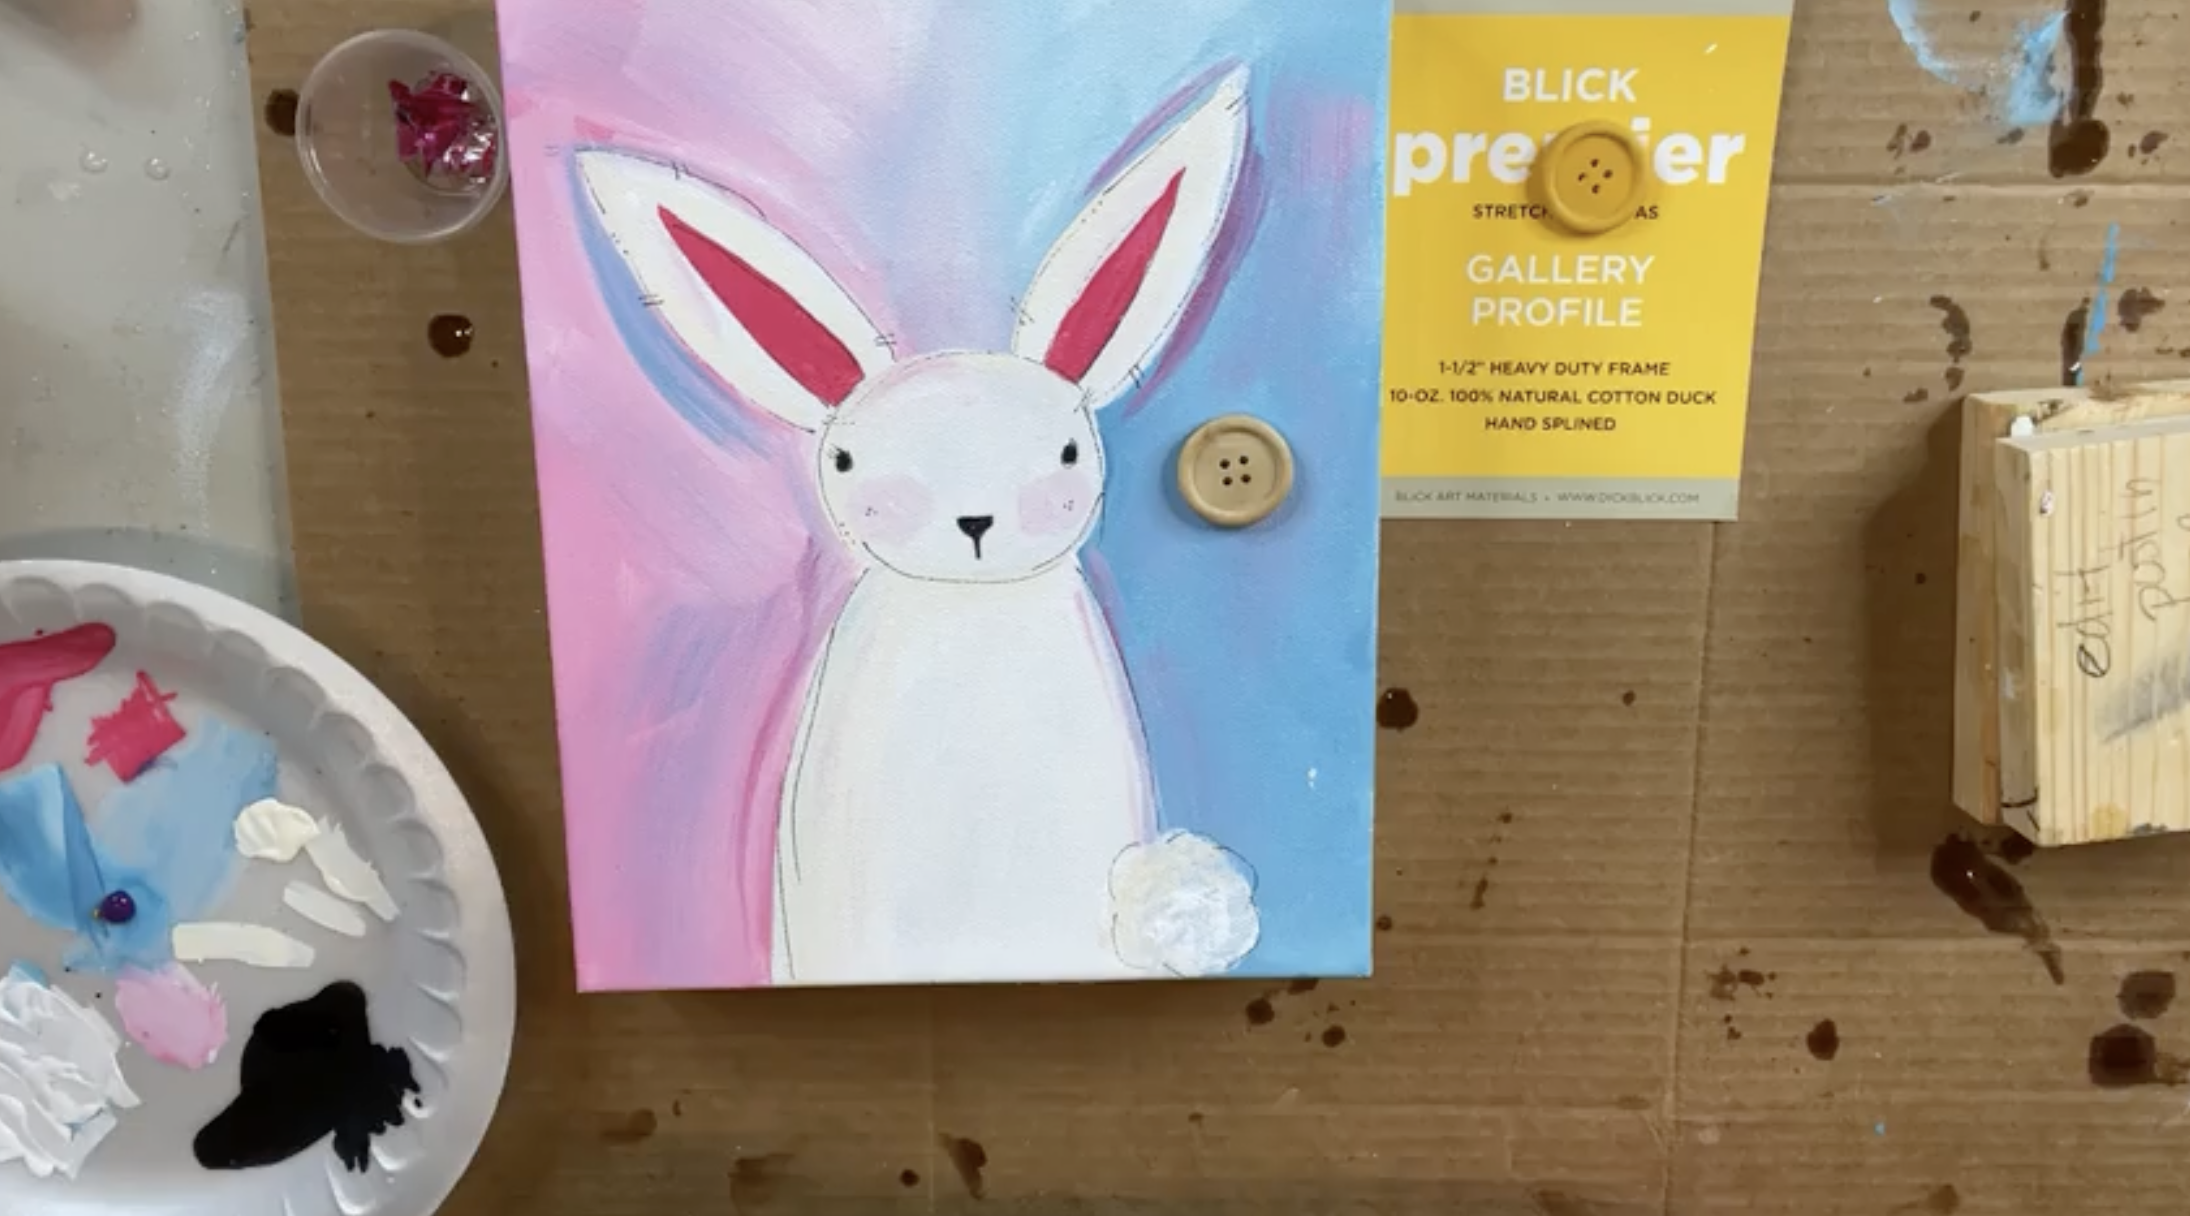
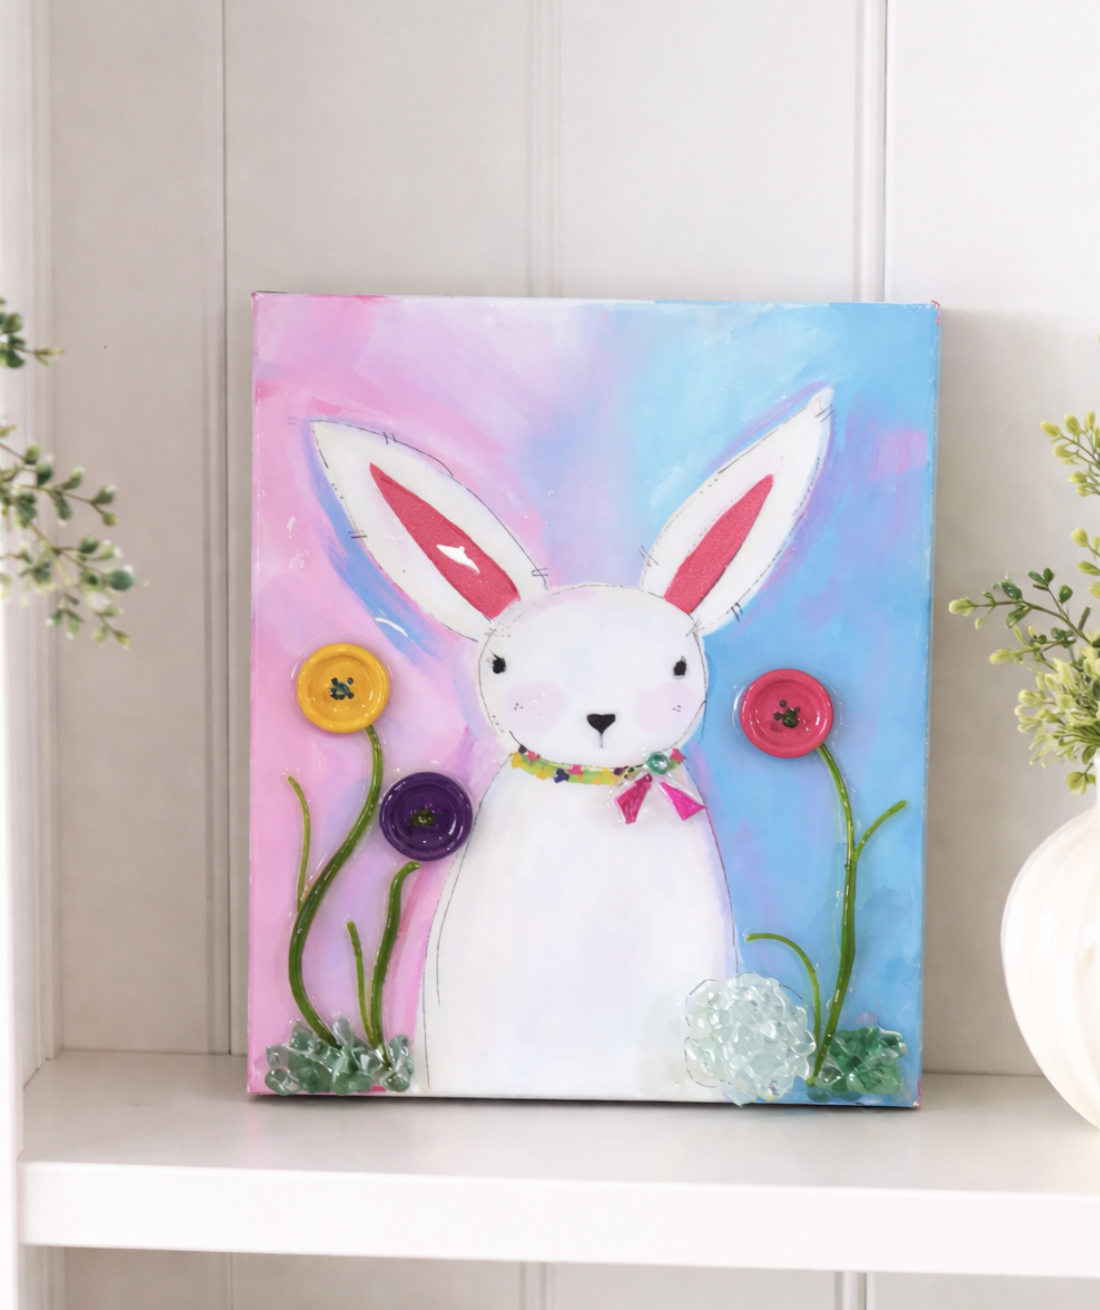
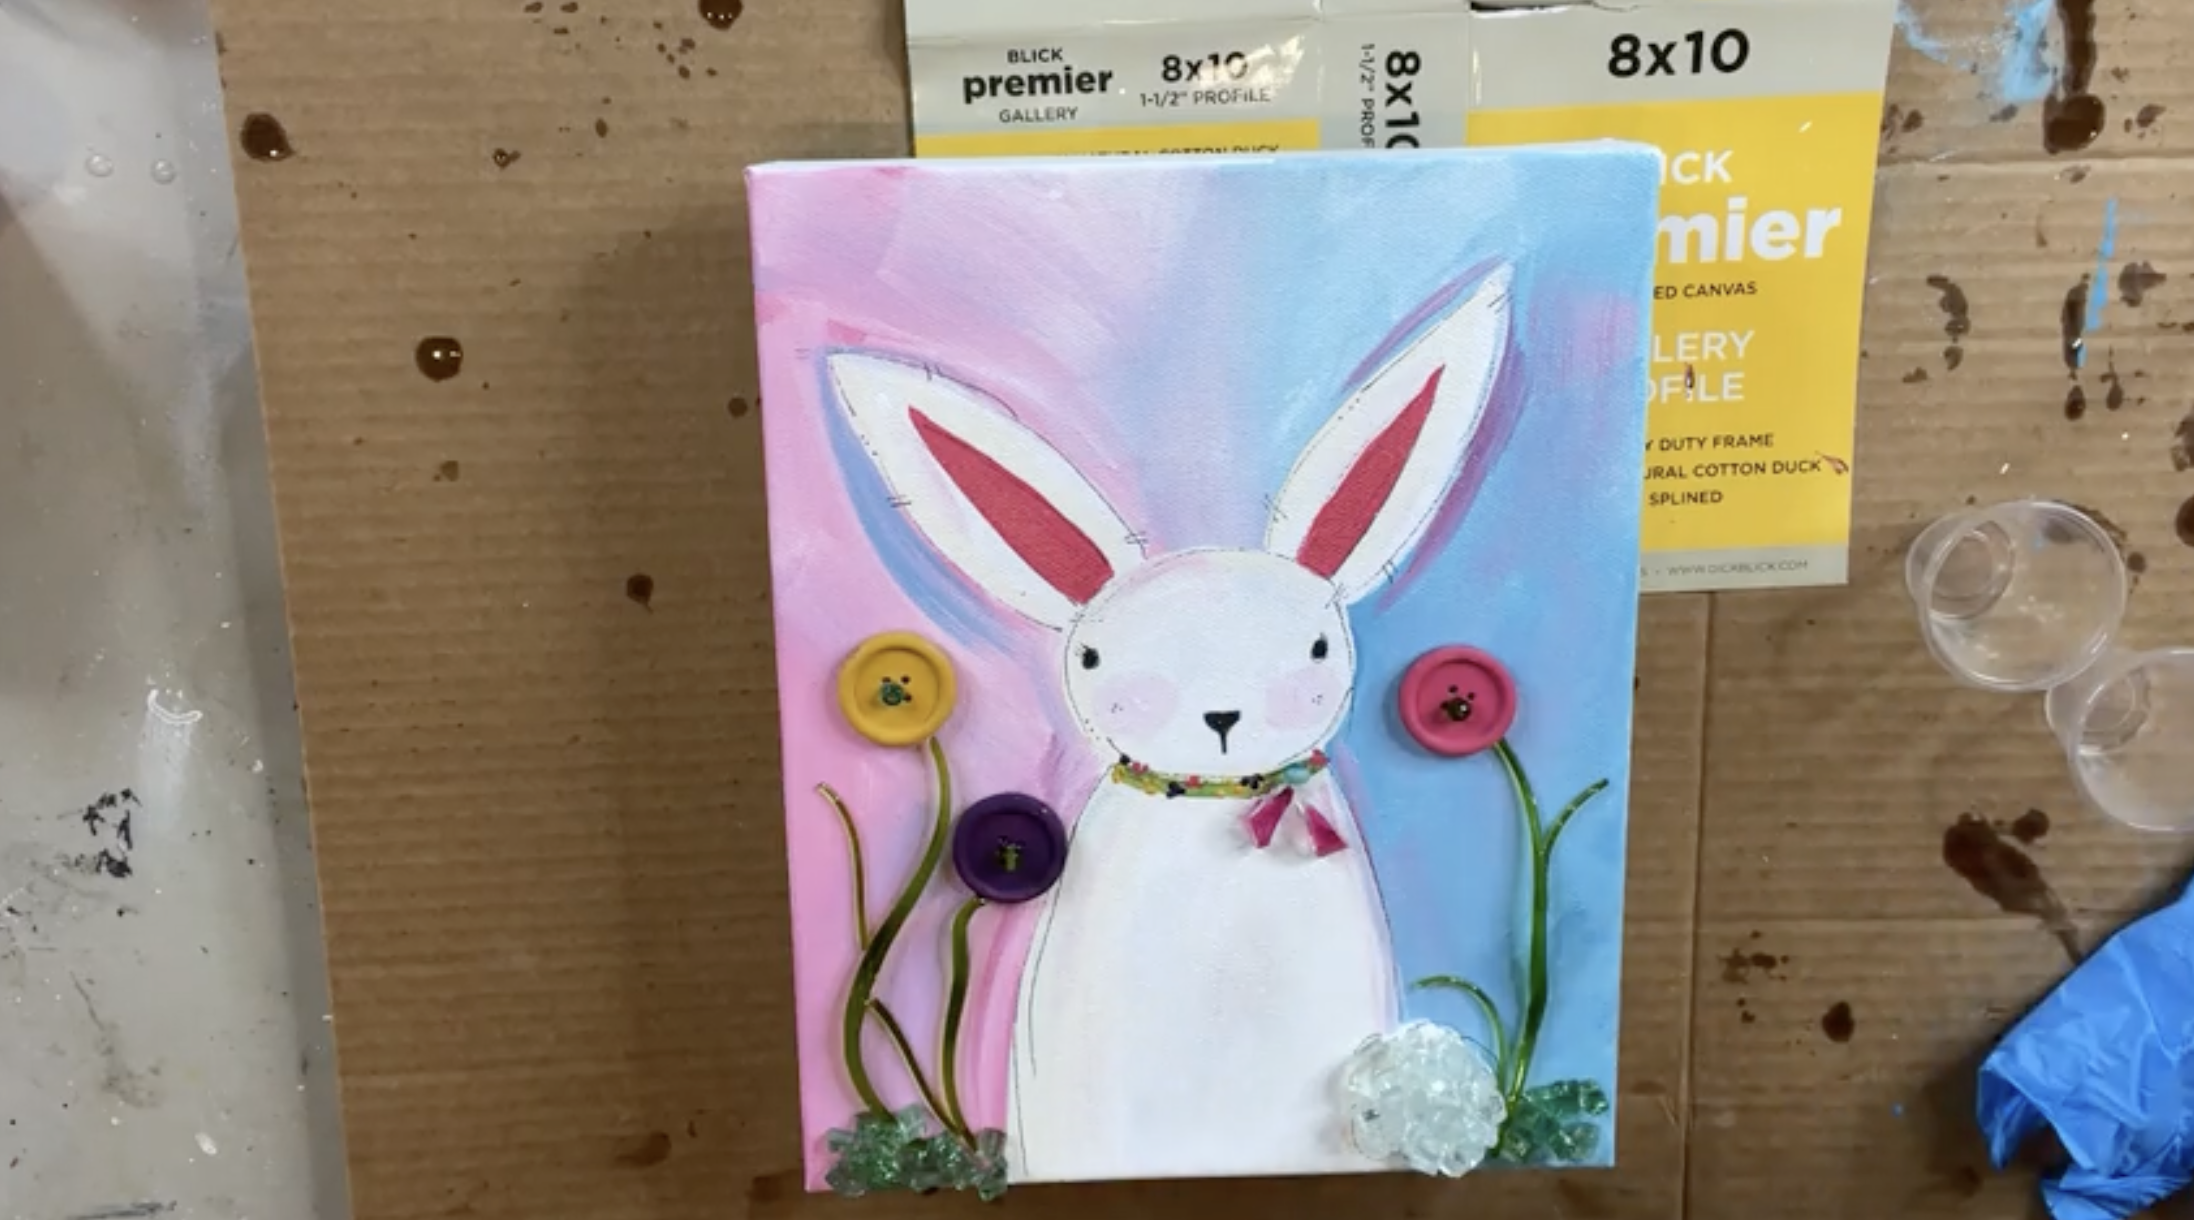
Paint three wooden buttons to become your flowers. Use a bright yellow for one, a deep purple (eggplant) for another, and Dragon Fruit pink for the third. Paint the edges as well so they look finished from every angle. If the purple doesn’t cover well on the first coat, add a second coat once it dries. You can use plastic buttons too, but painting wood buttons gives a softer, handmade look that matches the bunny perfectly.
Step 6: Choose Flower Centers and Necklace BeadsPick out a few tiny beads or seed beads for the centers of the button flowers, aiming for greens and blues that pop against the yellow, purple, and pink. Pull a few extra small beads if you want to create a simple little “necklace” detail on the bunny as well. This is the fun part - mix and match until it feels playful without getting too busy.
Step 7: Arrange Vitrigraph Stems and Bottom “Grass”Lay your spring green vitrigraph pieces under the flower buttons like stems, arranging two stems on one side and one on the other. Add a couple curly sprigs or smaller pieces around the base to make the area feel fuller and more garden-like. If you’re planning to add crushed glass at the bottom as grass, leave space for that and think of it as a grounding border that frames the bunny and flowers.
Step 8: Add the EmbellishmentsOnce you like your layout, glue the buttons down where you want your flowers. After the buttons are secure, add a tiny dot of glue in the center of each and place your beads to finish the flower centers.
If the bunny neck detail feels too crowded with the buttons, keep it simple and paint a small bow or collar line using Fresh Cut Grass green. You can also add a few tiny beads as a little necklace and pieces of glass to make a bow, if you prefer. For the ears, if you originally planned seed beads but the project already feels busy, use Metallic Pink Pearl paint to fill the ears instead - this adds shine and pop without adding more texture pieces. Let everything dry completely before moving into any glass placement or resin.
Time to bring in the glass. Start with the bunny’s tail. Use either a clear glass nugget or a small mound of crushed glass to create a fluffy little tail. Next, add crushed glass along the bottom edge of the canvas to create “grass.” A soft seafoam or light green works beautifully here. Tuck the glass slightly under the button flowers and vitrograph stems so everything feels grounded instead of floating.
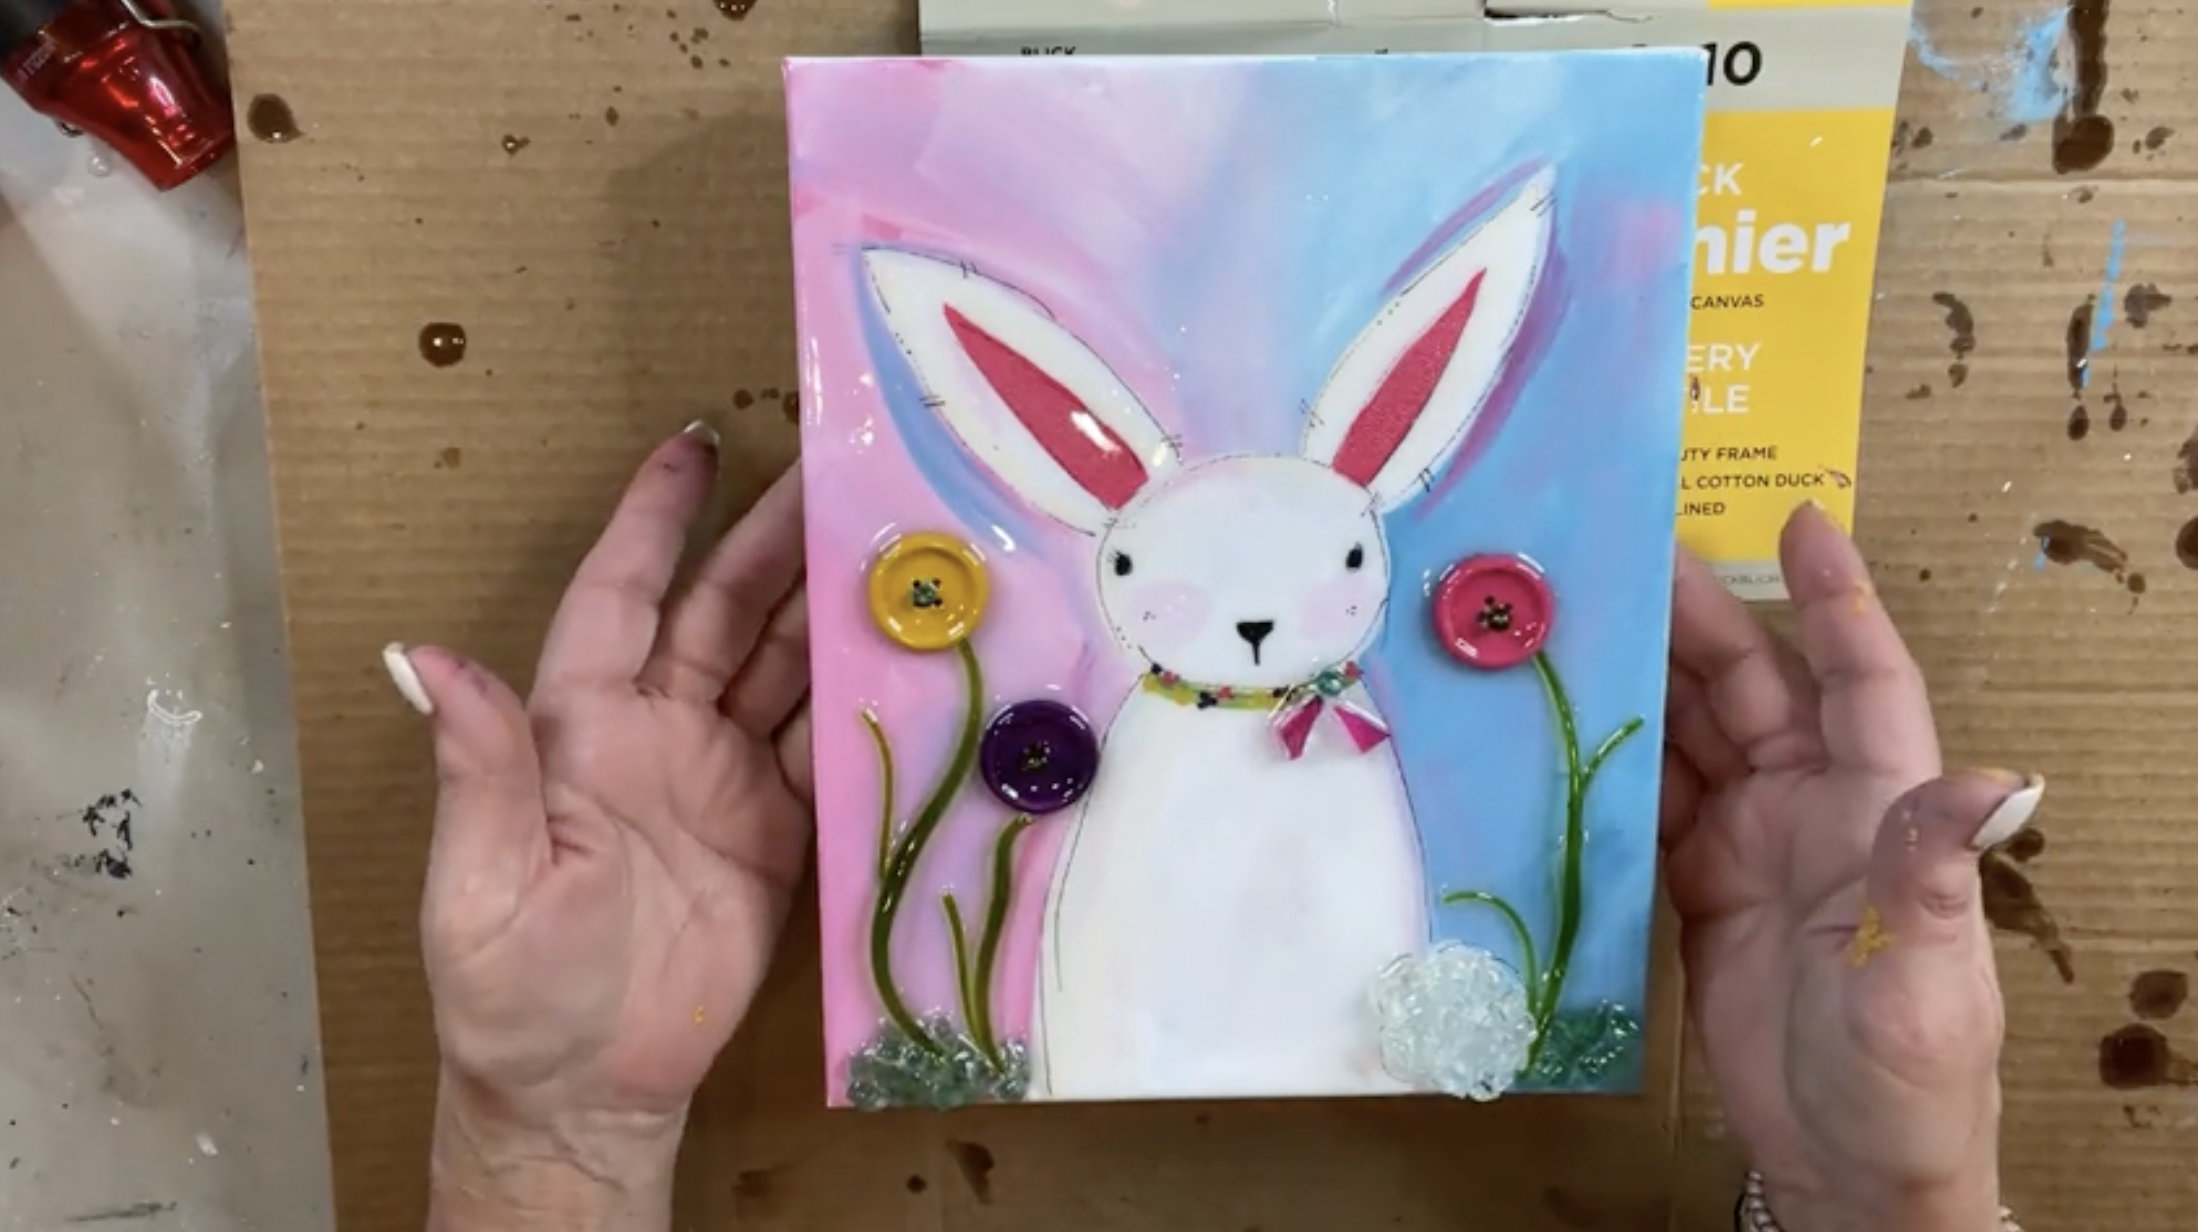
Step 9: Mix and Apply Resin
Put on your gloves and mix your resin according to the manufacturer’s directions (typically a 1:1 ratio). Stir slowly and thoroughly for the recommended time, scraping the sides and bottom of your cup to ensure it’s fully combined.
Pour the resin directly onto the center of the canvas and use a gloved hand or spreader to gently move it across the surface. Work methodically so you don’t miss any dry spots. Make sure the resin flows around and slightly over the glass pieces to lock them into place.
Use a heat gun or torch lightly to remove bubbles, keeping the heat moving so you don’t scorch the resin.
If you want a little extra sparkle, you can sprinkle a tiny amount of clear crushed glass or iridescent bits into the wet resin near the base for added dimension.
Let the canvas sit flat and undisturbed for at least 24 hours to cure fully.
If you're a member of The Shattered Circle, you'll find this tutorial in your classroom under Art Shattered Weekly Facebook Lives, search for "Button Bunny".
If you don’t want to miss my Facebook LIVE art instruction, make sure you are on my texting list. I always text 10 minutes before I’m going to go LIVE, so you won’t ever miss it. You can text “Hey Cindy” to 901-519-2923.
Want more inspiration and artwork?
- My website artshattered.com with resources, shop, and more!
- My creative membership The Shattered Circle, where you can explore the world of glass art with online workshops, a supportive community, and more!
- My mini creative membership Just A ‘Lil Bit Monthly Glass Art Club, where you’ll get a new quick and easy online tutorial for just a lil' bit of sparkle in your life!
- My Facebook page where I go LIVE every Wednesday night.
- My YouTube channel which has tons of free art lessons right at your fingertips.
