
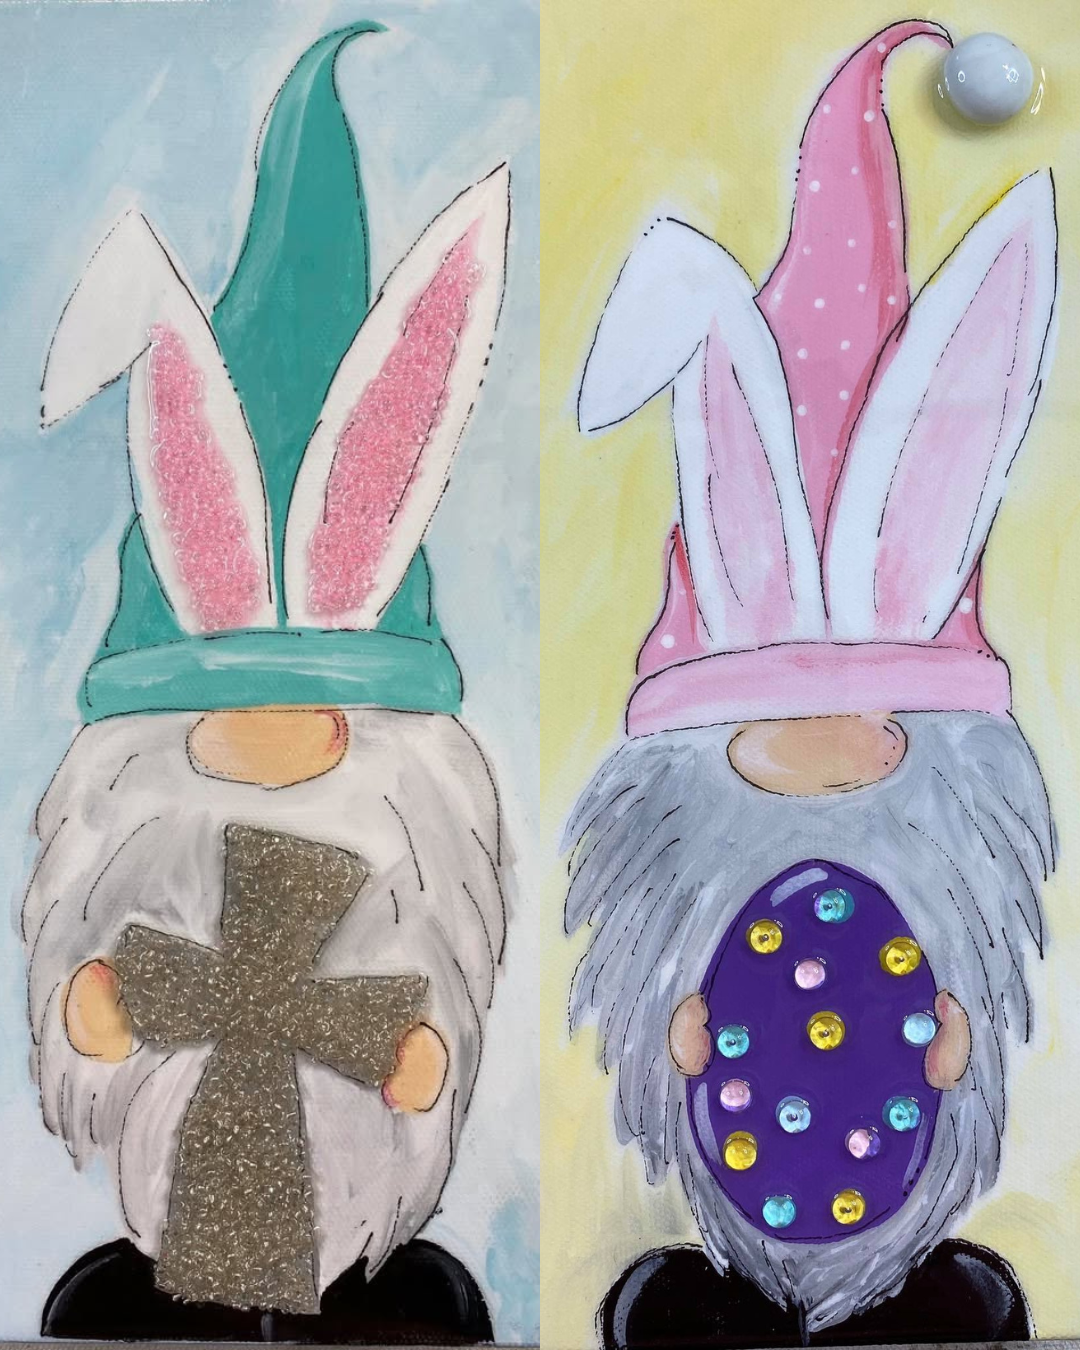
Gnome Bunnies 🐰
If you’re in the mood for something whimsical, springy, and just plain adorable, this Easter bunny gnome project is such a fun one to make. In this tutorial, you’ll paint a sweet little gnome with bunny ears, a fluffy beard, and either a beaded cross or a dotted Easter egg, then finish it off with resin for that glossy, polished look.
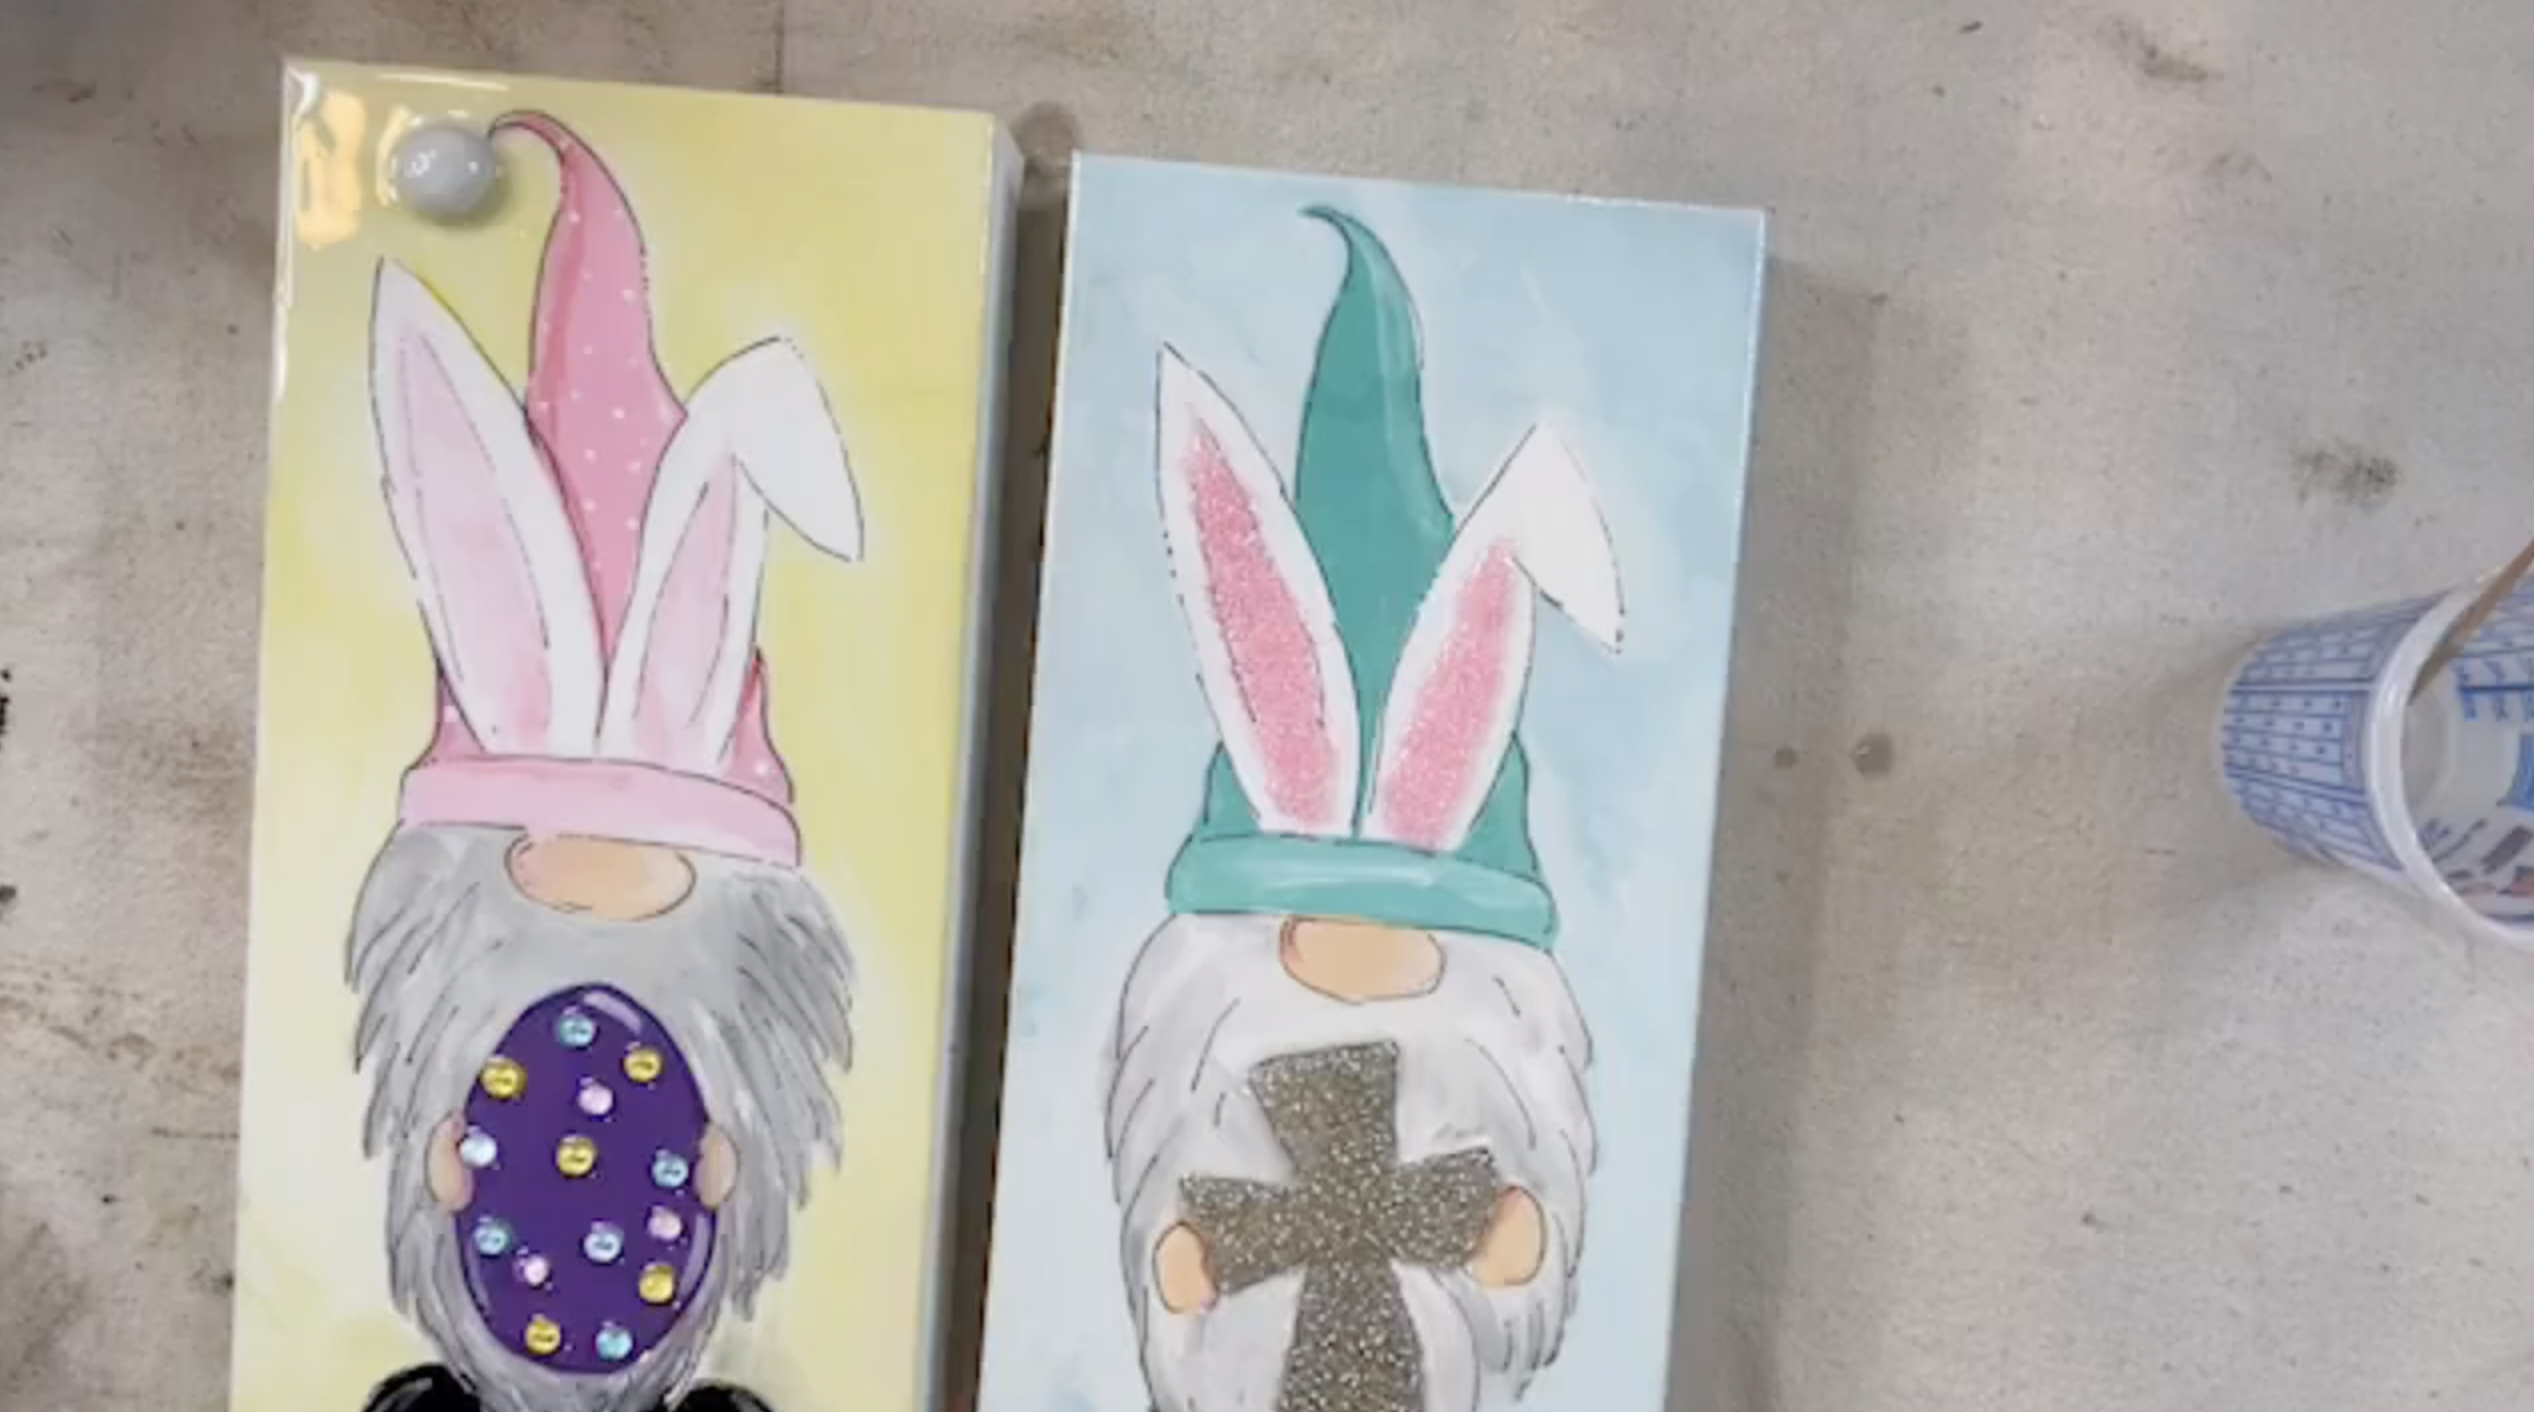
One of the best things about this project is how easy it is to customize. You can switch up the hat color, choose whether your gnome holds a cross or an Easter egg, and decide how much sparkle you want to add with beads and embellishments. The basic process stays the same, so once you make one, you may just want to make a whole lineup of bunny gnomes!
Step 1: Trace the Bunny Gnome Design
Start by tracing your bunny gnome onto the canvas. Make sure the outline is light but still visible enough for painting. If you are using a tracer and graphite paper, transfer the design before you begin painting so all of your features are placed correctly.
The design includes the nose, hands, beard, hat, bunny ears, shoes, and either the cross or the Easter egg. Once the full outline is on the canvas, you’re ready to paint.
Step 2: Paint the Nose and Hands
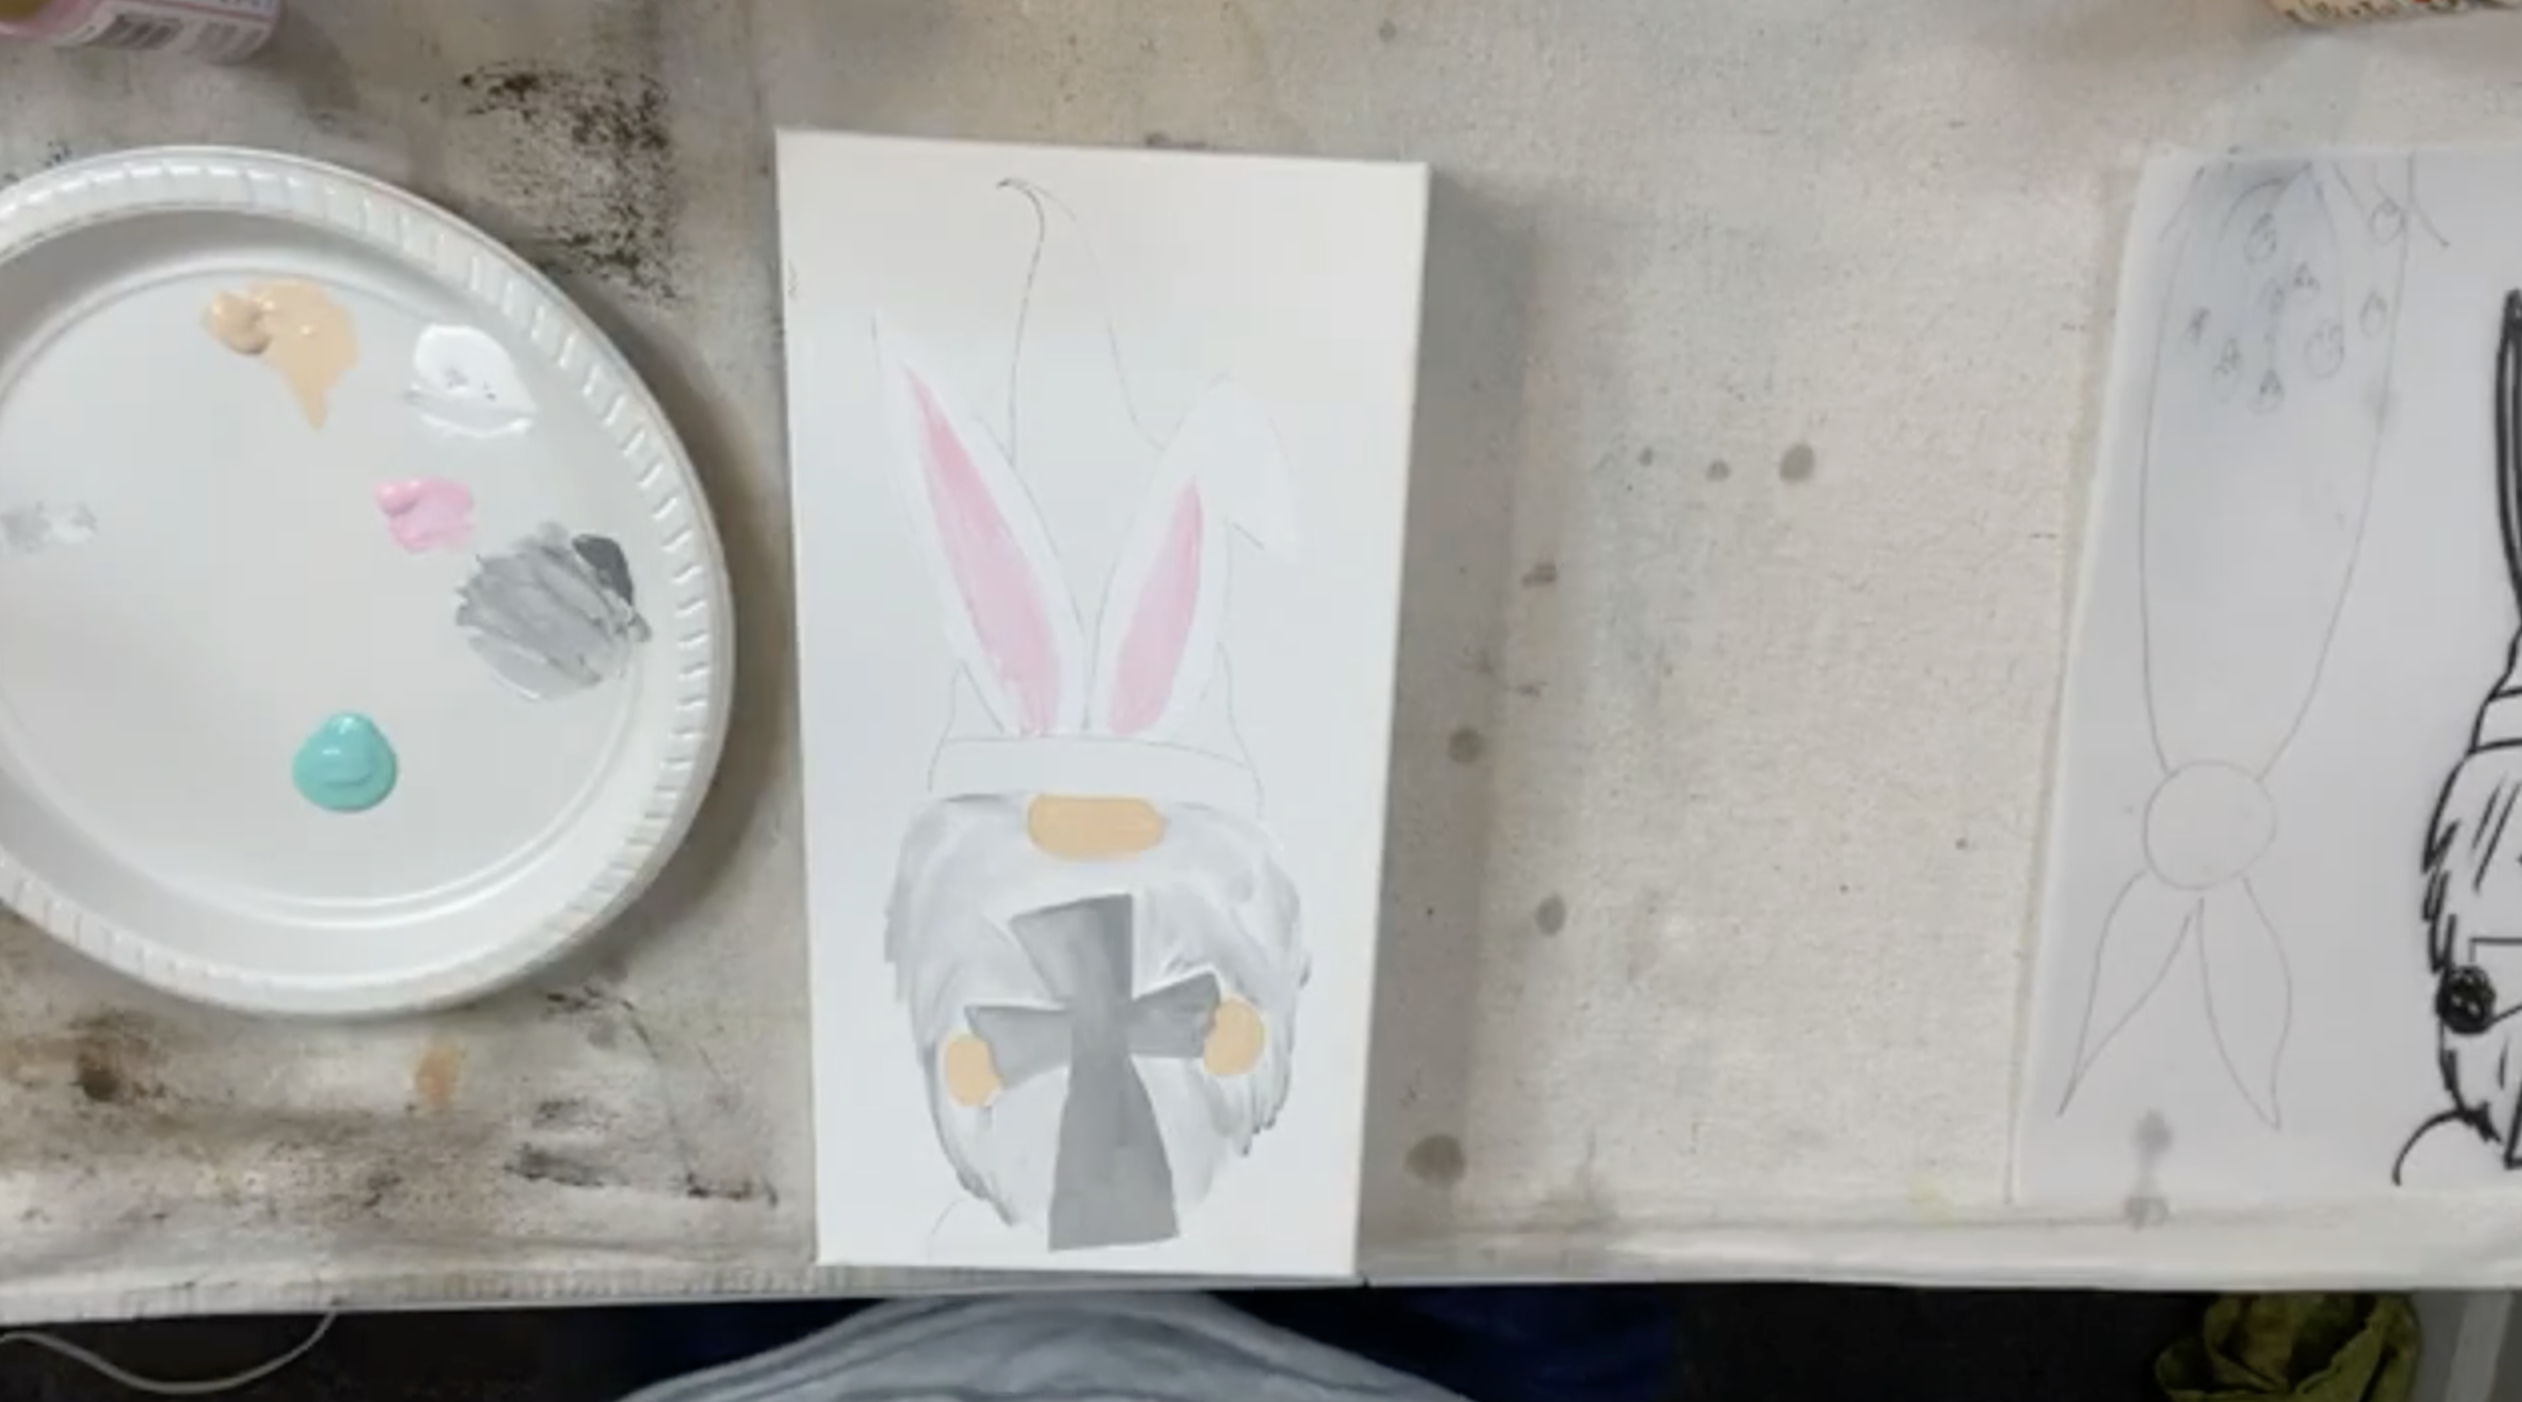
Begin with the lightest flesh tone for the nose and hands. Using a small brush, fill in the nose and both little hands. This step gives you a good starting point and helps you see where all the facial and hand details will sit as you build the rest of the piece.
Step 3: Paint the Bunny Ears
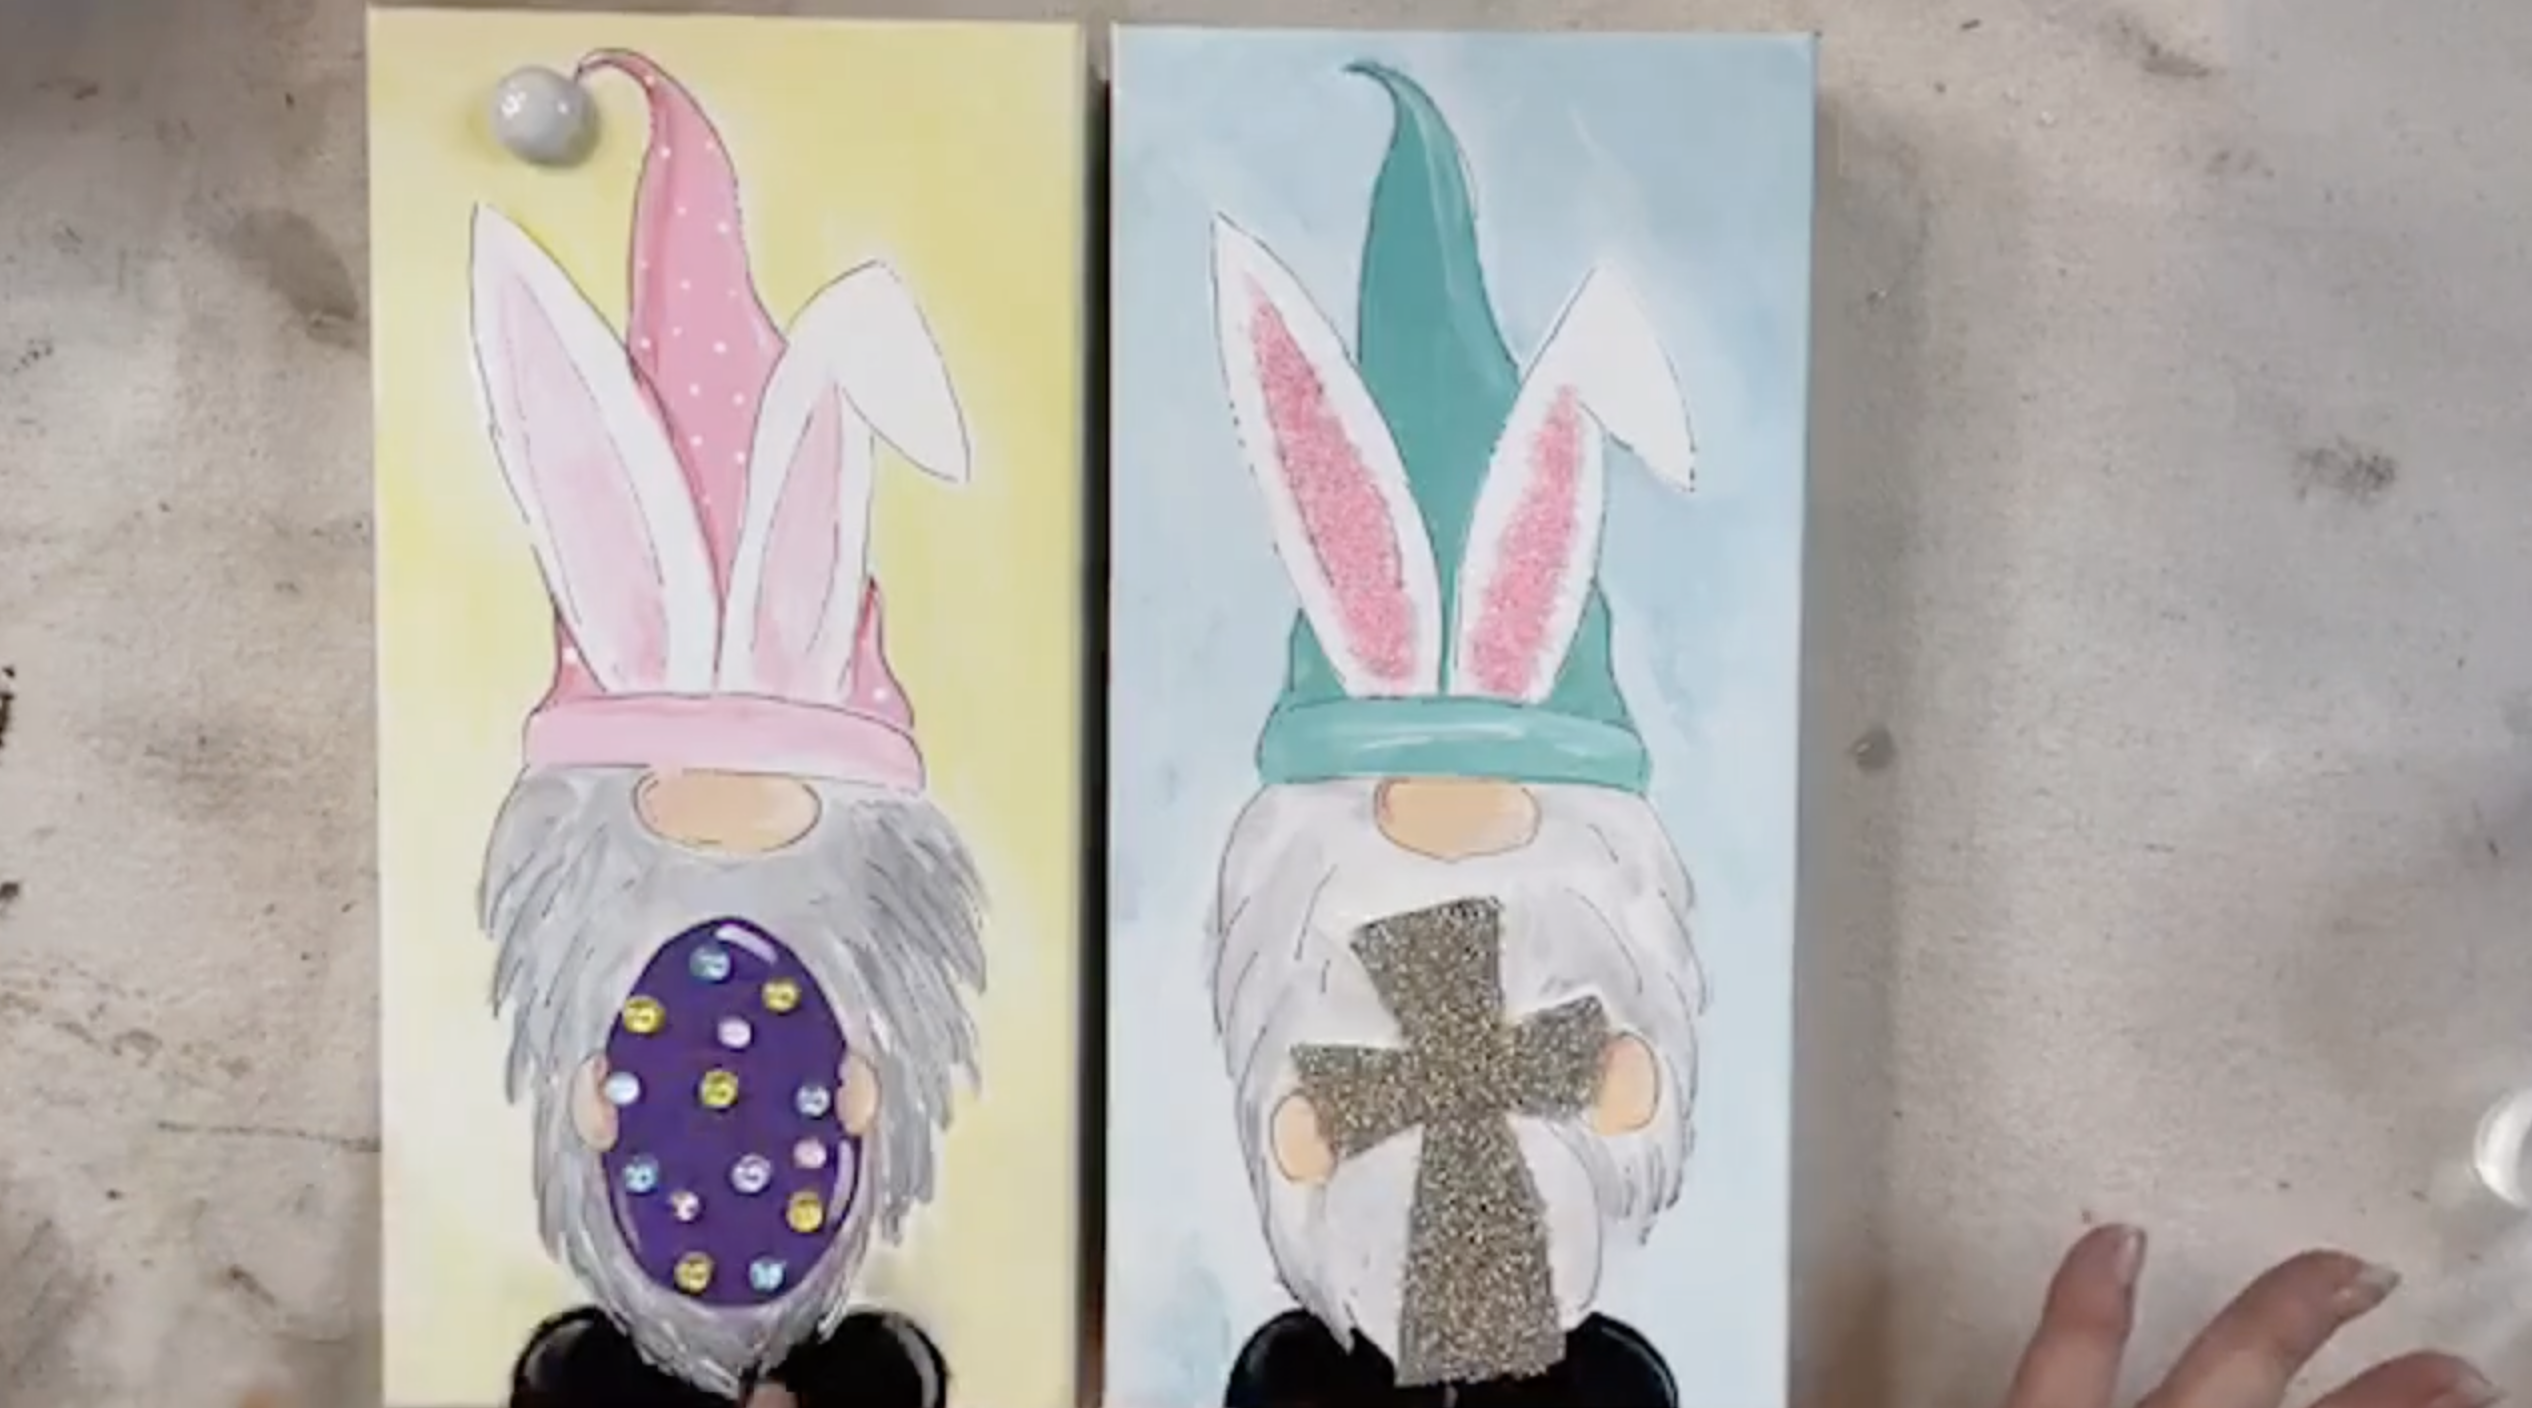
Next, paint the bunny ears white. Cover both ears fully, leaving the inner ear area ready for a little soft pink. Once the white is on, add a touch of pink to the center of each ear while the paint is still workable. This gives the ears a sweet, soft Easter look and creates a nice base for the beads that will be added later.
Step 4: Paint the Beard
For the beard, use mostly white with just a little gray mixed in so it doesn’t feel flat. Start by filling the beard with white, then add a small amount of gray around the edges and in a few strokes through the beard to create dimension and movement.
Step 5: Paint the Cross or Easter Egg Base
If your gnome is holding a cross, mix a little white into gray to create a pale gray base and paint the entire cross shape. This helps prepare it for the crystal seed beads later and keeps the white canvas from showing through underneath.
If your gnome is holding an Easter egg instead, paint the egg in your chosen color. In my version, a rich purple was used. Make sure the base is nice and solid since the decorative dots and bubbles will sit on top.
Step 6: Paint the Hat
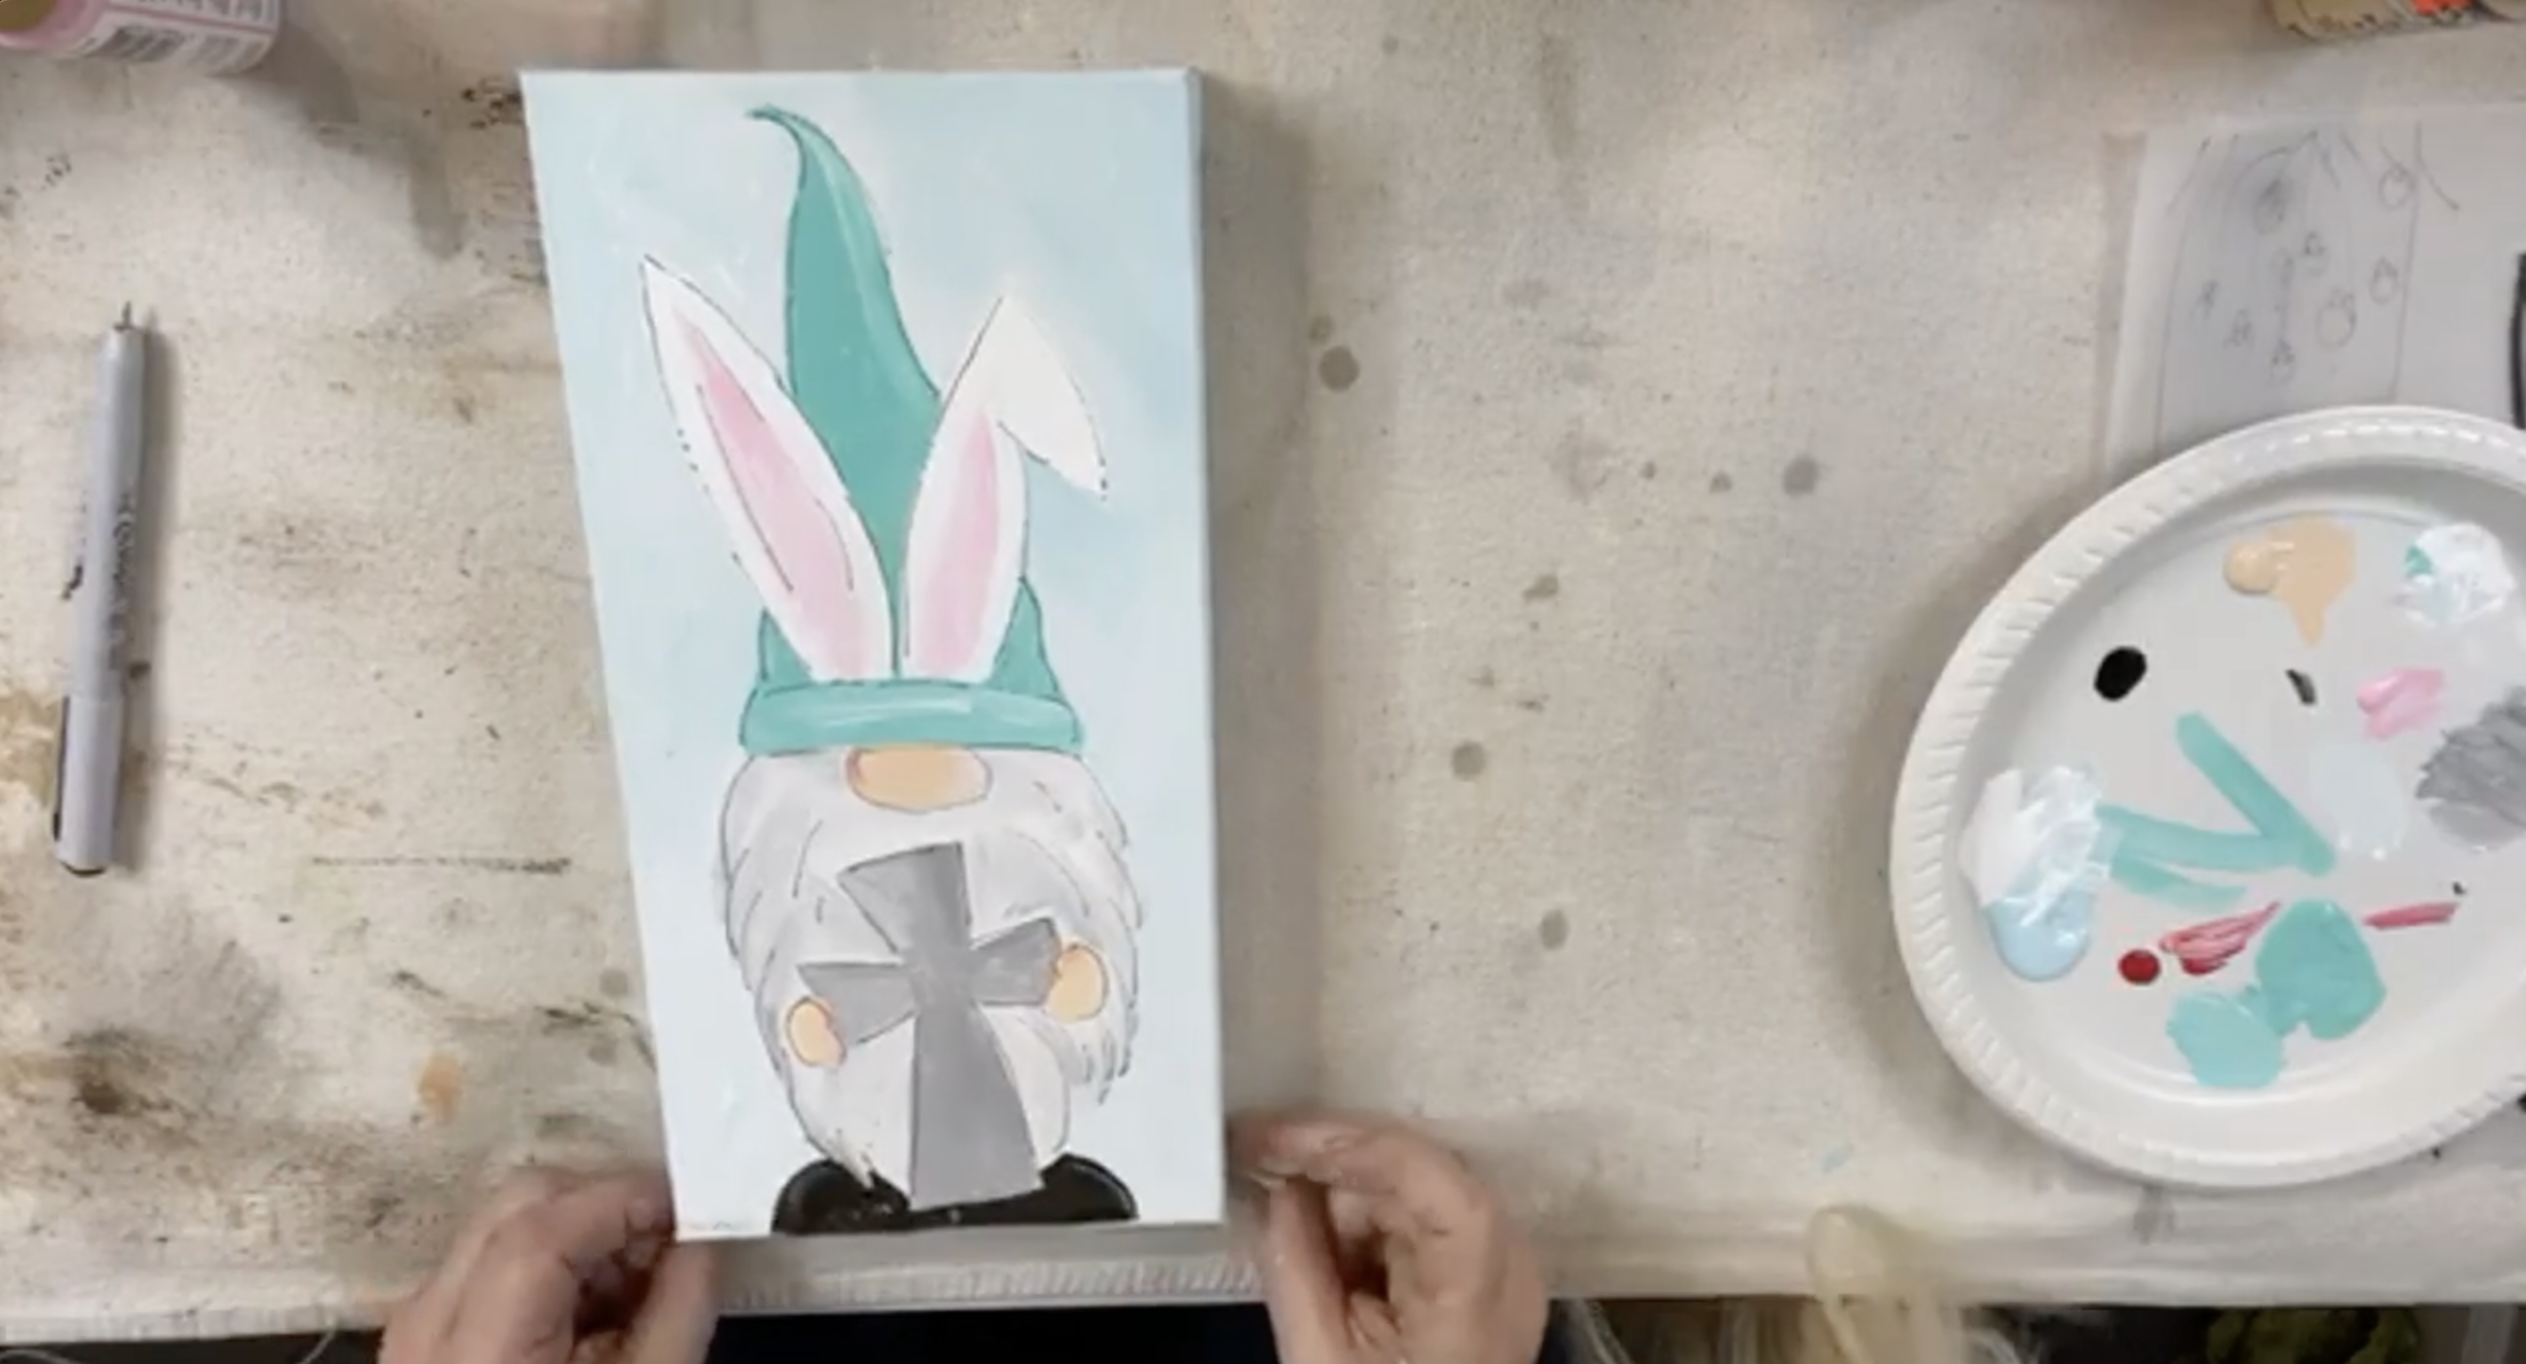
Now it’s time for one of the most fun parts: the hat. The original cross version uses Sea Breeze, which is a beautiful soft teal that feels perfect for spring. Paint the main hat shape in this color, carefully working around the ears. Then mix a little white into the same color and use that lighter version on the brim to create contrast, as if the brim folds over slightly.
You can also add a little extra white highlighting to the hat for dimension. This keeps it from looking too flat and makes the color feel even more lively.
For the other version, the hat was painted pink with little white polka dots, which gives the whole piece a different Easter personality. Either option works beautifully.
Step 7: Paint the Shoes
Paint the shoes black at the bottom of the canvas. Then add a tiny bit of white highlight to the tops of the shoes and a little separating line between them. This small detail helps define the shoes and makes them feel more finished.

Step 8: Paint the Background
Once the gnome is painted, fill in the background using Spa Blue. Mix in a little white here and there as you paint so the background stays soft and varied instead of one solid flat color. Brush around the gnome carefully, but don’t stress about perfection.
Step 9: Add Warmth to the Nose and Hands
Once the main painting is in place, go back and add the tiniest bit of red or blush tone to the nose and hands. Just a touch on the edges or one side is enough. This adds warmth and gives those little skin-tone details more life.
Step 10: Outline the Design with a Black Pen
Using a fine black illustration pen, loosely outline the bunny ears, hat, beard, nose, hands, shoes, and either the cross or Easter egg. You do not need to be super precise here. In fact, a slightly sketchy, whimsical outline works best.
If you choose the pink hat version, this is also the stage where you can add little details like the hat dots if you haven’t already.
Step 11: Add the Beads
Once the paint is dry, brush Aleene’s Clear Tacky Glue inside each ear, keeping it mostly within the pink center area. Sprinkle pink luster seed beads over the glue, then press them gently into place using the bottom of a cup or your fingertip. This helps them settle into the glue and adhere well.
If your gnome is holding a cross, outline the cross with Aleene’s glue, then fill it in completely. Use a brush if needed to spread the glue into a nice even layer. Next, cover the entire cross with crystal seed beads and gently press them into the glue. The result is a sparkly, pearly cross that has beautiful Easter texture.
If your gnome is holding an egg instead, decorate the egg with painted dots in a few spring colors like pink, aqua, and yellow. Once those dots are dry, glue on clear flat-backed bubbles or domed embellishments over the top of them for extra shine and dimension.
You can also add a single white embellishment to the tip of the hat for a cute finishing touch.
Before resining, let all glued sections dry well. This allows the beads to settle and ensures that nothing shifts when the resin goes on. Once dry, shake or tap off any loose beads from the ears and cross.
Step 12: Mix & Apply the Resin
To finish the piece, mix equal parts resin and hardener according to your resin’s directions. In my project, half an ounce of each part was used, for a total of one ounce, which was enough to cover both small gnome pieces.
Stir the resin thoroughly for a full three minutes, scraping the sides and bottom of the cup so everything is mixed evenly.
Drizzle resin over the painted and embellished areas, starting around the beaded sections first. Spread it gently with a gloved finger so the whole surface gets a nice even coat. Be a little more careful over the seed beads, especially on the cross, since too much resin can make those areas look overly flooded.
Once the full canvas is covered, check for dry spots and make sure the resin reaches the edges.
Use a heat gun or small torch to pop any bubbles in the resin. Keep the heat moving and don’t stay in one place too long. This step helps the resin level out and gives the piece that glossy, finished look.
Once the bubbles are gone, leave the piece to cure undisturbed.
If you're a member of The Shattered Circle, you'll find this tutorial in your classroom under Art Shattered Weekly Facebook Lives, search for "Cross and Egg Gnome Bunnies".
If you don’t want to miss my Facebook LIVE art instruction, make sure you are on my texting list. I always text 10 minutes before I’m going to go LIVE, so you won’t ever miss it. You can text “Hey Cindy” to 901-519-2923.
Want more inspiration and artwork?
- My website artshattered.com with resources, shop, and more!
- My creative membership The Shattered Circle, where you can explore the world of glass art with online workshops, a supportive community, and more!
- My mini creative membership Just A ‘Lil Bit Monthly Glass Art Club, where you’ll get a new quick and easy online tutorial for just a lil' bit of sparkle in your life!
- My Facebook page where I go LIVE every Wednesday night.
- My YouTube channel which has tons of free art lessons right at your fingertips.
