
Gold Leaf Abstract 💛
This project is simple, calming, and wildly forgiving - soft gray and smoky blue undercoats, dreamy dry-brushed whites, and a delicate “horizon line” made from gold leaf and tiny gold floral glass. The finished look is modern, minimal, and perfect for a bathroom, entryway, or anywhere you want a little quiet sparkle.
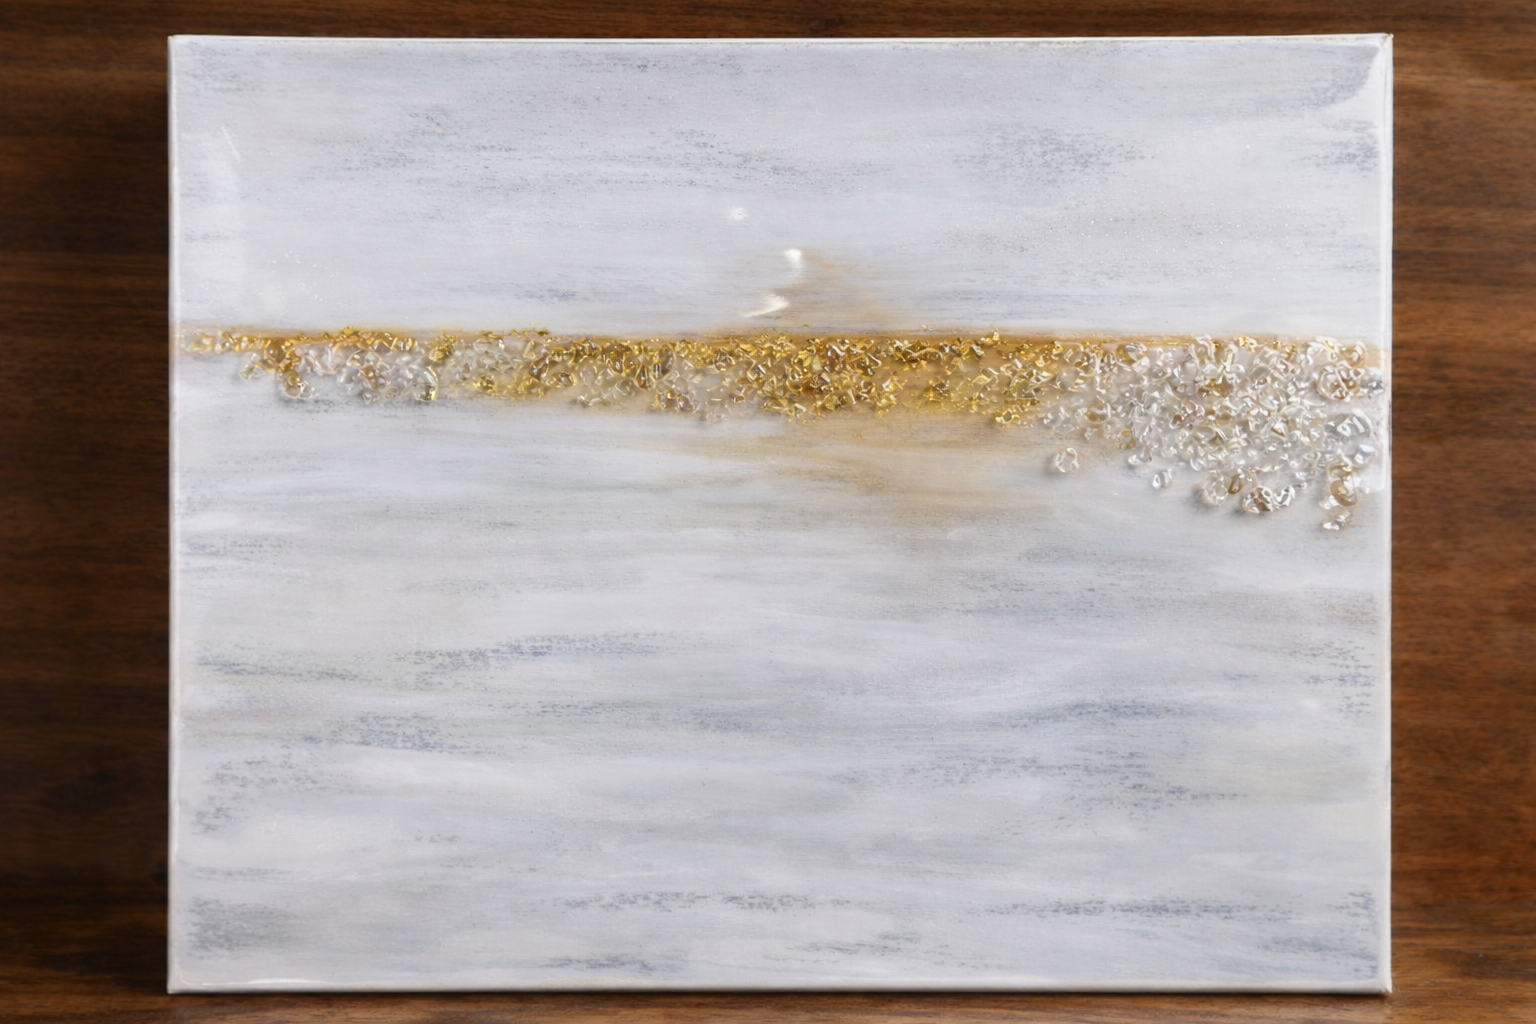
This design is basically two zones: a top section and a bottom section, with a “horizon” line running across where they meet. Lightly mark where you want that line - about one-third down from the top is a great starting point. Don’t stress about measuring perfectly; this piece looks best when it feels organic.
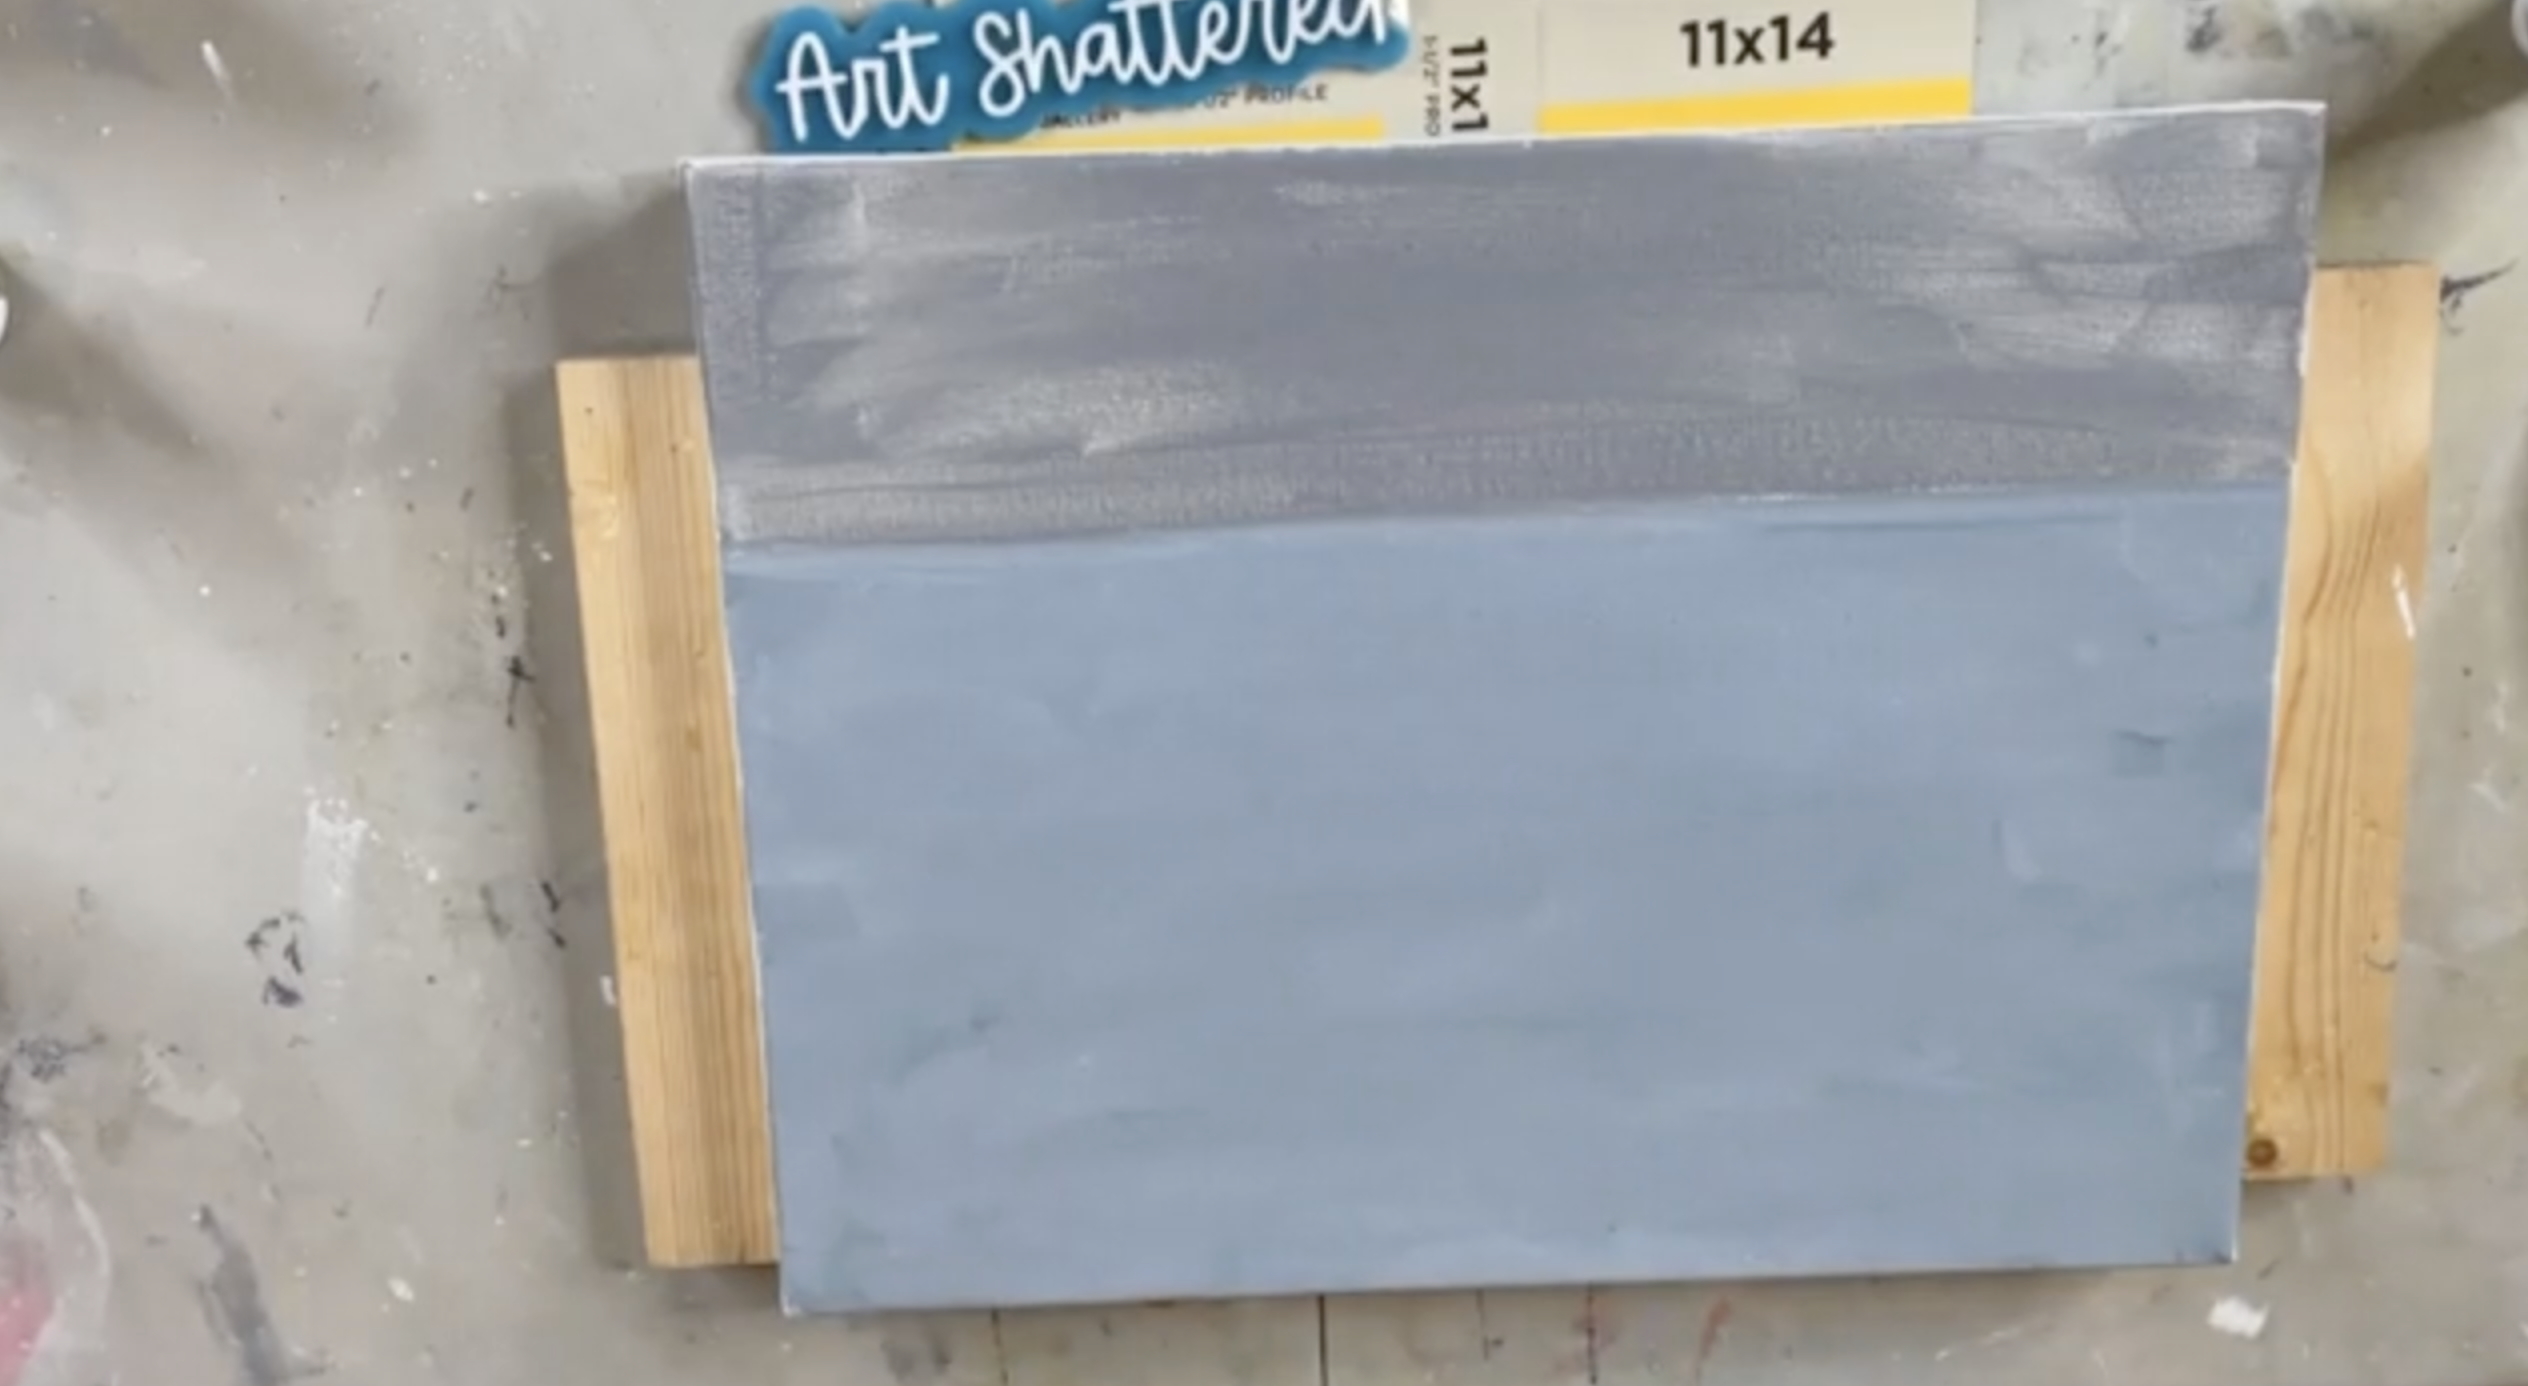
Step 1: Paint the Undercoat (Gray Top, Blue Bottom)
Start with your dark gray (Anita’s Rainy Day) and paint the top portion down to your pencil mark. Don’t worry about painting the edges perfectly at this stage, because you’ll be dry brushing later and most of the undercoat will peek through rather than dominate.
Without cleaning the brush too much, offload excess paint and paint the bottom portion with Silver Marlin (a smoky, beachy blue). Bring the blue right up to the gray so the two meet cleanly at the horizon line.
This undercoat isn’t meant to be the final look - it’s simply there so you’re not staring at a blank white canvas and freezing up. Use your heat gun to dry everything fully.
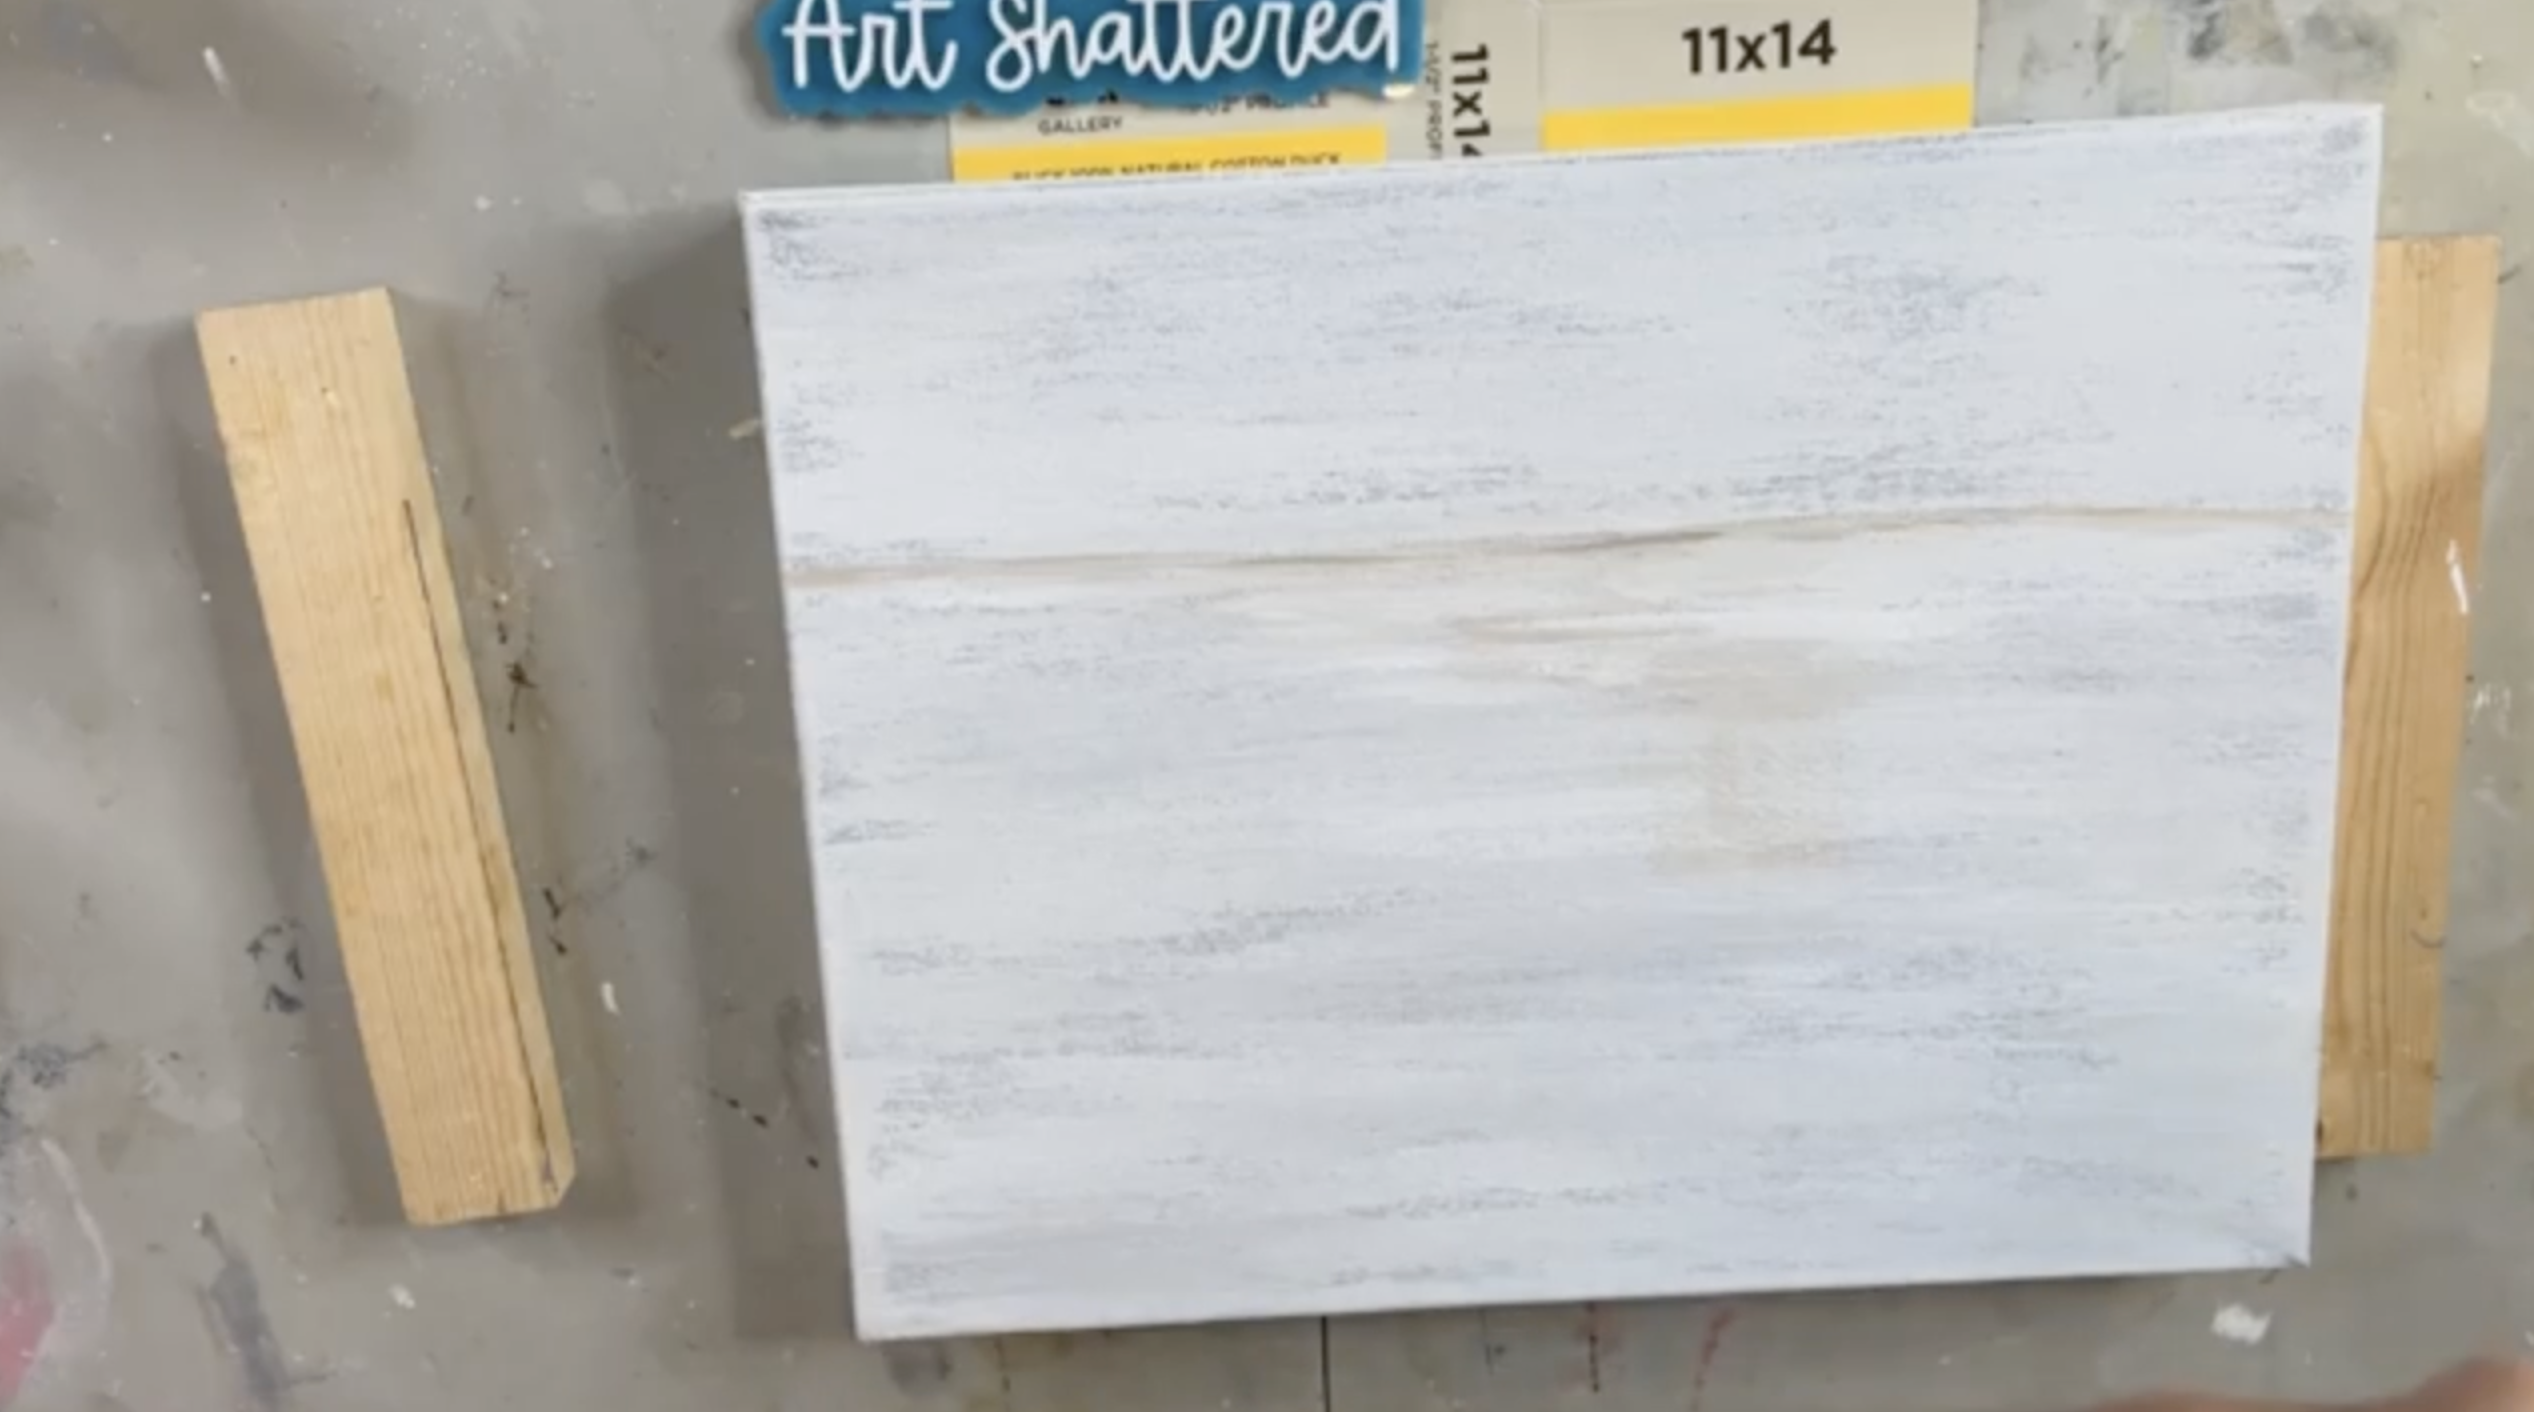
Step 2: Dry Brush Oyster White Over the Whole Background
Load a dry 2" chip brush with Oyster White (don’t wet the brush - dry brushing is the whole magic here). Brush into the paint lightly on both sides of the bristles, then sweep it across the canvas using the brush held flat and parallel to the surface. You’re aiming for a distressed, layered look, not full coverage.
Work slowly and build the color gradually. If you add too much paint too fast, it’s hard to undo, so keep it light and airy, letting some of the gray and blue peek through like a moody sky.
If your Oyster White feels too bright, add a little gray on top, especially in the lower section, to calm things down and create more depth. This step is optional, but it helps keep the final piece soft and monochromatic.
Step 3: Add White for a Wispy “Storm Cloud” Effect
Now bring in standard white and dry brush it gently over areas where the undercoat still shows strongly. Use the brush flat and sweep back and forth. If you accidentally get too much white in one area (it happens), just keep brushing lightly to redistribute it and soften it out.
Once you like the background, dry it thoroughly.
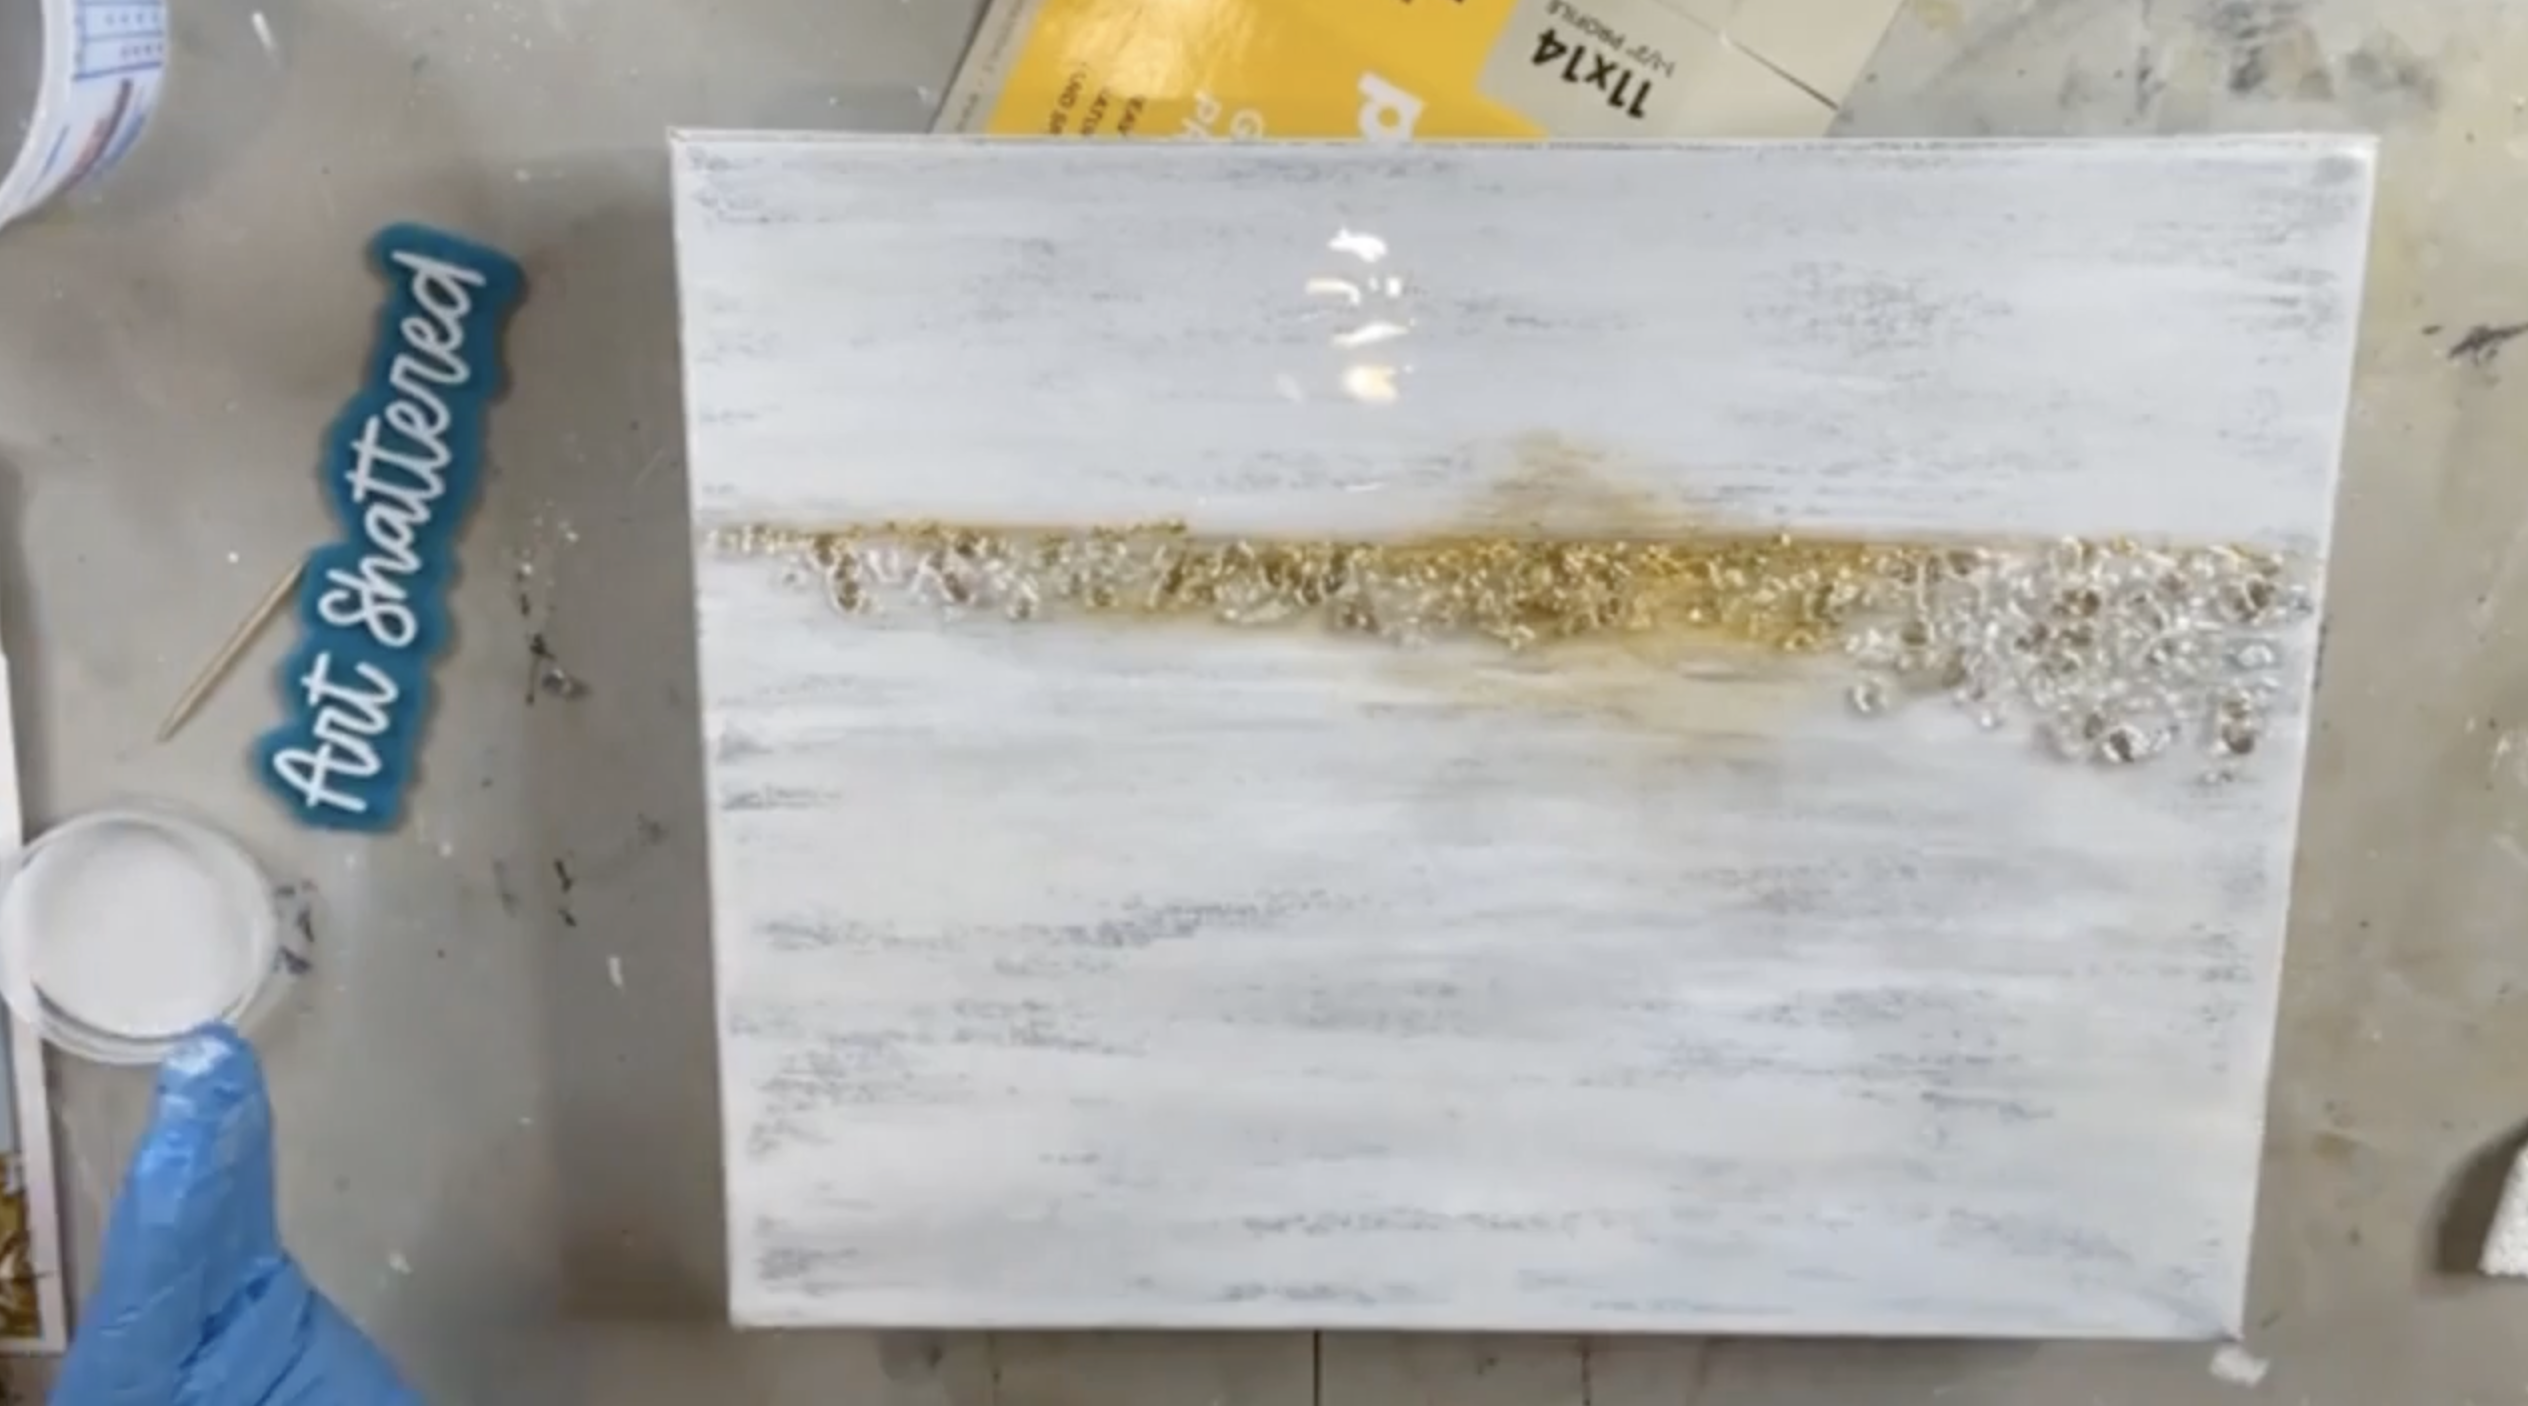
Step 4: Redefine Your Horizon Line With Lightened Khaki
Mix a small amount of khaki/tan with white so it’s soft and forgiving. Using a small brush, paint a thin line across the canvas where your horizon lives. This is not meant to be perfectly straight; it’s just a guide layer that will help your metallics look intentional and give the “horizon” a base.
After you’ve got the line, add a few soft downward strokes under it and a little bit above it to create a gentle “sunset glow” effect.
Dry this layer before you add metallics so it stays clean and doesn’t muddy.
Step 5: Add Gold Along the Horizon
Using a flat brush, pick up a tiny amount of Splendid Gold and drag it loosely along the horizon line area. Don’t aim for a solid stripe.
If you want, you can create a soft semi-circle of gold above the horizon (like a hint of sun), then spread it outward with your brush so it feels abstract, not literal.
Without worrying about cleaning the brush perfectly, add a touch of metallic taupe/champagne around the horizon line and into the “sun” area. This ties in beautifully with the gold leaf and glass you’ll add later and keeps everything soft and cohesive.
If you want some warmth, add the tiniest amount of a soft pink (like “pink melon”) mixed with white. Touch it right at the horizon line so it reads more like “warm light” than pink paint. Dry again.

You’ll add gold leaf and glass into resin, so have everything ready: gold leaf sheets (Hobby Lobby) and tiny gold floral glass/vase filler (Michael’s floral section). The tiny size matters because it stays subtle and doesn’t overpower the piece.
Step 6: Mix 2 Ounces of Resin and Apply a Base Coat
Elevate your canvas and mix 2 ounces total resin (1 oz resin + 1 oz hardener) and stir for 3 minutes, scraping sides and bottom.
Spread a smooth coat across the entire canvas, making sure the horizon area is well covered since that’s where your leaf and glass will go. Hit it quickly with a heat gun to pop early bubbles.
Step 7: Add Gold Leaf & Glass Into the Wet Resin
Tear off tiny bits of gold leaf (a little goes a long way). Drop small pieces along the horizon line area, then use a toothpick to break up large chunks and nudge pieces into place.
Sprinkle a thin line of the tiny gold glass across the horizon, letting it cluster slightly heavier in one area so the line isn’t perfectly even. Keep it delicate so it doesn’t cover up all your leaf.
Use the remaining resin to drizzle over the gold leaf and glass, ensuring everything is encapsulated. The heat gun will help the resin level out and settle around the glass.
Pop bubbles again with your heat gun/torch, keeping it moving so you don’t scorch the resin. Let it cure flat and undisturbed per your resin’s cure time (usually overnight to the touch, longer for full cure).
If you're a member of The Shattered Circle, you'll find this tutorial in your classroom under Art Shattered Weekly Facebook Lives, search for "Gold Leaf Abstract".
If you don’t want to miss my Facebook LIVE art instruction, make sure you are on my texting list. I always text 10 minutes before I’m going to go LIVE, so you won’t ever miss it. You can text “Hey Cindy” to 901-519-2923.
Want more inspiration and artwork?
- My website artshattered.com with resources, shop, and more!
- My creative membership The Shattered Circle, where you can explore the world of glass art with online workshops, a supportive community, and more!
- My mini creative membership Just A ‘Lil Bit Monthly Glass Art Club, where you’ll get a new quick and easy online tutorial for just a lil' bit of sparkle in your life!
- My Facebook page where I go LIVE every Wednesday night.
- My YouTube channel which has tons of free art lessons right at your fingertips.
