
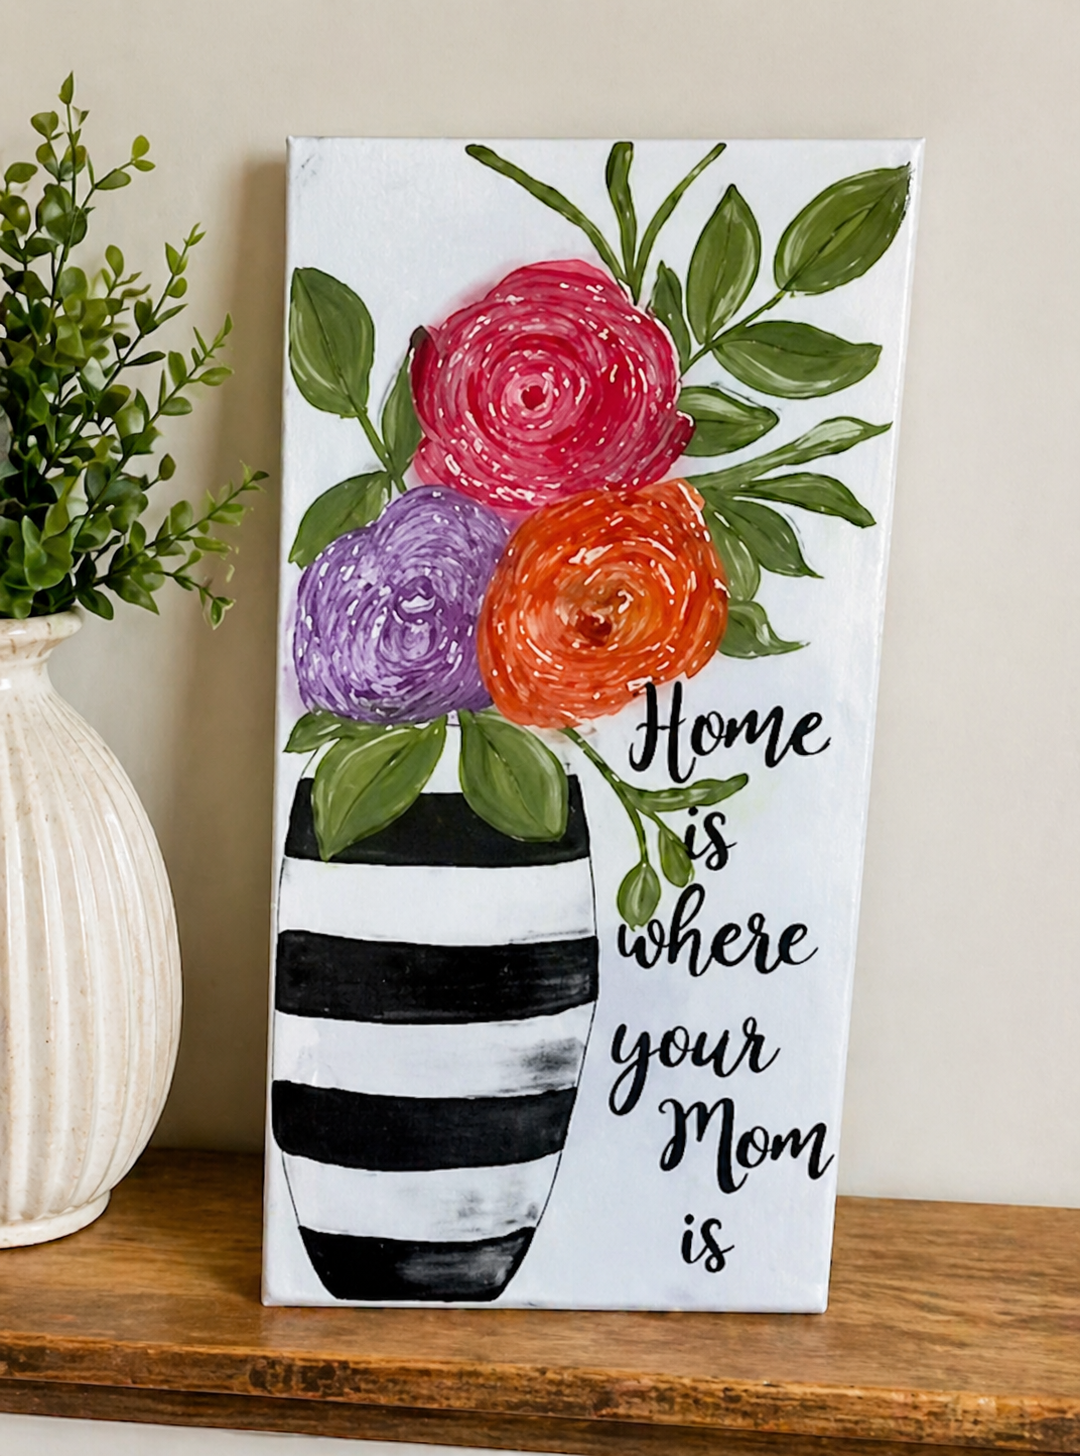
Mother's Day Flowers 💐
This sweet floral canvas is such a pretty handmade gift idea for Mother’s Day, birthdays, or just because. We’re taking a painted floral vase design and adding curved vase glass to the flowers so they become dimensional, shiny, and full of texture. We'll finish it off with resin to make it all pop!
Step 1: Choose Your Glass First
Before adding anything to the canvas, choose the glass colors you want for your flowers. In this project, the paint colors were chosen to match the glass, not the other way around. That makes the finished piece look more cohesive because the glass and painted flowers work together. The flowers used orange, purple, and pink curved vase glass, which gives the petals a really pretty raised look.
Step 2: Prep Your Glass Pieces
Use curved pieces from broken vases or candle votives for the flower petals. Since vase glass is not flat, it stands up beautifully on its edge and creates a dimensional flower effect. If any pieces have sharp points, smooth them with a honing stone, knife sharpener, brick, concrete sidewalk, or driveway. You do not need every piece to be perfect, but you do want to remove any dangerous sharp edges before placing them on your canvas.
Step 3: Start with the Front Flower
Begin with the flower that sits in the front of your design. In this piece, that was the orange flower. Add Aleene’s Clear Gel Tacky Glue around the outside of the painted flower and across the center area where your glass will sit. You don’t need to flood it, but make sure there is enough glue to help the glass stand upright and stay in place while you work.
Step 4: Build the Flower
Place a small matching glass nugget in the center of the flower first. For the orange flower, a little orange nugget was used. This gives you a starting point, almost like the center of a cinnamon roll, and helps guide the rest of the glass placement as you build outward.
Start with your smallest curved glass pieces and place them around the center nugget. Instead of lining the ends up perfectly, overlap the pieces slightly so they feel more like petals spiraling around the center. Continue working outward in a circle, moving from smaller pieces to larger ones as you reach the outside of the flower. This creates that rose-like, cinnamon-roll shape.
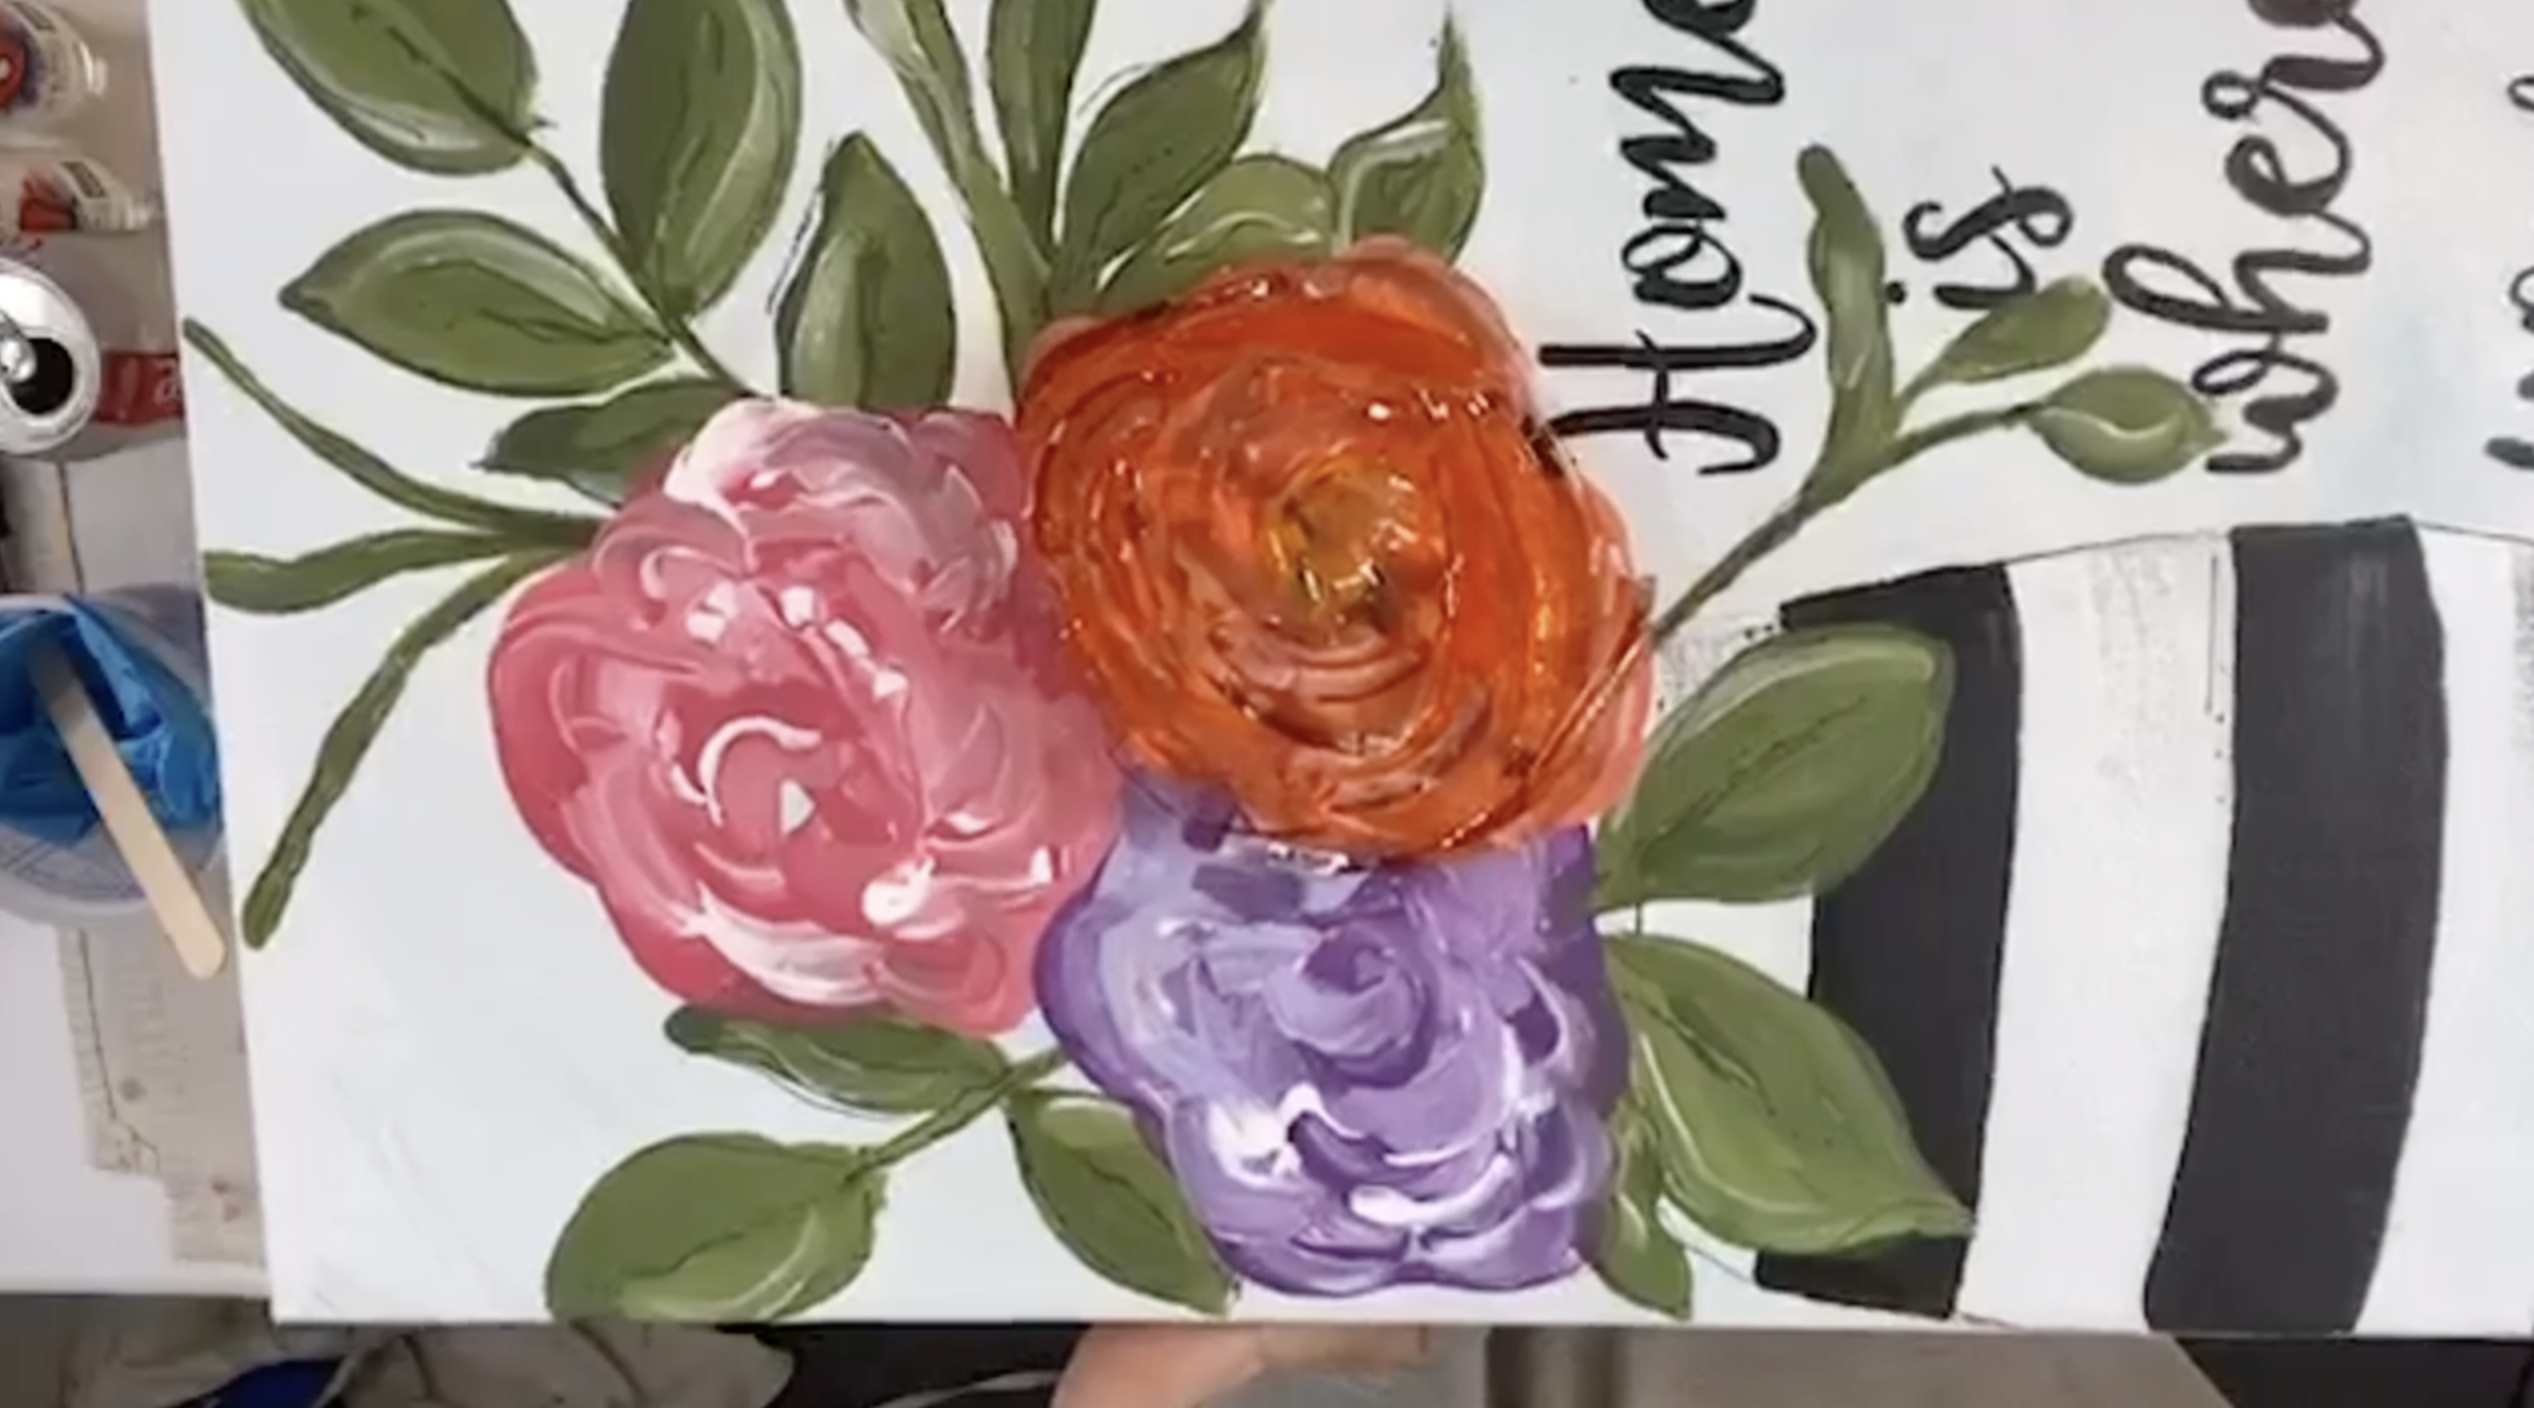
Step 5: Repeat with the Pink Flower
Add glue over the pink flower and place a small pink or pink-tinted glass nugget in the center. Then repeat the same spiral process, adding curved pieces around the center and overlapping them as you go. If a piece feels too large or sits awkwardly, move it to another spot or save it for the outer edge. Keep adjusting until the flower feels full but not overcrowded.
Step 6: Repeat with the Purple Flower
For the purple flower, add your glue and center nugget, then begin layering the curved purple glass pieces around the middle. The purple glass used in the project had only a hint of purple, but because the flower underneath was painted purple, the color still showed beautifully once resin was added. If your glass is lighter or more transparent, matching the paint underneath is especially helpful.
Step 7: Cut Smaller Pieces If Needed
As you get toward the outer edges of the flowers, you may need smaller pieces to fill gaps. Use glass nippers to carefully break a piece in half or trim it down. This is especially helpful in tighter spaces where one large piece would cover too much of the painted design. Take your time and tuck smaller bits into the gaps so the flower looks balanced.
Step 8: Brush Away Glass Dust
Before adding resin, gently brush off the canvas to remove any dust, loose glass crumbs, or debris from cutting the glass. This is a small step, but it matters because anything left behind can get trapped permanently under the resin.
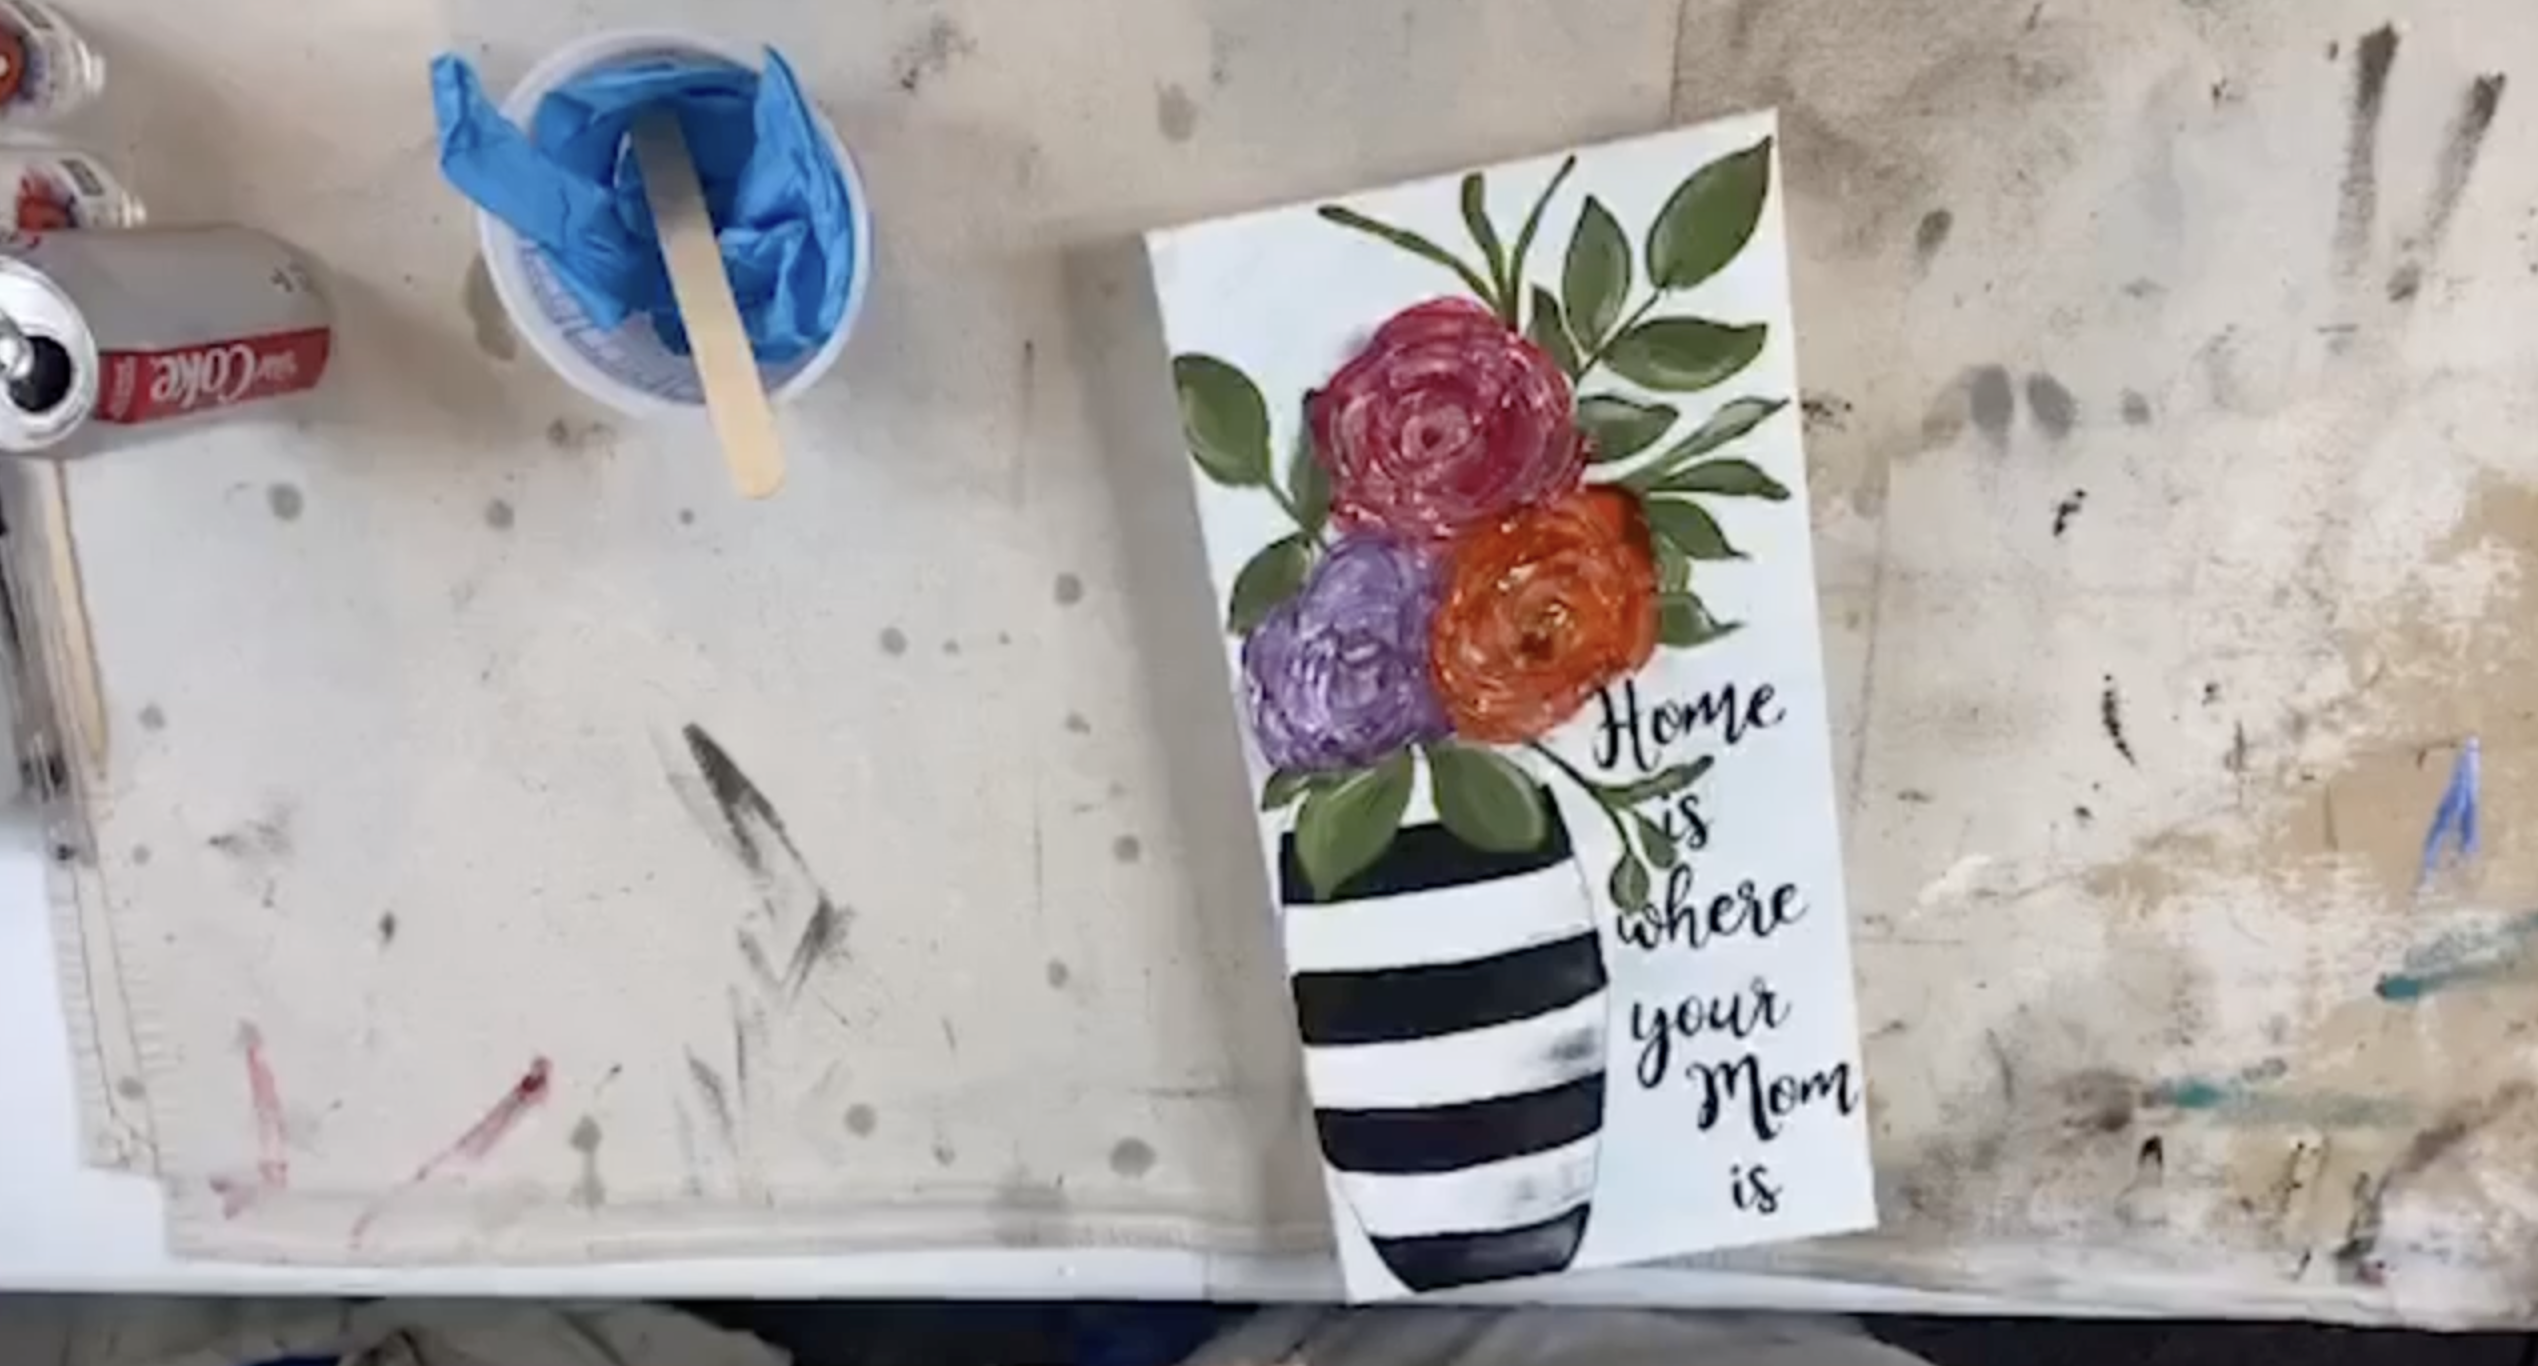
Step 9: Mix the Resin
This project used ArtResin, which is a two-part epoxy mixed at a 50/50 ratio by measured volume, not weight. For the floral canvas plus a few small extra pieces, 4 ounces total were mixed: 2 ounces of hardener and 2 ounces of resin. For just the 8x16 floral piece, about 2 ounces of resin was enough. Stir slowly for 3 full minutes, scraping the sides and bottom of your cup as you mix.
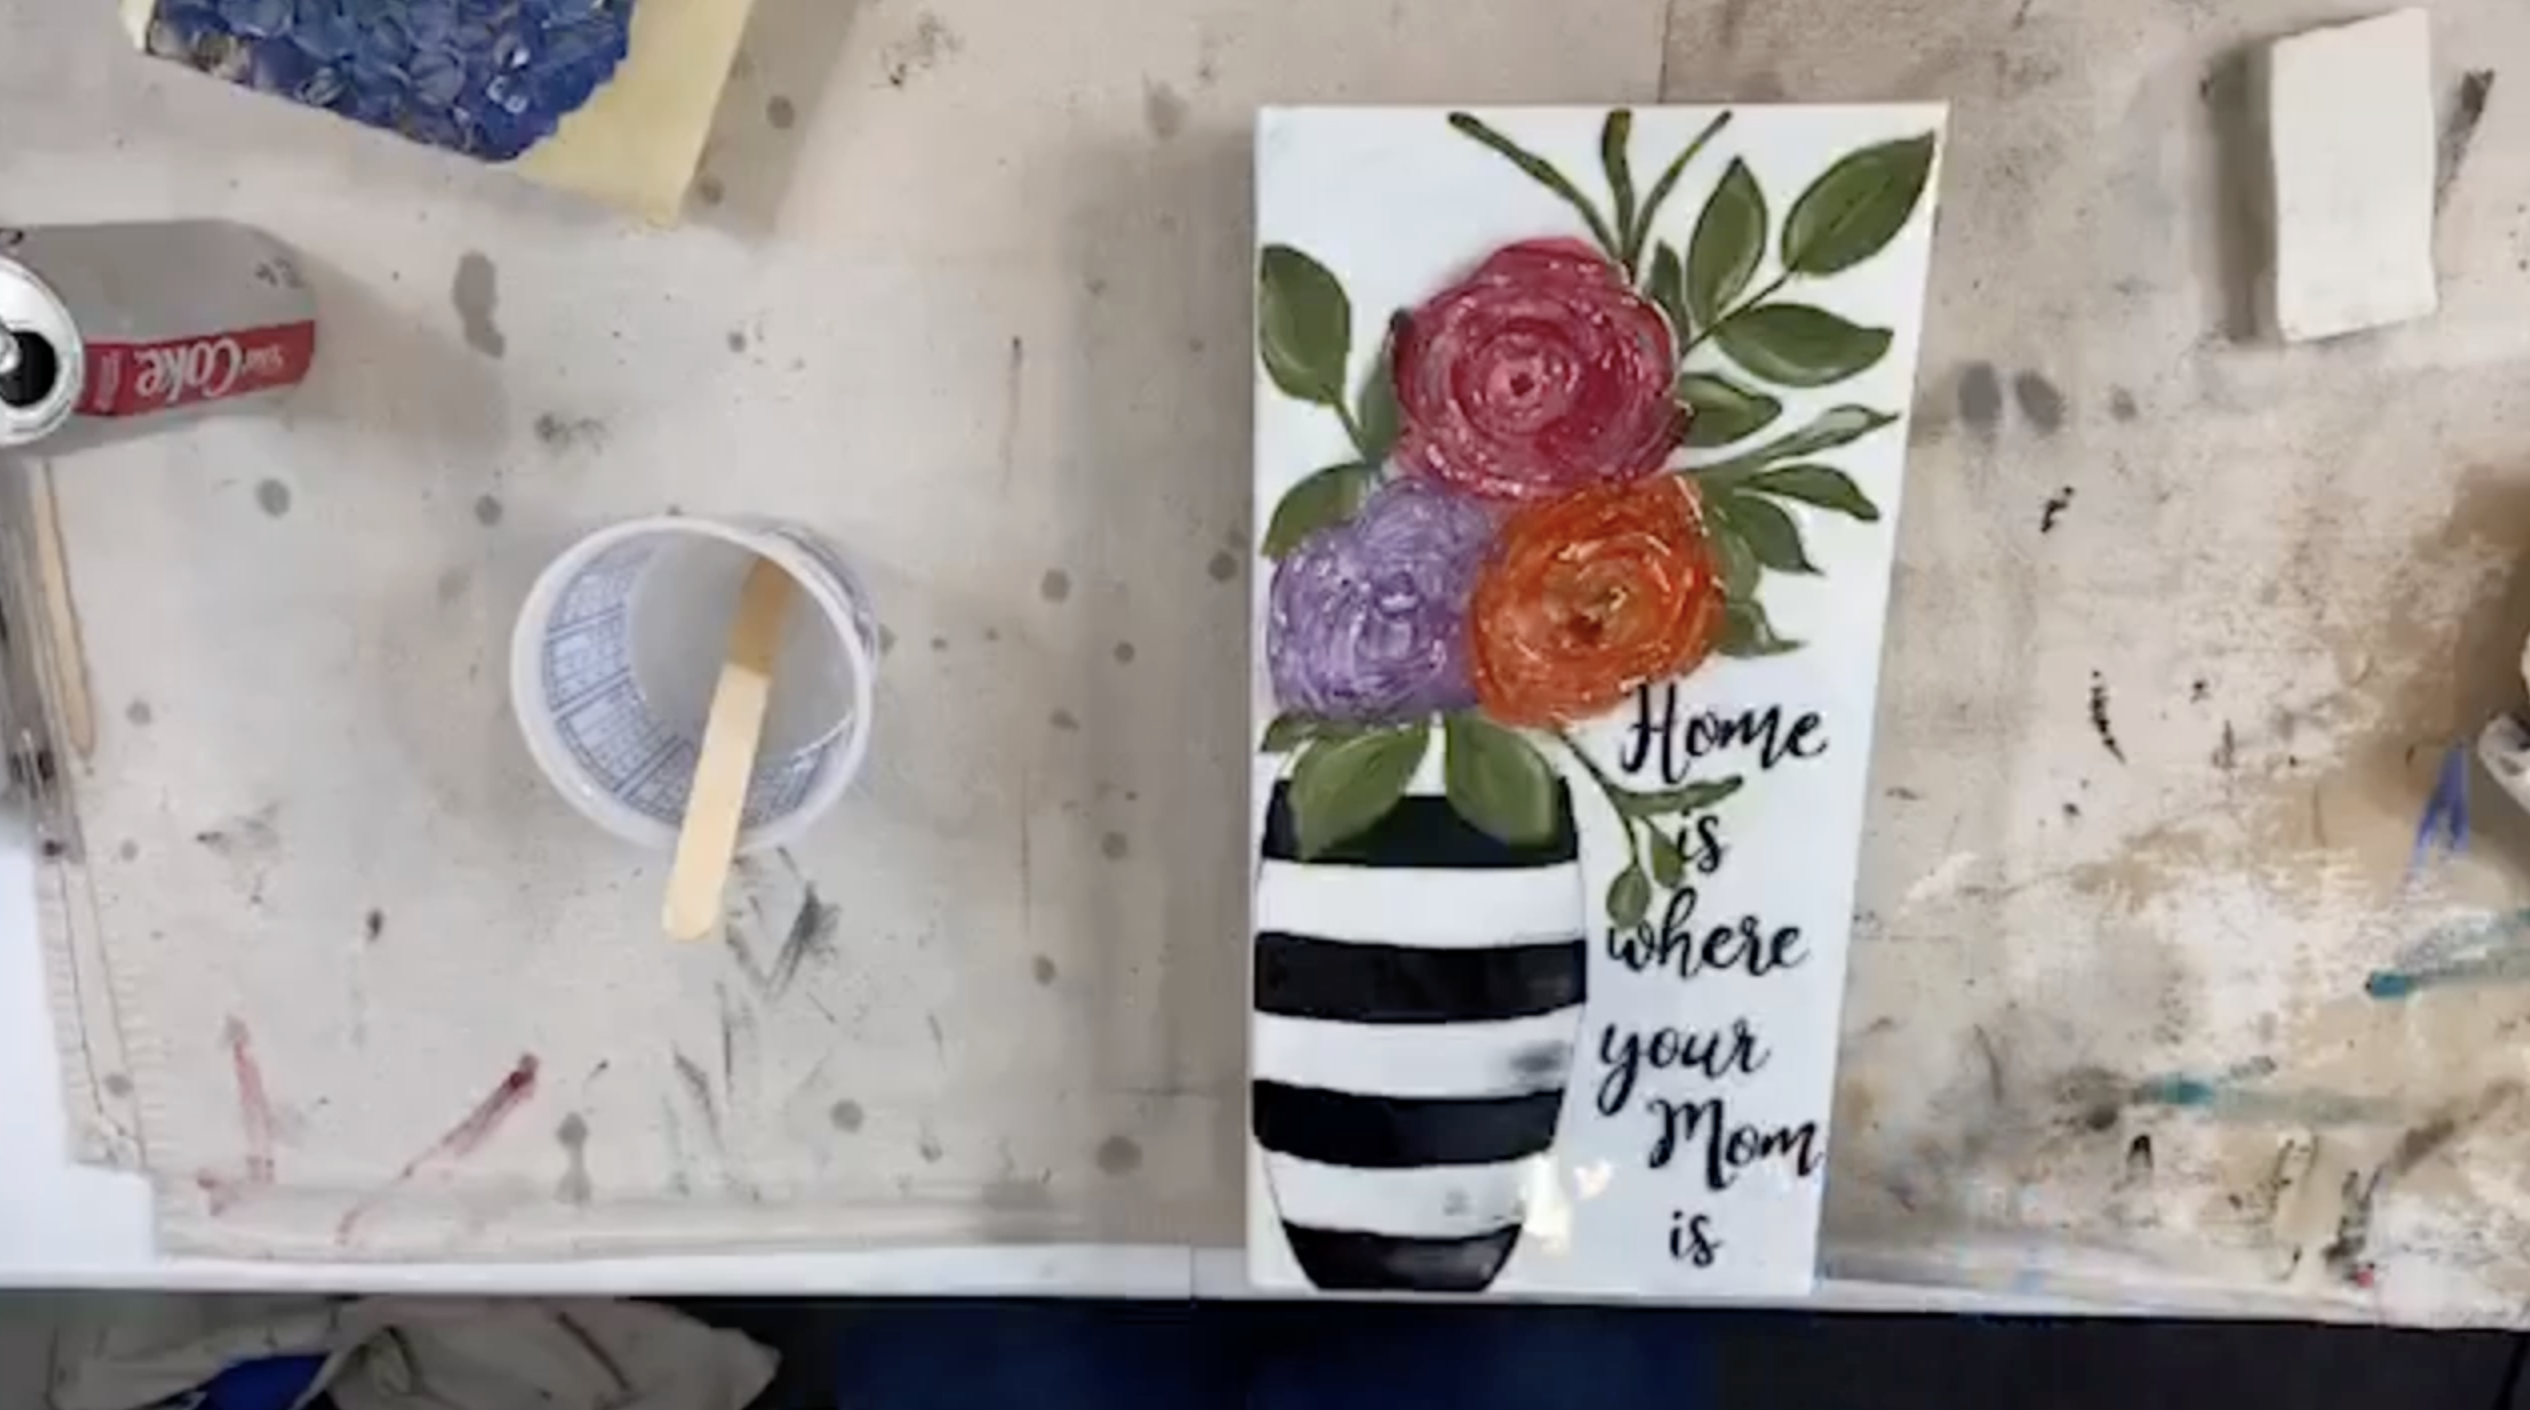
Step 10: Apply Resin to the Glass Flowers First
Raise your canvas on blocks before pouring so it does not stick to your work surface. Start by drizzling resin over the glass flowers first. This helps secure the glass and lets the resin seep down between the petals. Cover all the glass carefully before spreading resin over the rest of the canvas. Starting with the glass also helps you avoid wasting resin, because the resin naturally flows out from the flowers into the surrounding surface.
After the glass is covered, pull the resin into the blank spaces around the flowers, leaves, vase, and lettering. You want a thin, even coat across the whole top surface. This makes the colors pop and gives the entire piece a glossy finish. Avoid using too much resin, especially near the edges, because extra resin will drip off and be wasted.
Use a torch, heat gun, or small kitchen torch to pop any bubbles created while mixing and applying the resin. Keep the heat moving the whole time and do not let the flame touch the artwork. Holding heat in one place too long can burn the resin and may cause yellowing later, so use quick passes over the surface.
Let the canvas sit flat and undisturbed for at least 12 hours, or according to your resin’s directions. Once cured, the flowers will be glossy, raised, and full of beautiful texture. The resin also deepens the painted colors underneath, making the whole piece feel brighter and more finished.
This “Home Is Where Your Mom Is” floral canvas is such a sweet way to combine painting, glass, and resin into a meaningful handmade gift. The curved vase glass makes the flowers feel dimensional, the resin brings everything to life, and the message makes it perfect for celebrating Mom. It’s a beautiful reminder that handmade art doesn’t have to be complicated to feel special!
This colorful glass fish canvas art tutorial creates a bright coastal statement piece perfect for beach homes, lake houses, bathrooms, sunrooms, or summer decor.
If you love fish art ideas, beach crafts, resin canvas projects, and coastal decorating, this is one project you will want to make again and again!
If you're a member of The Shattered Circle, you'll find this tutorial in your classroom under Art Shattered Weekly Facebook Lives, search for "Mother's Day Flower Piece".
If you don’t want to miss my Facebook LIVE art instruction, make sure you are on my texting list. I always text 10 minutes before I’m going to go LIVE, so you won’t ever miss it. You can text “Hey Cindy” to 901-519-2923.
Want more inspiration and artwork?
- My website artshattered.com with resources, shop, and more!
- My creative membership The Shattered Circle, where you can explore the world of glass art with online workshops, a supportive community, and more!
- My mini creative membership Just A ‘Lil Bit Monthly Glass Art Club, where you’ll get a new quick and easy online tutorial for just a lil' bit of sparkle in your life!
- My Facebook page where I go LIVE every Wednesday night.
- My YouTube channel which has tons of free art lessons right at your fingertips.
