
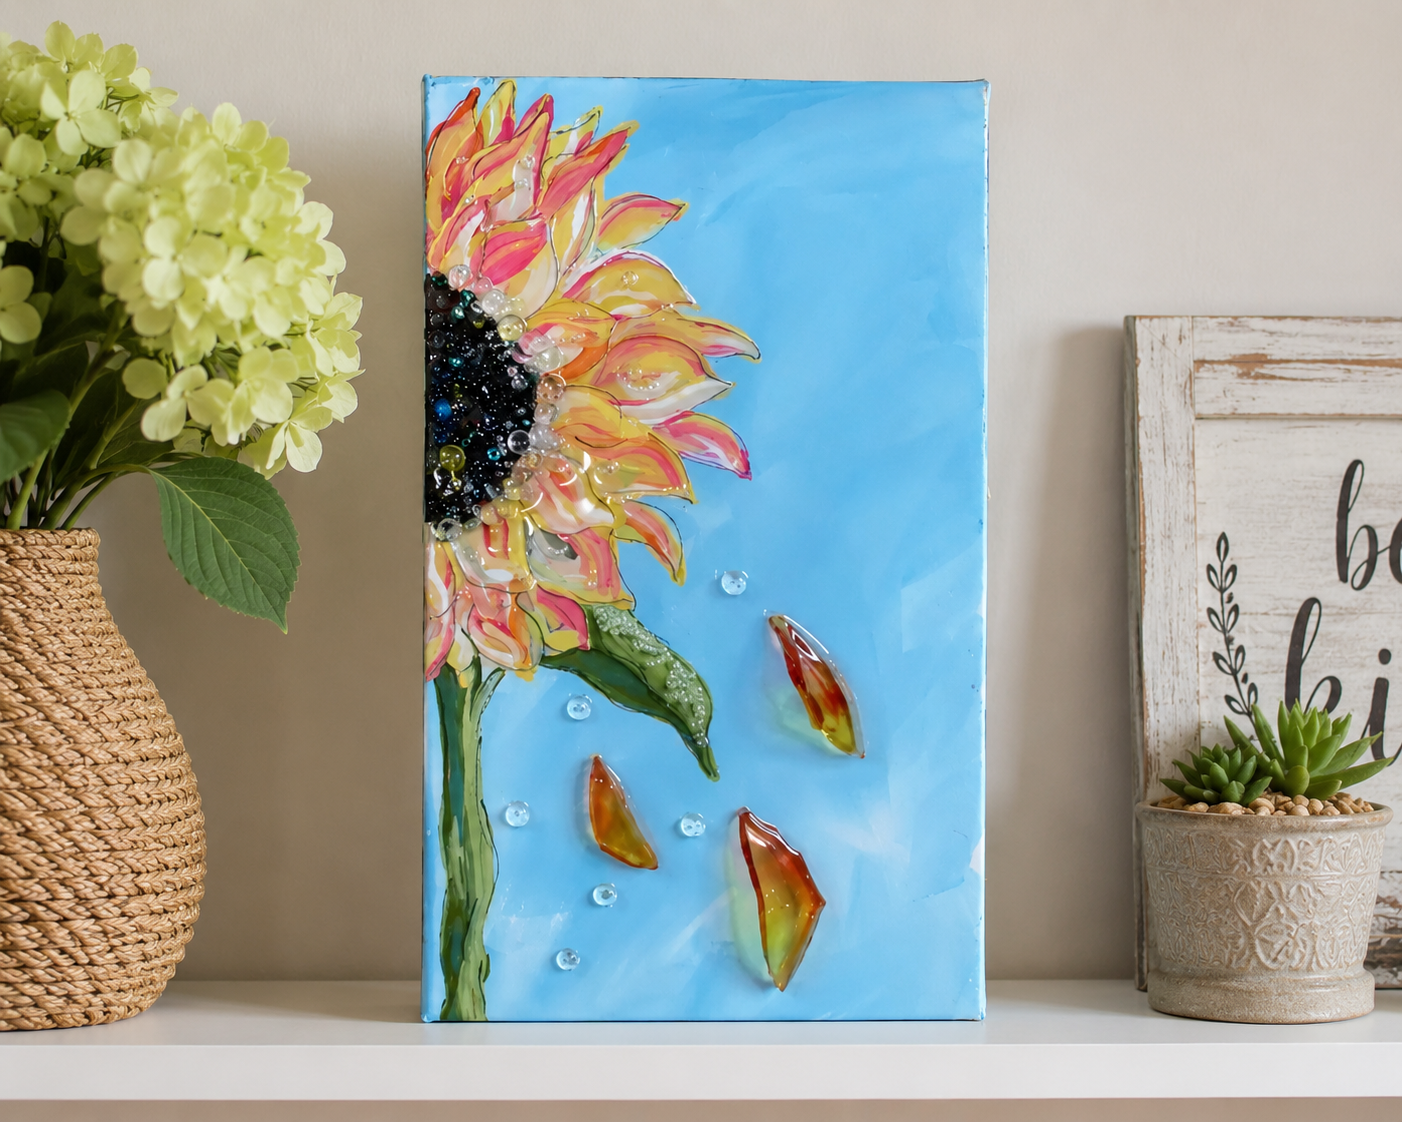
Star Spangled Sunflower 🌻🇺🇸
This patriotic sunflower project is such a fun way to combine summer florals with red, white, and blue style. Instead of painting a traditional sunflower, we’re turning the petals into an American flag-inspired design, then finishing the center with sparkling blue glass and resin. It’s perfect for summer decor, Memorial Day, the 4th of July, Veterans Day, or any patriotic art display.

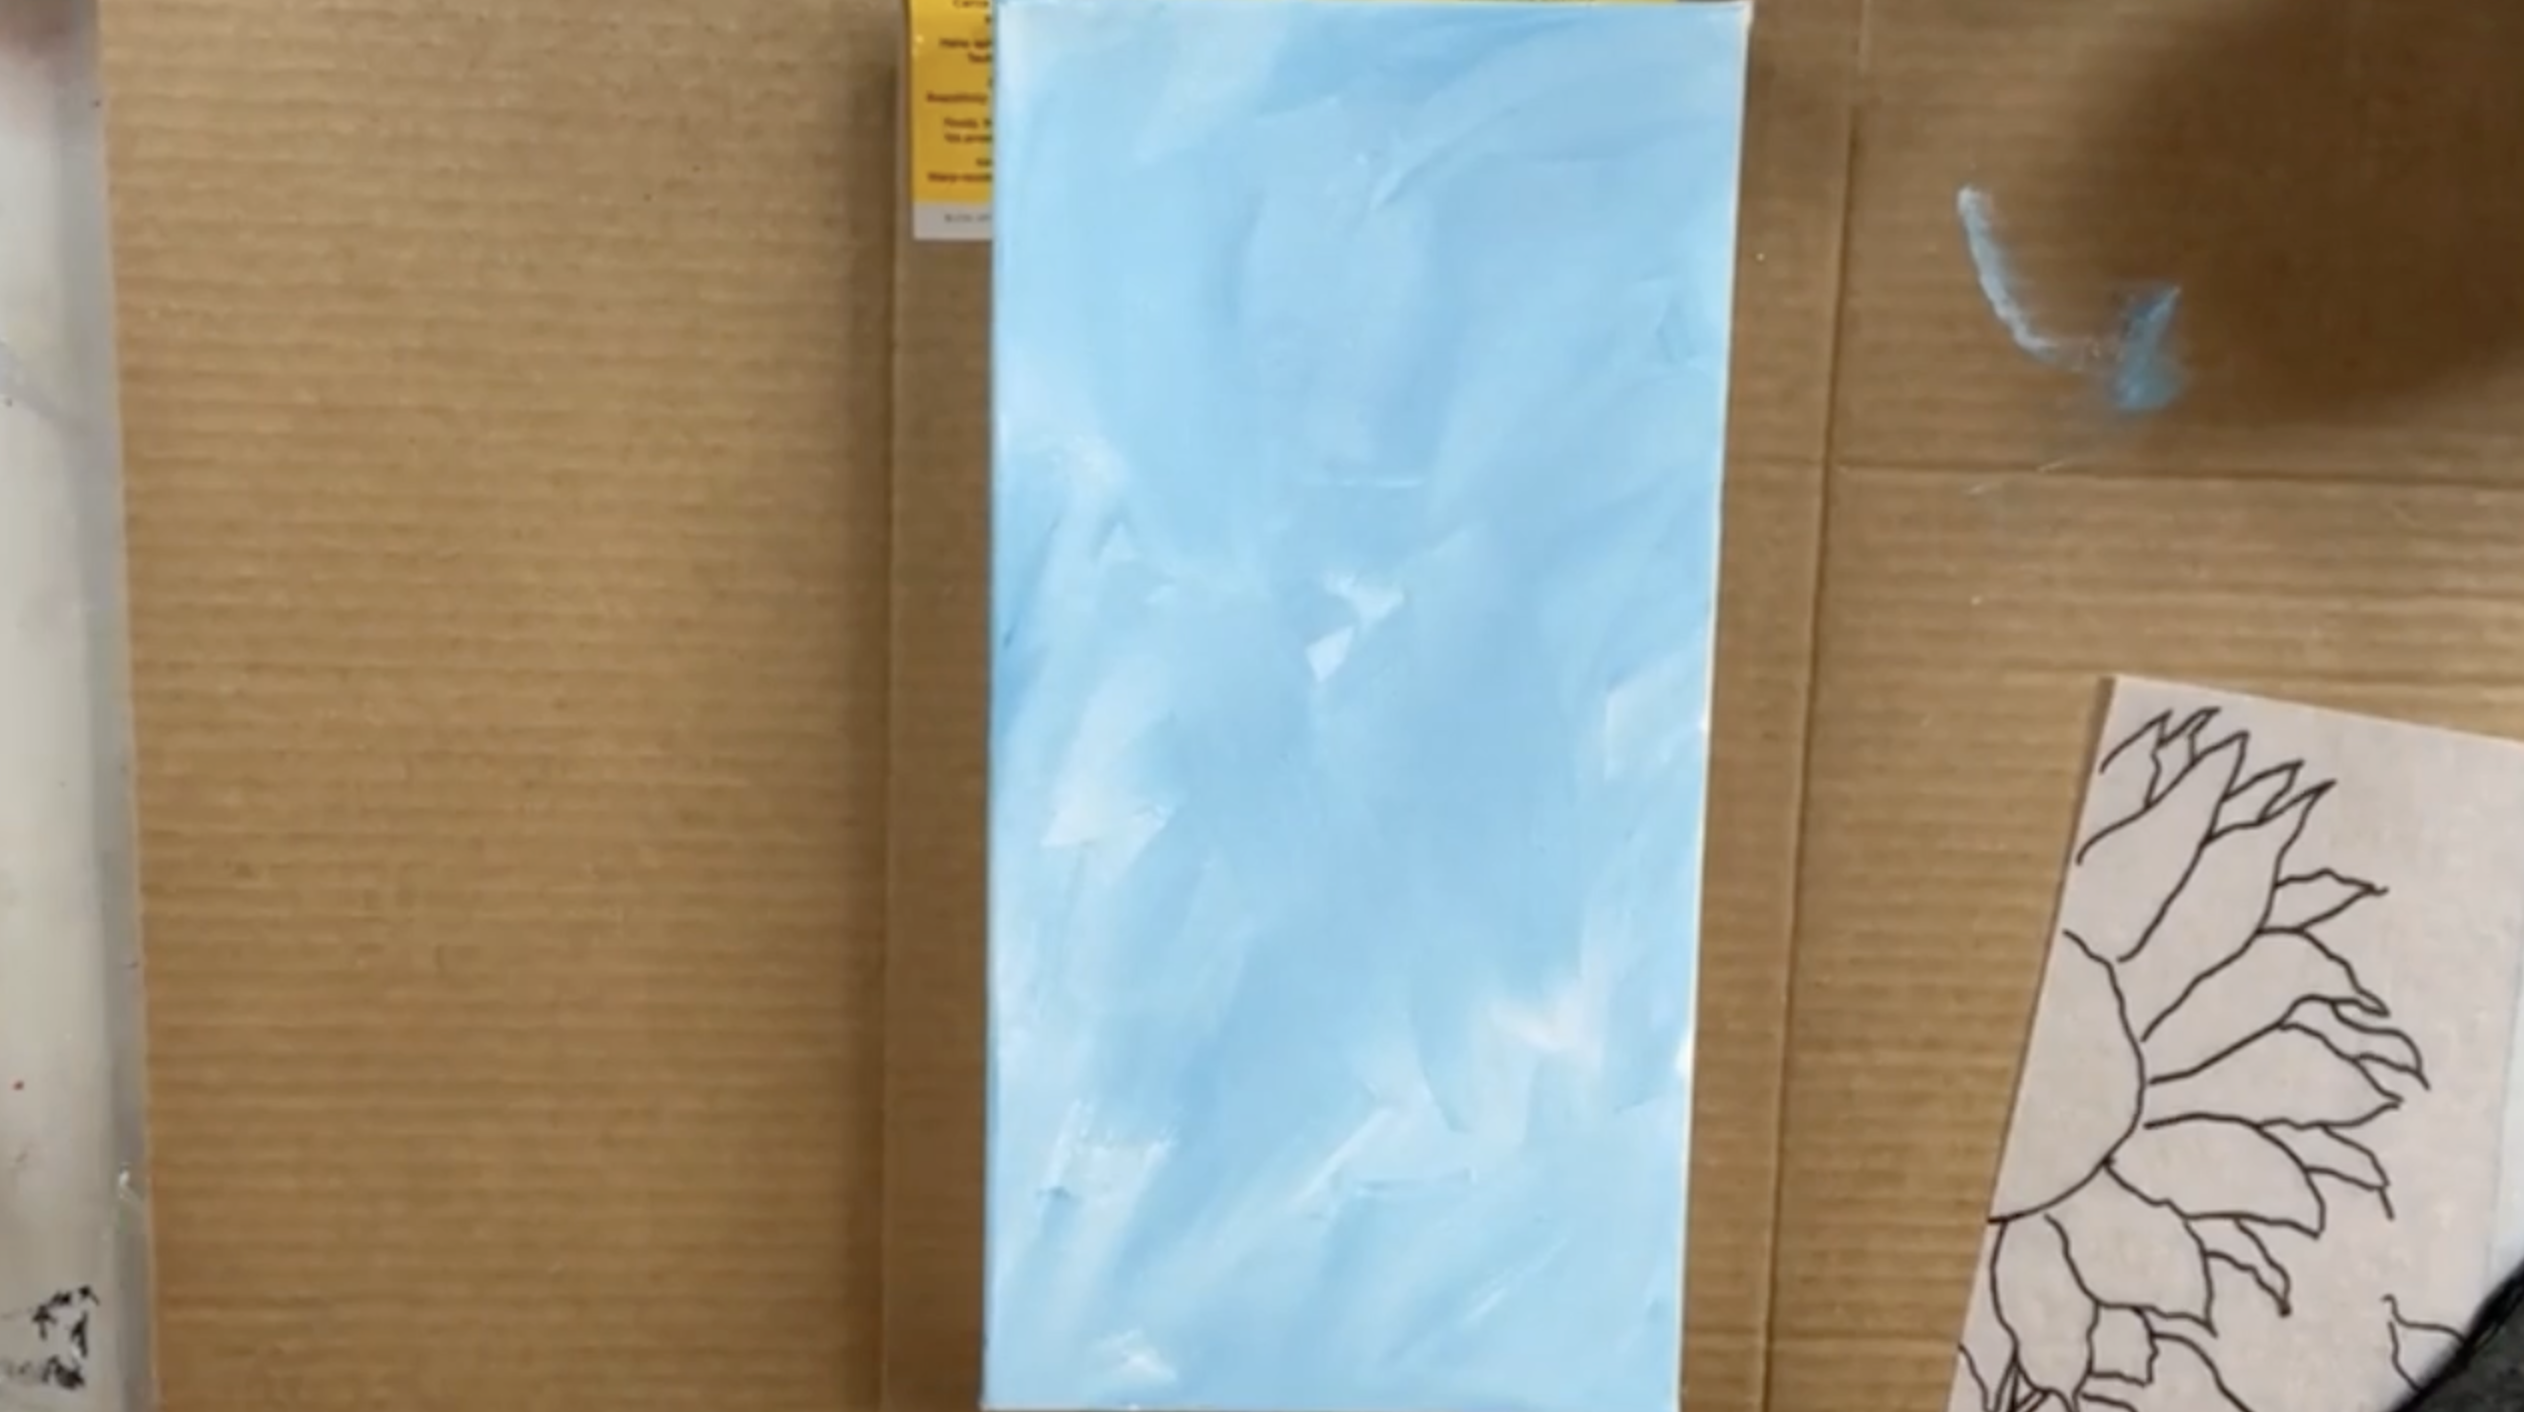
Step 1: Paint the Background
Start by painting the canvas with Oyster White. This gives the background a soft off-white tone instead of stark white, which makes it easier to see the white petals later. Cover the full canvas with a thin coat, then dry it with a heat gun. Let the surface cool before tracing or painting on top of it.
Step 2: Trace or Sketch the Sunflower
Use the center of a sunflower tracer to place the middle of the flower. Then sketch larger sunflower petals around the center. The goal is to create petals large enough to hold the flag-inspired design, so don’t make them too tiny or d...
Sunny Flower 🌻
This bright sunflower project is full of color, texture, and sparkle. We’re painting a loose, whimsical sunflower on a Mermaid Blue background, then adding crushed glass, seed beads, acrylic bubbles, and resin for a dimensional mixed media finish.
Cactus 🌵
This glass cactus art project is such a fun way to create desert-inspired wall decor using canvas, crushed glass, and resin. Instead of painting the cactus underneath, this piece is built almost entirely with glass, which gives it beautiful texture, sparkle, and dimension. It’s a great project for anyone who loves cactus decor, succulent-inspired art, or mixed media glass and resin projects!

Step 1: Prep the Canvas Background
Start with a 9x12 thick canvas. Paint the entire canvas with a layer of white acrylic paint, then add a small amount of soft gray paint along the bottom edge. This creates just enough shading for the cactus to visually “sit” on something instead of floating on a blank white background. Keep the gray subtle and blended so it doesn’t compete with the glass cactus.
Step 2: Sketch the Cactus Shape
Lightly sketch your cactus onto the canvas using a watercolor pencil. Keep the lines very soft because this project does not have painted cactus color underneath the g...
Mother's Day Flowers 💐
This sweet floral canvas is such a pretty handmade gift idea for Mother’s Day, birthdays, or just because. We’re taking a painted floral vase design and adding curved vase glass to the flowers so they become dimensional, shiny, and full of texture. We'll finish it off with resin to make it all pop!
Step 1: Choose Your Glass First
Before adding anything to the canvas, choose the glass colors you want for your flowers. In this project, the paint colors were chosen to match the glass, not the other way around. That makes the finished piece look more cohesive because the glass and painted flowers work together. The flowers used orange, purple, and pink curved vase glass, which gives the petals a really pretty raised look.
Step 2: Prep Your Glass Pieces
Use curved pieces from broken vases or candle votives for the flower petals. Since vase glass is not flat, it stands up beautifully on its edge and creates a dimensional flower effect. If any pieces have sharp points, smooth them with ...
Hydrangea Bucket 🌸
If you love hydrangeas and textured mixed media art, this project is such a fun one to create. This piece combines a softly textured background, a painted metal flower bucket, layered leaves, and chunky glass hydrangea blooms. For this project, I worked on an 11x14 canvas and built the piece in layers. The result is a hydrangea arrangement that feels full, bright, and beautifully dimensional!
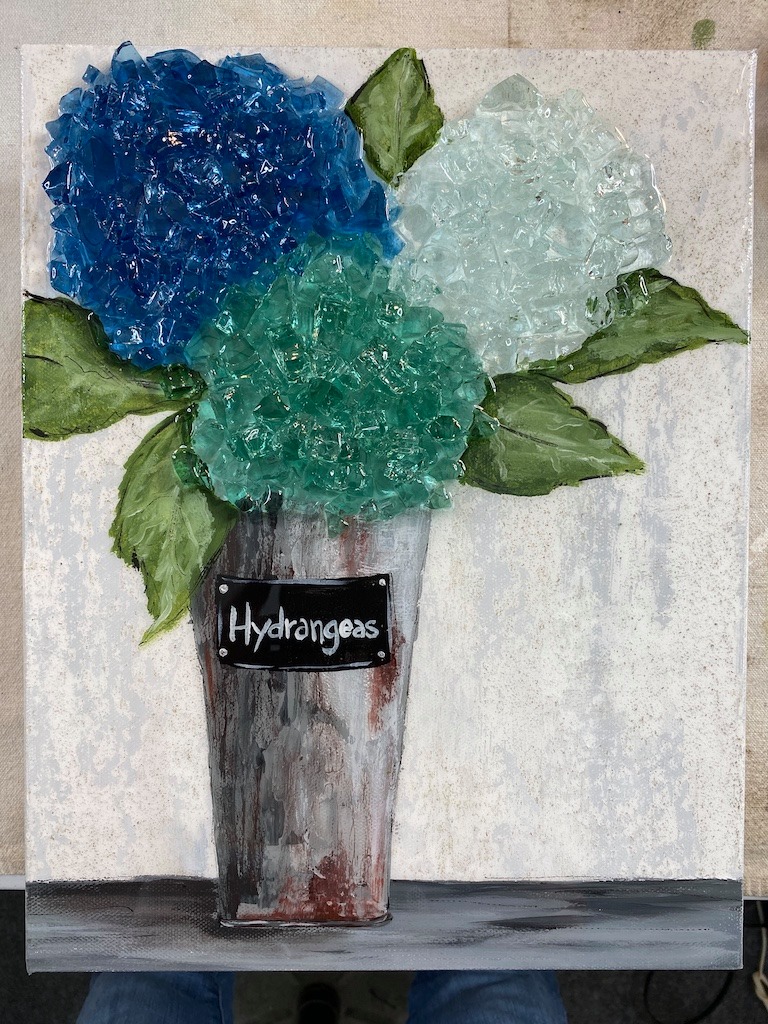
Step 1: Paint the Background
Start with your 11x14 canvas and brush on a thin coat of white acrylic paint. This is not meant to be a fully finished base coat. It simply softens the brightness of the raw canvas and helps mute the gray background color that comes next. While that white is still slightly wet, brush in a soft light gray over the canvas. Blend it out so you end up with a subtle gray-and-white base rather than a flat, solid coat of gray. Once the canvas is covered, dry it completely with a heat gun or blow dryer.
Use painter’s tape to mask off the bottom section of the canvas w...
Hummingbird 🌸
If you’re in the mood to create something soft, pretty, and full of movement, this hummingbird project is such a fun one to make! This project is a great example of how painted details and glass can work together beautifully. You do not need to overpaint every single detail, because the glass does a lot of the visual work in the finished piece. That makes this a really approachable mixed media project, even if birds feel a little intimidating at first!
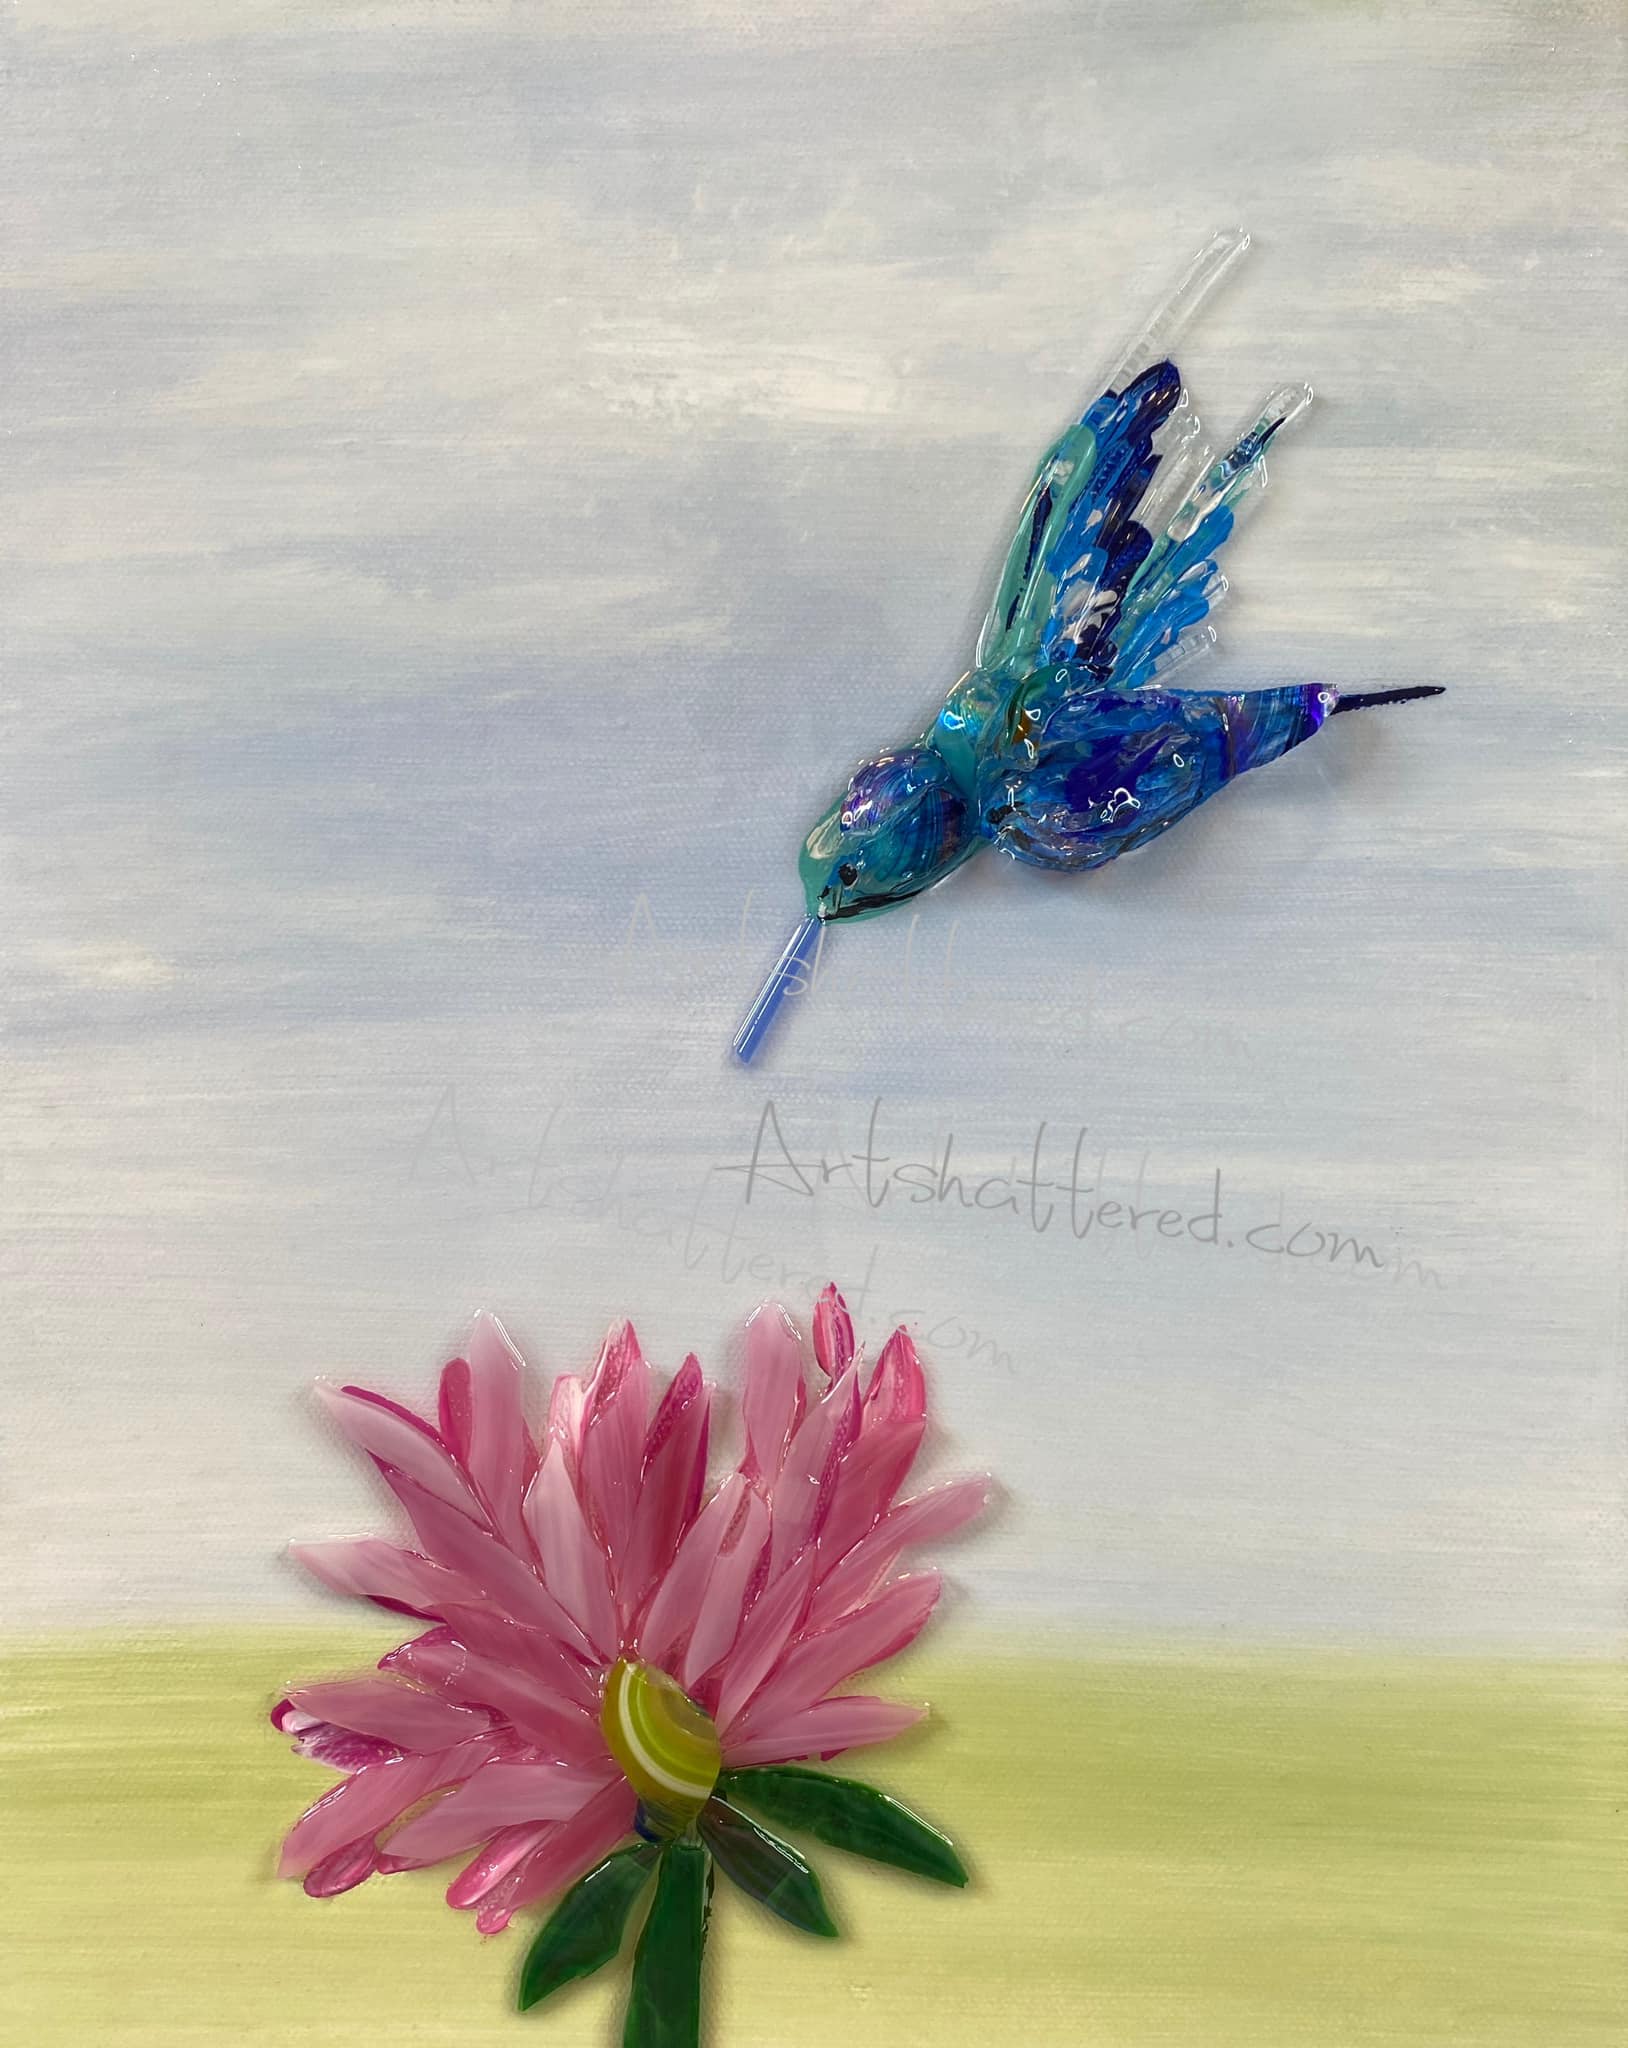
Step 1: Paint the Background and Sketch
Paint your background with a light green in the bottom portion of the canvas and some blue and white on the top portion of the canvas to create a grass and sky compositon. Let dry.
Begin by lightly sketching your hummingbird onto the canvas with watercolor pencils. You could also use a tracer. The sketch does not need to be overly detailed, but it should give you the general shape of the head, body, wings, tail, and beak placement. Add a simple flower near the bottom of the canvas as well. Thi...
How to Make Shrinky Dink Flower Petals for Resin Art 🌼
You know those late-night Pinterest scrolls that turn into full-blown obsessions? That’s exactly how this whole Shrinky Dink petal project started. I stumbled across an artist using Shrinky Dinks to make jewelry, and a big ol’ lightbulb went off. What if we could use this same material to make custom, colorful petals for our resin art? Let me walk you through everything you need to know, from coloring and cutting to shrinking and shaping.
Step 1: Sketch and Color Your Petals
Start by drawing your petal or leaf shapes. You can sketch freehand or use a template. Since Shrinky Dink sheets shrink by about 50%, be sure to size your designs accordingly - something that starts around 4.5” long will end up around 2” once shrunk.
Place your Shrinky Dink sheet frosted side up over your design and start coloring. You can use:
-
Archival brush markers for bold, opaque color
-
Watercolor pencils for a more translucent look
-
Mica powder or chalk for unique textures
Avoid Sharpies...
Pretty in Pink Flowers 🌸
Welcome to a spring-inspired glass art project that’s as sweet as it sounds - Pretty in Pink Flowers! In this tutorial, we’ll walk through how to paint a dreamy background, create flowing stems and leaves, and top it all off with dimensional flowers made from beads, acrylic petals, and resin.
Step 1: Painting the Background
Star by painting the background using a mix of Shoreline Blue and Hauser Light Green acrylic paints, creating a loose sky and grass effect. With a large brush, loosely apply your white paint across the canvas. Then, using the same brush, gently blend in Shoreline Blue by swishing in X-patterns. This gives the sky depth with highs and lows in color, rather than flat blue.
Leaving the bottom inch or two unpainted, switch to your green and use the same X-motion to bring the grass up into the blue. To warm it up, add Poodleskirt Pink to softly blend above the grass for a rosy glow. Dry with a heat tool.
Step 2: Adding Blades of Grass
Next, use a long liner brush ...
Sunflower Love 🌻
There’s something about sunflowers that feels like instant joy - and when you bring one to life using layers of colored glass and shiny resin, it’s pure magic! In this project, I created a sunflower using glass-on-glass techniques, meaning everything is built directly on a piece of clear glass. I'm sharing how to build your flower from cut yellow glass petals, copper glass, mosaic pieces, and a chunky vitrigraph stem.
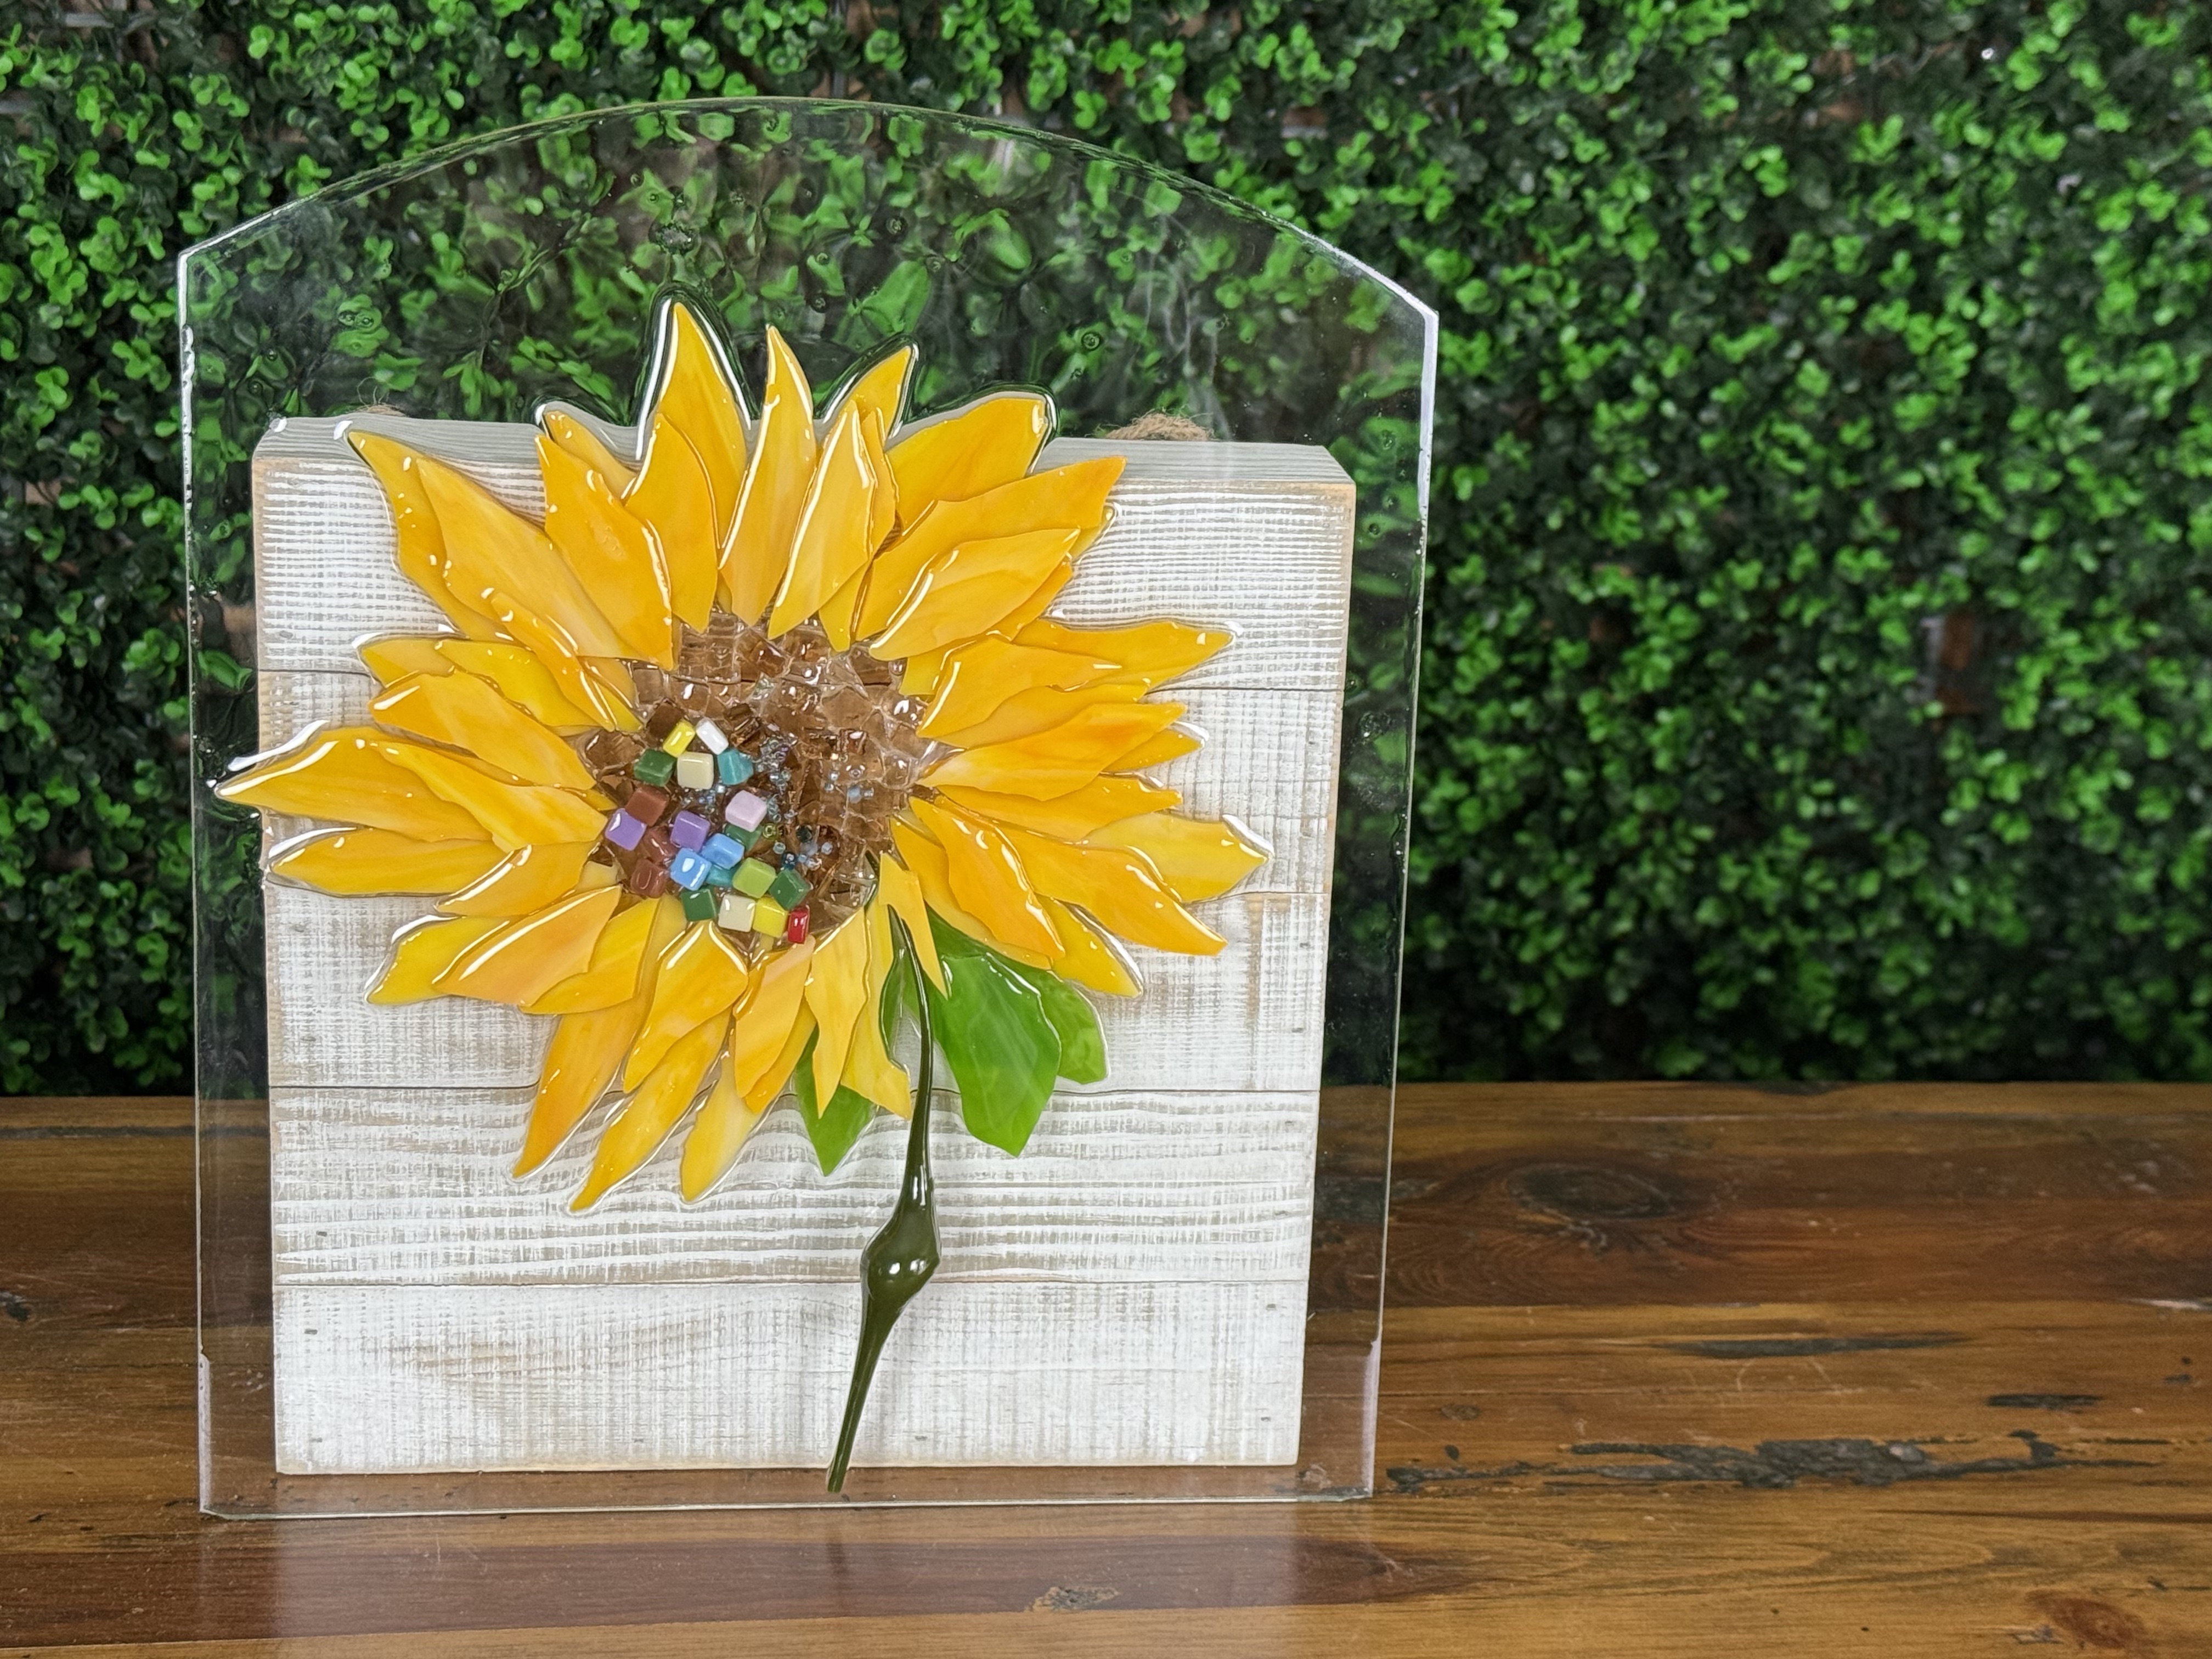
I started with a piece of found glass that likely came from a light fixture, but you can use any piece you have on hand. A frame from the dollar store works just fine - just pop the glass out, and you’re good to go. First things first: clean the glass thoroughly to remove dust and fingerprints. Then, wearing gloves to avoid smudging the surface, flip it over and tape off the back. Taping isn’t essential, but it does make cleanup easier if resin drips. If you skip this step, no worries - a razor blade will scrape it right off once it cures.
Once the base is ready, prep...
Crackled Daisy 🌼

For this art piece, I had been experimenting with crackle and came up with this background. I am using an 8x10 wooden frame that I painted with Tropical Blue, added Elmer's glue for crackle, and then painted another coat of Tropical Blue on top.
Next, I found some white sheet glass that I had cut into flower petals with my wheeled nippers. You will want to do this with gloves and eye protection on! I also have two cut pieces of green vase glass for the leaves.
We are going to mix our resin first, then start creating our flower by layering the glass flower petals. We will add resin ...
